Dyeing Easter eggs is a beloved tradition, especially for families during the Easter season. Instead of relying on pre-packaged kits, you can easily create vibrant and unique egg colors right at home using simple food coloring and vinegar. This guide will walk you through exactly how to dye Easter eggs with food coloring, unlocking a spectrum of shades and making your Easter egg decorating experience fun and affordable.
Essential Supplies for Dyeing Eggs with Food Coloring
Before you begin your colorful egg adventure, gather these simple supplies:
- Eggs: Choose white or brown eggs, depending on the color intensity you desire. You can use raw or hard-boiled eggs, but hard-boiled are recommended, especially when dyeing with children.
- Food Coloring: Liquid food coloring or gel food coloring works well. For a wide range of colors, consider a set of primary food colors and/or neon food colors.
- White Vinegar: Standard white vinegar from your pantry is perfect. You’ll need 1 teaspoon of vinegar for each color you plan to create.
- Hot Water: Hot tap water works just fine, no need to boil. Prepare ½ cup of hot water for each dye color.
- Cups or Bowls: You’ll need a separate glass or bowl for each dye color you want to mix.
- Slotted Spoon or Whisk: Use a slotted spoon or whisk to gently place eggs into the dye and remove them without damaging the color.
- Drying Rack or Egg Carton: For drying the dyed eggs.
Choosing the Right Food Coloring for Egg Dyeing
When it comes to food coloring, not all types are equally effective for dyeing eggs. You’ll typically encounter liquid food coloring and gel food coloring. While both can be used, there are nuances to consider.
Liquid Food Coloring: Regular liquid food coloring, commonly found in grocery stores, is a reliable and readily available option. These often come in standard primary colors (blue, red, yellow, green), which can be mixed to create a wide array of shades.
Gel Food Coloring: Gel food coloring, particularly Wilton gel food coloring, is highly recommended for achieving vibrant and consistent colors. Wilton gels, available on Amazon, Target, and craft stores, offer concentrated pigments that dissolve effectively in the water and vinegar mixture. Both standard and neon Wilton gel sets are excellent choices for Easter egg dyeing.
Avoid gel food colorings that come in small tubes, as these may not dissolve as smoothly and can result in uneven color distribution on the eggs.
Preparing Your Eggs for Dyeing: Hard Boiling and Pre-treatment
Hard boiling eggs before dyeing is advisable, especially if children are participating. Hard-boiled eggs are less messy and prevent raw egg spills if accidentally cracked during the dyeing process.
How to Hard Boil Eggs:
- Place eggs in a single layer at the bottom of a large saucepan.
- Cover the eggs completely with cold water.
- Bring the water to a rolling boil over medium heat.
- Once boiling, cover the pot, remove it from the heat, and let it sit for 10-12 minutes.
- After 10-12 minutes, transfer the eggs to a bowl of ice water to stop the cooking process and make them easier to peel later if desired.
For enhanced dye adhesion, especially with lighter colors like blues and purples, consider a diluted vinegar rinse before dyeing. Simply dip the hard-boiled eggs in a mixture of water and vinegar. This step is optional but can improve color vibrancy and evenness. Remember, eggs are natural products, and slight variations in dye uptake are normal and contribute to the unique charm of hand-dyed Easter eggs.
Step-by-Step Guide: How to Dye Easter Eggs with Food Coloring
Follow these simple steps to dye your Easter eggs with food coloring:
- Prepare the Dye Bath: In a cup or bowl, combine ½ cup of hot water and 1 teaspoon of white vinegar.
- Add Food Coloring: Add food coloring drops according to your desired color. Refer to the color formulas below for specific shades and drop quantities. Stir the mixture well to ensure the food coloring is fully dissolved.
- Dye the Eggs: Gently place an egg into the dye bath using a slotted spoon or whisk. Ensure the egg is fully submerged in the dye.
- Soak for Desired Color: Leave the egg in the dye for the time indicated in the color formula or until you achieve your desired shade. Soaking time affects color intensity – shorter times result in lighter shades, while longer times create deeper, richer colors.
- Remove and Dry: Carefully remove the dyed egg from the dye bath using a slotted spoon or whisk. Place the egg on a drying rack or an upside-down egg carton to dry completely.
Tips for Dyeing Multiple Eggs and Colors: You can use the same dye bath for several eggs. To create a variety of colors without making a new dye bath for each, start with a lighter shade and gradually add more food coloring to deepen the color for subsequent eggs. This allows for efficient use of dye and creative color exploration.
Refer to the following color guides for specific color formulas and soaking times to achieve a wide range of beautiful Easter egg colors.
Dyeing Brown Eggs: Achieving Rich, Jewel-Toned Colors
Yes, you can absolutely dye brown eggs with food coloring! While the resulting colors will be different compared to white eggs, brown eggs offer a beautiful palette of deeper, jewel-toned shades. The initial brown hue of the eggshell will influence the final color, creating richer and more muted tones.
When dyeing brown eggs, the color formulas provided for white eggs can be used as a starting point, but be mindful that the results may vary depending on the base shade of the brown egg. It’s essential to check the egg frequently during the dyeing process to achieve your desired color. Brown eggs often require longer soaking times to achieve noticeable color changes.
Formulas specifically noted for brown eggs in the color guides below are optimized to account for the darker eggshell base.
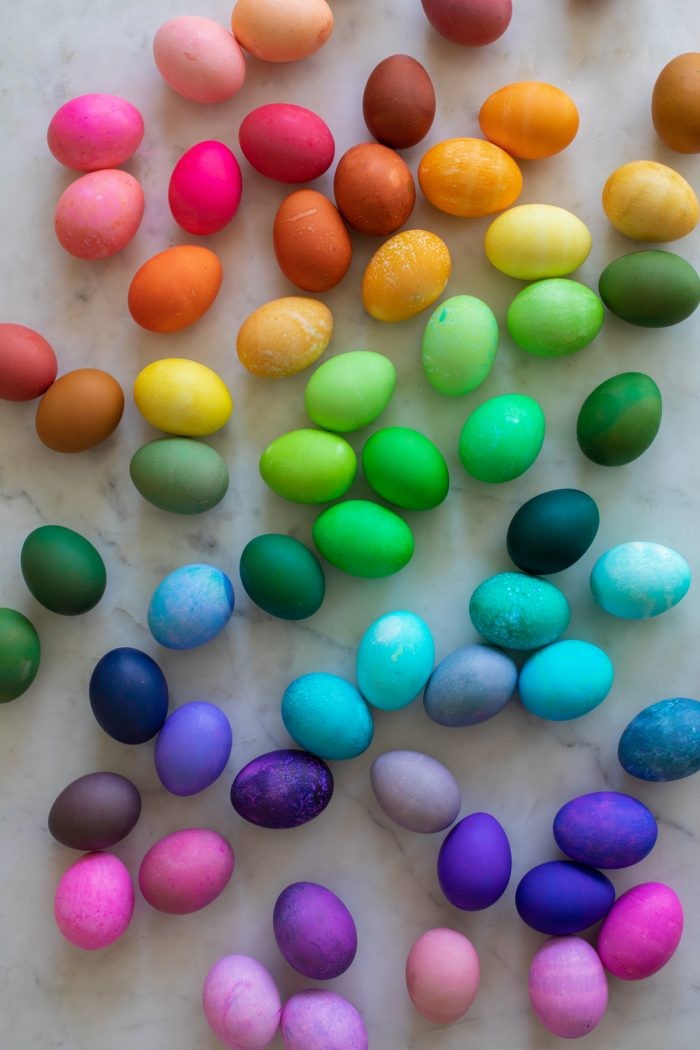
Color Formulas for Egg Dyeing: Pinks, Purples, Blues, and Greens
Explore these color formulas to create a spectrum of pink, purple, blue, and green Easter eggs using food coloring:
Pink & Purple Easter Eggs:
- Bubblegum: 5 drops pink, 30 seconds or less
- Fuchsia: 5 drops pink, 3 minutes
- Lilac: 5 drops pink + 5 drops purple, 30 seconds or less
- Orchid: 5 drops pink + 5 drops purple, 3 minutes
- Ultraviolet: 5 drops purple, 3 minutes
- Grape: 10 drops purple, 5 minutes
- Lavender: 5 drops purple, 30 seconds or less
Blue Easter Eggs:
- Periwinkle: 5 drops blue + 5 drops purple, 30 seconds or less
- Cornflower: 5 drops blue + 5 drops purple, 3 minutes
- Cobalt: 5 drops blue + 5 drops purple, 5 minutes
- Navy (Brown Egg): 5 drops blue + 5 drops purple, 5 minutes
- Sky: 5 drops blue, 3 minutes
- Robin’s Egg: 5 drops teal, 30 seconds or less
- Aqua: 5 drops blue, 30 seconds or less
- Turquoise: 5 drops teal, 3 minutes
- Peacock (Brown Egg): 5 drops blue, 5 minutes
Green Easter Eggs:
- Mint: 5 drops teal + 3 drops green, 30 seconds or less
- Teal: 5 drops teal + 3 drops green, 3 minutes
- Emerald: 10 drops teal + 10 drops green, 3 minutes
- Shamrock: 5 drops teal + 10 drops green, 3 minutes
Color Formulas for Egg Dyeing: Greens, Yellows, Oranges, and Reds
Continue your color journey with these formulas for green, yellow, orange, and red Easter eggs:
Green & Yellow Easter Egg Dye:
- Evergreen (Brown Egg): 5 drops teal, 5 minutes
- Olive (Brown Egg): 10 drops green, 5 minutes
- Chartreuse: 5 drops green, 3 minutes
- Celery: 5 drops green, 30 seconds or less
- Butter: 10 drops yellow + 3 drops green, 30 seconds or less
- Sunshine: 10 drops yellow + 3 drops green, 3 minutes
- Daffodil: 5 drops yellow, 30 seconds or less
- Marigold: 5 drops yellow, 3 minutes
Orange Easter Egg Dye:
- Peach: 5 drops orange, 30 seconds or less
- Creamsicle: 5 drops orange, 3 minutes
- Tangerine: 5 drops orange + 5 drops yellow, 3 minutes
- Mustard (Brown Egg): 10 drops yellow + 3 drops green, 5 minutes
- Salmon: 10 drops yellow + 5 drops red, 30 seconds or less
- Coral: 10 drops orange + 5 drops red, 3 minutes
- Rust (Brown Egg): 10 drops orange + 5 drops red, 5 minutes
Red & Pink Easter Egg Dye:
- Watermelon: 5 drops red, 30 seconds or less
- Candy Apple: 10 drops red + 5 drops yellow, 5 minutes
- Neon: 5 drops red + 5 drops pink, 3 minutes
- Berry (Brown Egg): 5 drops pink, 3 minutes
- Wine (Brown Egg): 5 drops pink + 5 drops purple, 5 minutes
Tips for Drying Dyed Easter Eggs Evenly
Drying dyed eggs evenly is crucial to prevent color smudging and ensure a beautiful finish. Here are effective drying methods:
- Gentle Patting with a Rag: Use a soft cloth or paper towel to gently pat the dyed eggs dry. Be aware that some dye may transfer to the cloth. This method is quick but can slightly lighten the color.
- Cooling Rack: Place dyed eggs on a wire cooling rack, similar to those used for baking. This allows air circulation around the egg, promoting even drying. Be mindful that the rack may leave a grid pattern on the egg where it makes contact.
- Toothpick Stand: Insert toothpicks into a piece of Styrofoam or cardboard to create a makeshift drying rack. Balance the eggs on the toothpicks, allowing air to circulate freely.
- Upside Down Egg Carton: Flip an egg carton upside down and place the eggs in the spaces. While convenient, this method may result in uneven drying where the egg touches the carton.
Choose the drying method that best suits your needs and available supplies to achieve perfectly dried and beautifully colored Easter eggs.
Creative Ideas for Using Your Dyed Easter Eggs
Once you have a basket full of beautifully dyed Easter eggs, how can you showcase them?
- Easter Brunch Centerpiece: Arrange your dyed eggs in a decorative bowl or basket as a centerpiece for your Easter brunch table.
- Easter Egg Hunt: Hide your colorful creations for a classic Easter egg hunt.
- Easter Brunch Board Accent: Incorporate dyed eggs into an Easter brunch board alongside cheeses, fruits, and pastries for a festive touch.
- Gifts: Package a few dyed eggs in small boxes or bags as charming Easter gifts for friends and family.
Dyeing Easter eggs with food coloring is a simple, enjoyable, and budget-friendly way to celebrate Easter. With a few basic supplies and these color formulas, you can create a stunning array of Easter eggs that will impress everyone. Happy dyeing!
Photos by Jeff Mindell
Explore More Easter Egg Decorating Ideas
Looking for more ways to decorate Easter eggs beyond dyeing? Consider these creative alternatives:
- Painting: Use acrylic paints or watercolors to create intricate designs on your eggs.
- Temporary Tattoos: Apply temporary tattoos for a fun and easy decorative effect.
- Sprinkles: Coat eggs in glue and then roll them in colorful sprinkles for a festive, textured finish.
Have fun experimenting with different egg decorating techniques and make this Easter egg season your most creative yet!