Do you need to create a beautiful brown frosting but find yourself without brown food coloring? Don’t worry, foods.edu.vn is here to help with simple methods to achieve the perfect shade of brown using ingredients you likely already have, including other food colorings, ensuring your desserts look as delicious as they taste. Learn how to master brown frosting techniques and explore a variety of color combinations.
1. What is the Easiest Way to Make Brown Frosting Without Brown Food Coloring?
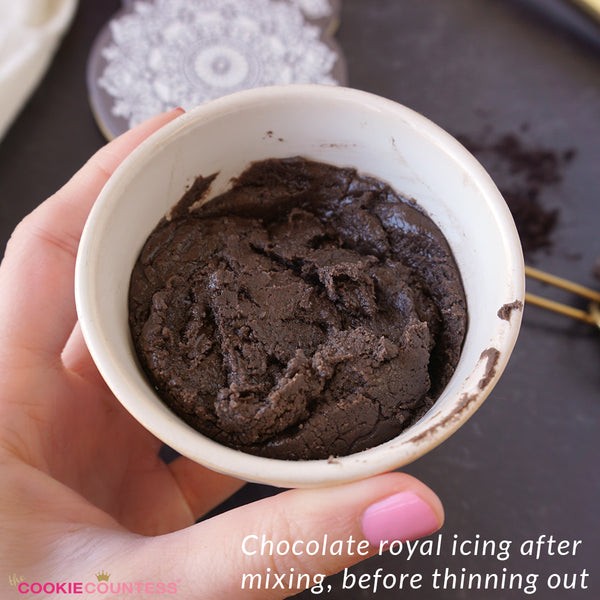
The easiest way to make brown frosting without brown food coloring is to use cocoa powder. Adding unsweetened cocoa powder to your white frosting will create a chocolatey brown hue. The depth of the brown will depend on the type and amount of cocoa powder you use, ranging from a light tan to a rich, dark brown.
Cocoa powder is an excellent alternative to food coloring because it not only adds color but also enhances the flavor of your frosting. According to “The Cook’s Illustrated Baking Book,” using Dutch-processed cocoa powder will result in a darker, more intense chocolate flavor and color compared to natural cocoa powder.
1.1. Cocoa Powder Brown Frosting Recipe
This recipe provides a simple method for creating brown frosting using cocoa powder.
Ingredients:
- 1 cup white frosting (store-bought or homemade)
- 1-2 tablespoons unsweetened cocoa powder (Dutch-processed for a darker color)
- 1-2 teaspoons warm water (optional, for adjusting consistency)
Instructions:
- Combine Frosting and Cocoa Powder: In a mixing bowl, add the cocoa powder to the white frosting. Start with 1 tablespoon and add more to achieve your desired shade of brown.
- Mix Well: Thoroughly mix the cocoa powder and frosting until fully combined. The mixture may become stiff.
- Adjust Consistency (Optional): If the frosting is too thick, add warm water one teaspoon at a time, mixing after each addition, until you reach the desired consistency.
- Taste and Adjust: Taste the frosting and add more cocoa powder or water as needed.
- Use: Apply the brown frosting to your cakes, cupcakes, or cookies.
1.2. Types of Cocoa Powder for Brown Frosting
The type of cocoa powder you use can significantly affect the color and flavor of your brown frosting. Here are the main types:
- Natural Cocoa Powder: This cocoa powder is lighter in color and has a more acidic flavor. It’s best used in recipes that also include baking soda, as the baking soda neutralizes the acidity.
- Dutch-Processed Cocoa Powder: This cocoa powder has been treated with an alkaline solution to neutralize its acidity. It has a darker color and a milder, more mellow flavor. It’s suitable for recipes that don’t rely on baking soda for leavening.
- Black Cocoa Powder: This is a highly processed cocoa powder that is almost black in color and has a very intense flavor. It’s often used to give baked goods a dramatic dark color.
1.3. Expert Tips for Using Cocoa Powder
Here are some expert tips for achieving the best results when using cocoa powder to make brown frosting:
- Sift the Cocoa Powder: Sifting the cocoa powder before adding it to the frosting will help prevent lumps and ensure a smooth consistency.
- Use Warm Water: If you need to adjust the consistency of your frosting, use warm water instead of cold water. Warm water will help the cocoa powder dissolve more easily and create a smoother frosting.
- Adjust to Taste: Start with a small amount of cocoa powder and add more to taste. This will help you achieve the perfect shade of brown without overpowering the flavor of your frosting.
- Experiment with Flavors: Consider adding other flavorings to complement the chocolate flavor of the cocoa powder. Vanilla extract, cinnamon, or coffee powder can all enhance the flavor of your brown frosting.
2. How Can I Mix Food Colors to Achieve Brown Frosting?
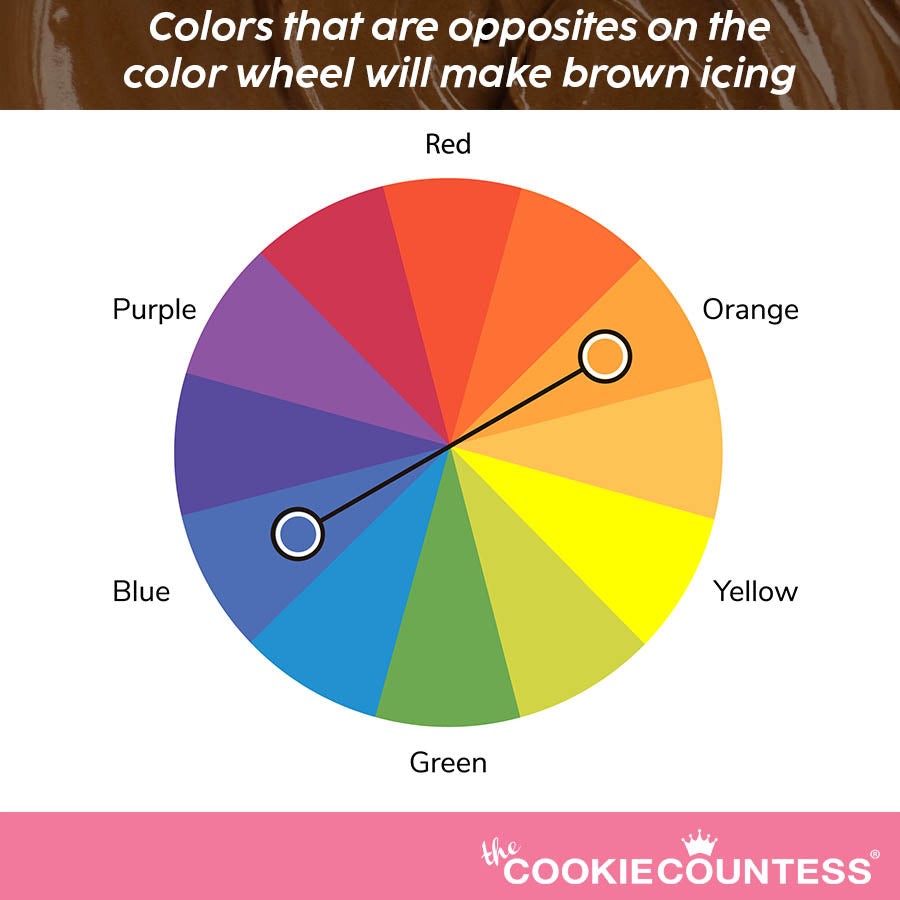
You can create brown frosting by mixing various food colors. The most common method involves combining complementary colors, which are colors opposite each other on the color wheel. Equal parts of complementary colors, such as red and green, blue and orange, or yellow and purple, will produce a shade of brown.
According to color theory, brown is essentially a dark shade of orange, so you can also achieve brown by mixing red, yellow, and a touch of blue. The exact proportions will depend on the specific shades of food coloring you are using.
2.1. Color Wheel Basics for Brown Frosting
Understanding the color wheel is essential for mixing food colors effectively. The primary colors are red, yellow, and blue. Secondary colors are created by mixing two primary colors:
- Red + Yellow = Orange
- Yellow + Blue = Green
- Blue + Red = Purple
Complementary colors are those opposite each other on the color wheel:
- Red and Green
- Blue and Orange
- Yellow and Purple
Mixing equal amounts of complementary colors will result in brown. Adjusting the ratios will create different shades of brown.
2.2. Step-by-Step Guide to Mixing Food Colors for Brown Frosting
Here’s a detailed guide on how to mix food colors to create brown frosting:
Materials:
- White frosting
- Red, Yellow, Blue, Green, Orange, and Purple food coloring gels or liquids
- Mixing bowls
- Spoons or spatulas
Instructions:
- Prepare the Frosting: Divide the white frosting into several small bowls. This allows you to experiment with different color combinations without contaminating the entire batch.
- Start with Complementary Colors:
- Red and Green: Add equal amounts of red and green food coloring to a bowl of frosting. Mix well.
- Blue and Orange: Add equal amounts of blue and orange food coloring to a bowl of frosting. Mix well.
- Yellow and Purple: Add equal amounts of yellow and purple food coloring to a bowl of frosting. Mix well.
- Adjust the Shade: Depending on the initial result, adjust the color by adding more of one color or the other.
- To darken the brown, add a touch of blue or black food coloring.
- To lighten the brown, add a bit of yellow or white food coloring.
- Experiment with Primary Colors: In another bowl, try mixing red, yellow, and a tiny amount of blue. Adjust the ratios to achieve the desired brown shade. More red will result in a warmer brown, while more blue will create a cooler brown.
- Mix Thoroughly: Ensure that the food coloring is completely mixed into the frosting to avoid streaks or uneven color.
- Let it Rest: Allow the frosting to sit for a few minutes. The color may deepen slightly as it rests. Adjust the color again if necessary before using.
- Use and Enjoy: Once you’ve achieved the perfect shade of brown, use the frosting to decorate your cakes, cupcakes, or cookies.
2.3. Color Combinations for Brown Frosting
Here’s a table summarizing the different color combinations you can use to create brown frosting:
| Combination | Colors Used | Resulting Shade | Notes |
|---|---|---|---|
| Complementary Colors | Red + Green | Earthy Brown | Start with equal parts; adjust to achieve desired shade. |
| Blue + Orange | Earthy Brown | Start with equal parts; adjust to achieve desired shade. | |
| Yellow + Purple | Earthy Brown | Start with equal parts; adjust to achieve desired shade. | |
| Primary Color Combination | Red + Yellow + Blue | Varies Based on Ratio | Adjust ratios for warm or cool browns. |
| Deeper Shade Combination | Red + Green + Yellow | Rich Brown | Add a little yellow to deepen the color. |
| Blue + Orange + Red | Deep Brown | Add a little red to deepen the color. | |
| Yellow + Purple + Blue | Dark Brown | Add a little blue to deepen the color. | |
| Variations with Other Colors | Royal Red + Gourmet Green | Earthy Brown | Use gel colors for best results. |
| Brick Red + Gourmet Green | Warm Brown | Use different shades of colors to create variations of brown. | |
| True Blue + Outrageously Orange | Deep Brown | Experiment with shades for unique colors. |
2.4. Expert Tips for Mixing Food Colors
- Use Gel Colors: Gel food colors are more concentrated than liquid food colors, so they provide more vibrant and consistent results. They also won’t change the consistency of your frosting as much as liquid colors might.
- Start Small: Add food coloring gradually, one drop at a time, until you reach the desired shade. It’s easier to add more color than to remove it.
- Mix Thoroughly: Ensure that the food coloring is completely mixed into the frosting to avoid streaks or uneven color.
- Let it Rest: Allow the frosting to sit for a few minutes. The color may deepen slightly as it rests. Adjust the color again if necessary before using.
- Keep a Record: If you find a color combination that you love, write it down so you can recreate it in the future.
3. What are Some Creative Ways to Make Brown Frosting?
Beyond cocoa powder and mixed food colors, there are several other creative ways to achieve brown frosting. These methods often add unique flavors and textures to your frosting, making your desserts even more special.
3.1. Using Coffee or Espresso
Coffee or espresso can be used to create a rich, coffee-flavored brown frosting. The coffee not only adds color but also imparts a delicious mocha flavor that pairs well with chocolate cakes and cupcakes.
Instructions:
- Brew Strong Coffee or Espresso: Brew a small amount of strong coffee or espresso.
- Cool Slightly: Allow the coffee to cool slightly before adding it to the frosting.
- Add to Frosting: Gradually add the coffee to your white frosting, mixing well after each addition, until you reach the desired shade of brown.
- Adjust Consistency: If the frosting becomes too thin, add a bit of powdered sugar to thicken it.
- Taste and Adjust: Taste the frosting and add more coffee or powdered sugar as needed.
According to “The Joy of Baking,” adding coffee to frosting enhances its flavor and gives it a rich, sophisticated taste.
3.2. Using Melted Chocolate
Melted chocolate is another excellent way to make brown frosting. Using high-quality chocolate will result in a rich, decadent frosting that is perfect for chocolate lovers.
Instructions:
- Melt Chocolate: Melt your favorite chocolate (dark, milk, or semi-sweet) using a double boiler or microwave.
- Cool Slightly: Allow the melted chocolate to cool slightly before adding it to the frosting.
- Add to Frosting: Gradually add the melted chocolate to your white frosting, mixing well after each addition, until you reach the desired shade of brown.
- Adjust Consistency: If the frosting becomes too thick, add a bit of milk or cream to thin it.
- Taste and Adjust: Taste the frosting and add more chocolate or liquid as needed.
3.3. Using Spices
Certain spices, such as cinnamon, nutmeg, and cloves, can be used to add a warm, brown tint to your frosting. These spices also impart a delicious flavor that is perfect for fall-themed desserts.
Instructions:
- Combine Spices: Mix together equal parts of cinnamon, nutmeg, and cloves.
- Add to Frosting: Gradually add the spice mixture to your white frosting, mixing well after each addition, until you reach the desired shade of brown.
- Taste and Adjust: Taste the frosting and add more spices as needed.
- Consider Extracts: Vanilla, maple, or almond extract are perfect pairings with spices.
3.4. Using Brown Sugar
Brown sugar can be added to frosting to create a caramel-like flavor and a light brown color. The molasses in brown sugar adds a depth of flavor that is perfect for cakes and cupcakes.
Instructions:
- Soften Butter: Make sure your butter is softened before creaming it with the brown sugar.
- Cream Butter and Brown Sugar: Combine softened butter with brown sugar and cream until light and fluffy.
- Add Other Ingredients: Add milk or cream and any extracts to reach your perfect flavor.
- Adjust Consistency: Add additional brown sugar or powdered sugar until your desired consistency is reached.
3.5. Recipe: Coffee Infused Brown Sugar Frosting
This recipe provides a delicious combination of Coffee and Brown Sugar.
Ingredients:
- 1 cup (2 sticks) unsalted butter, softened
- 3 cups packed light brown sugar
- 1/4 cup strong brewed coffee, cooled
- 2 teaspoons vanilla extract
- Pinch of salt
- 2-4 cups powdered sugar, as needed for consistency
Instructions:
- Cream Butter and Brown Sugar: In a large mixing bowl, cream together the softened butter and brown sugar until light and fluffy.
- Add Coffee and Vanilla: Gradually add the cooled coffee and vanilla extract to the butter and sugar mixture. Mix until well combined.
- Add Salt: Add a pinch of salt to balance the sweetness.
- Adjust Consistency: Gradually add the powdered sugar, one cup at a time, until you reach the desired consistency. Beat well after each addition.
- Taste and Adjust: Taste the frosting and adjust sweetness or coffee flavor as needed. Add more powdered sugar for a thicker consistency or a bit more coffee for a stronger flavor.
- Use Immediately: Use the frosting immediately to ice your cakes, cupcakes, or cookies.
3.6. Creative Brown Frosting Combinations
| Ingredient | Flavor Profile | Best Uses | Notes |
|---|---|---|---|
| Coffee | Rich, Mocha | Chocolate cakes, coffee cupcakes | Use strong brewed coffee or espresso. |
| Melted Chocolate | Decadent, Chocolatey | Chocolate cakes, vanilla cupcakes, brownies | Use high-quality chocolate for best results. |
| Spices | Warm, Spicy | Carrot cakes, pumpkin cupcakes, spice cakes | Use a blend of cinnamon, nutmeg, and cloves. |
| Brown Sugar | Caramel-like, Molasses | Apple cakes, pecan pies, oatmeal cookies | Adds a unique depth of flavor. |
| Maple Syrup | Sweet, Maple | Pancakes, waffles, oatmeal | Provides a distinctive taste to the recipe. |
3.7. Expert Tips for Creative Brown Frosting
- Use High-Quality Ingredients: When using ingredients like chocolate or coffee, opt for high-quality options to ensure the best flavor.
- Adjust to Taste: Taste the frosting as you go and adjust the ingredients to suit your preferences.
- Consider Texture: Be mindful of the texture of your frosting. If it becomes too thick, add a bit of liquid; if it becomes too thin, add a bit of powdered sugar.
- Experiment: Don’t be afraid to experiment with different combinations of ingredients to create your own unique brown frosting recipes.
4. How Do I Achieve Different Shades of Brown Frosting?
Achieving different shades of brown frosting involves understanding how to adjust the ratios of ingredients and how to use various techniques to manipulate the color. Whether you prefer a light tan, a deep chocolate brown, or a warm caramel hue, there are several ways to customize your frosting.
4.1. Adjusting Ratios of Cocoa Powder
The amount of cocoa powder you use will significantly impact the shade of brown in your frosting. Start with a small amount of cocoa powder and gradually add more until you reach the desired shade.
- Light Tan: Use 1 tablespoon of cocoa powder per cup of white frosting.
- Medium Brown: Use 2 tablespoons of cocoa powder per cup of white frosting.
- Dark Brown: Use 3 or more tablespoons of cocoa powder per cup of white frosting.
4.2. Manipulating Color Using Primary Colors
The combination of primary colors, red, yellow, and blue, is essential for creating a variety of brown shades. Adjusting the ratios of these colors allows you to achieve different tones.
- Warm Brown: Use more red and yellow and less blue.
- Cool Brown: Use more blue and less red and yellow.
- Neutral Brown: Use equal parts of red, yellow, and blue.
4.3. Using Different Types of Chocolate
The type of chocolate you use can also affect the shade of brown in your frosting.
- Milk Chocolate: Will produce a lighter, sweeter brown frosting.
- Semi-Sweet Chocolate: Will create a medium brown frosting with a balanced sweetness.
- Dark Chocolate: Will result in a dark, rich brown frosting.
According to “Baking Illustrated,” the percentage of cacao in chocolate affects both the color and flavor of baked goods.
4.4. Adjusting Coffee Concentration
If you’re using coffee to make brown frosting, the concentration of the coffee will influence the shade of brown.
- Light Brown: Use a weak coffee solution.
- Medium Brown: Use a regular strength coffee solution.
- Dark Brown: Use a strong espresso.
4.5. Playing with Spices
Different spices can be combined to create unique shades of brown.
- Cinnamon: Adds a warm, reddish-brown tint.
- Nutmeg: Adds a light, yellowish-brown tint.
- Cloves: Adds a dark, rich brown tint.
4.6. Shades of Brown Frosting Table
| Shade of Brown | Ingredients and Ratios | Notes |
|---|---|---|
| Light Tan | 1 tablespoon cocoa powder per cup of white frosting | Use natural cocoa powder for a lighter shade. |
| Medium Brown | 2 tablespoons cocoa powder per cup of white frosting | Dutch-processed cocoa powder will result in a richer color. |
| Dark Brown | 3+ tablespoons cocoa powder per cup of white frosting; equal parts red, yellow, and blue | Add a touch of black food coloring to deepen the shade. |
| Warm Brown | More red and yellow, less blue food coloring; cinnamon and brown sugar | A touch of orange food coloring can enhance the warmth. |
| Cool Brown | More blue, less red and yellow food coloring; strong brewed coffee or espresso | Add a tiny bit of green to get an “earthy” tone. |
| Caramel Brown | Brown sugar and butter creamed together; a drizzle of caramel sauce | Make sure to cream the butter and sugar thoroughly for a smooth texture. |
| Mocha Brown | Coffee and cocoa powder combined; dark chocolate shavings | A hint of vanilla extract complements the mocha flavor. |
4.7. Expert Tips for Achieving Different Shades
- Start Small: Add ingredients gradually and adjust as needed to avoid overshooting your desired shade.
- Mix Thoroughly: Ensure that all ingredients are fully incorporated to avoid streaks or uneven color.
- Let it Rest: Allow the frosting to sit for a few minutes after mixing, as the color may deepen slightly.
- Keep Notes: Keep track of the ingredients and ratios you use so you can recreate your favorite shades of brown frosting in the future.
- Control the Temperature: When adding melted chocolate or coffee, make sure they are cooled slightly to prevent the frosting from melting.
5. How Do I Store Brown Frosting Properly?
Proper storage is essential to maintain the quality, flavor, and texture of your brown frosting. Whether you’ve made a large batch or have leftovers, knowing how to store it correctly will ensure it’s ready to use whenever you need it.
5.1. Short-Term Storage (Room Temperature)
For short-term storage, brown frosting can be kept at room temperature if it doesn’t contain perishable ingredients like cream cheese or whipped cream.
Instructions:
- Transfer to an Airtight Container: Place the frosting in an airtight container to prevent it from drying out or absorbing odors from the refrigerator.
- Cover Tightly: Ensure the container is tightly sealed. If your container isn’t completely airtight, cover the frosting with plastic wrap, pressing it directly onto the surface, before sealing the container.
- Store in a Cool, Dark Place: Keep the container in a cool, dark place away from direct sunlight and heat.
- Use Within 2 Days: Frosting stored at room temperature should be used within 2 days for optimal quality.
5.2. Medium-Term Storage (Refrigeration)
Refrigeration is suitable for storing brown frosting for a longer period, typically up to a week.
Instructions:
- Transfer to an Airtight Container: Place the frosting in an airtight container.
- Cover Tightly: As with room temperature storage, ensure the container is tightly sealed. Use plastic wrap pressed directly onto the surface of the frosting for extra protection.
- Refrigerate: Store the container in the refrigerator.
- Use Within 7 Days: Refrigerated frosting should be used within 7 days.
- Bring to Room Temperature Before Use: Before using refrigerated frosting, allow it to sit at room temperature for at least 30 minutes to soften. You may need to re-whip it to restore its original consistency.
5.3. Long-Term Storage (Freezing)
Freezing is ideal for storing brown frosting for several months. This method is particularly useful if you’ve made a large batch and won’t be using it immediately.
Instructions:
- Transfer to a Freezer-Safe Container: Place the frosting in a freezer-safe airtight container. Leave a little extra space in the container, as the frosting may expand slightly when frozen.
- Cover Tightly: For added protection, cover the frosting with plastic wrap, pressing it directly onto the surface, before sealing the container.
- Freeze: Store the container in the freezer.
- Use Within 2-3 Months: While frosting can technically be stored in the freezer for longer, it’s best to use it within 2-3 months for optimal quality.
- Thaw in the Refrigerator: When ready to use, thaw the frosting in the refrigerator overnight.
- Re-Whip Before Use: After thawing, the frosting may separate or change in consistency. Re-whip it using a mixer until it returns to its original smooth and creamy texture.
5.4. Storage Guidelines Table
| Storage Method | Container | Temperature | Duration | Notes |
|---|---|---|---|---|
| Room Temp | Airtight container, covered with plastic wrap | Cool, dark place | Up to 2 days | Best for frostings without perishable ingredients like cream cheese or whipped cream. |
| Refrigeration | Airtight container, covered with plastic wrap | Refrigerated | Up to 7 days | Allow to come to room temperature and re-whip before using. |
| Freezing | Freezer-safe container, covered with plastic wrap | Frozen | Up to 2-3 months | Thaw in the refrigerator overnight and re-whip before using. May require additional mixing to restore original consistency. |
5.5. Expert Tips for Storing Brown Frosting
- Use High-Quality Containers: Invest in high-quality airtight containers to protect your frosting from drying out or absorbing odors.
- Label and Date: Always label your containers with the date you made or stored the frosting. This will help you keep track of its freshness.
- Avoid Temperature Fluctuations: Keep frosting away from temperature fluctuations, as this can cause it to separate or change in consistency.
- Re-Whip After Thawing: Always re-whip frosting after thawing to restore its original texture.
- Consider Piping Bags: For easy use, store frosting in piping bags. This makes it convenient to decorate cakes and cupcakes whenever you need it.
6. What are Common Problems When Making Brown Frosting and How to Fix Them?
Making brown frosting can sometimes present challenges, but understanding common problems and how to fix them can ensure a smooth and successful process. Here are some typical issues and solutions:
6.1. Frosting is Too Thin
Problem: The frosting is too runny and doesn’t hold its shape.
Causes:
- Too much liquid (milk, water, coffee) was added.
- The butter was too warm.
- The weather is too humid.
Solutions:
- Add Powdered Sugar: Gradually add powdered sugar, one tablespoon at a time, until the frosting reaches the desired consistency.
- Refrigerate: Place the frosting in the refrigerator for 15-30 minutes to firm up.
- Cornstarch: Add a small amount of cornstarch (about 1/2 teaspoon at a time) to help absorb excess moisture.
6.2. Frosting is Too Thick
Problem: The frosting is too stiff and difficult to spread.
Causes:
- Too much powdered sugar was added.
- The butter was too cold.
Solutions:
- Add Liquid: Gradually add a small amount of liquid (milk, water, cream) until the frosting reaches the desired consistency.
- Warm Slightly: Let the frosting sit at room temperature for a few minutes to soften the butter.
- Whip: Whip the frosting with a mixer to incorporate air and make it lighter.
6.3. Frosting is Grainy
Problem: The frosting has a gritty texture.
Causes:
- The powdered sugar wasn’t fine enough.
- The butter and sugar weren’t creamed properly.
Solutions:
- Sift Powdered Sugar: Sift the powdered sugar before adding it to the frosting to remove any lumps.
- Cream Thoroughly: Ensure that the butter and sugar are creamed together until light and fluffy before adding other ingredients.
- Whip: Whip the frosting with a mixer for several minutes to smooth out the texture.
6.4. Frosting is Separated
Problem: The frosting looks curdled or separated.
Causes:
- The butter was too warm or too cold.
- The ingredients weren’t emulsified properly.
Solutions:
- Adjust Temperature: Ensure that the butter is at room temperature but not too soft.
- Whip: Whip the frosting vigorously with a mixer to bring it back together.
- Add a Stabilizer: Add a small amount of cornstarch or cream cheese to help stabilize the frosting.
6.5. Frosting Has an Uneven Color
Problem: The frosting has streaks or an inconsistent color.
Causes:
- The food coloring or cocoa powder wasn’t mixed in thoroughly.
Solutions:
- Mix Thoroughly: Use a mixer to ensure that the food coloring or cocoa powder is completely incorporated into the frosting.
- Scrape the Bowl: Scrape down the sides and bottom of the bowl to ensure that all ingredients are evenly mixed.
6.6. Troubleshooting Table
| Problem | Cause(s) | Solution(s) |
|---|---|---|
| Too Thin | Too much liquid, butter too warm, humid weather | Add powdered sugar, refrigerate, add cornstarch |
| Too Thick | Too much powdered sugar, butter too cold | Add liquid, warm slightly, whip |
| Grainy | Powdered sugar not fine enough, butter and sugar not creamed well | Sift powdered sugar, cream thoroughly, whip |
| Separated | Butter too warm or cold, ingredients not emulsified properly | Adjust temperature, whip vigorously, add a stabilizer (cornstarch or cream cheese) |
| Uneven Color | Food coloring/cocoa powder not mixed thoroughly | Mix thoroughly, scrape the bowl |
6.7. Expert Tips for Troubleshooting
- Use Room Temperature Ingredients: Whenever possible, use ingredients that are at room temperature to ensure they emulsify properly.
- Start Slow: Add ingredients gradually, especially liquids and powdered sugar, to avoid overdoing it.
- Taste as You Go: Taste the frosting frequently and adjust the ingredients as needed to achieve the perfect flavor and consistency.
- Don’t Panic: If you encounter a problem, don’t panic. Most issues can be fixed with a few simple adjustments.
7. What are Some Variations of Brown Frosting?
Brown frosting is a versatile base that can be transformed into a variety of delicious flavors. Experimenting with different ingredients and techniques can create unique and exciting variations to suit any dessert.
7.1. Salted Caramel Frosting
Description: A sweet and salty frosting with a rich caramel flavor.
Ingredients:
- Brown frosting base
- Caramel sauce
- Sea salt
Instructions:
- Prepare Brown Frosting: Start with your favorite brown frosting recipe.
- Add Caramel Sauce: Gradually add caramel sauce to the frosting, mixing well after each addition, until you reach the desired flavor.
- Sprinkle with Sea Salt: Sprinkle a small amount of sea salt over the frosting and mix gently to distribute it evenly.
- Taste and Adjust: Taste the frosting and adjust the caramel sauce and sea salt as needed.
7.2. Mocha Frosting
Description: A coffee-flavored frosting with a hint of chocolate.
Ingredients:
- Brown frosting base
- Strong brewed coffee or espresso
- Cocoa powder
Instructions:
- Prepare Brown Frosting: Start with your favorite brown frosting recipe.
- Add Coffee: Gradually add strong brewed coffee or espresso to the frosting, mixing well after each addition, until you reach the desired coffee flavor.
- Add Cocoa Powder: Add a small amount of cocoa powder to enhance the chocolate flavor.
- Taste and Adjust: Taste the frosting and adjust the coffee and cocoa powder as needed.
7.3. Cinnamon Spice Frosting
Description: A warm and spicy frosting with a hint of cinnamon, nutmeg, and cloves.
Ingredients:
- Brown frosting base
- Cinnamon
- Nutmeg
- Cloves
Instructions:
- Prepare Brown Frosting: Start with your favorite brown frosting recipe.
- Add Spices: Add cinnamon, nutmeg, and cloves to the frosting, mixing well after each addition, until you reach the desired spice level.
- Taste and Adjust: Taste the frosting and adjust the spices as needed.
7.4. Maple Brown Sugar Frosting
Description: A sweet and earthy frosting with a distinct maple flavor.
Ingredients:
- Brown frosting base
- Maple syrup
- Brown sugar
Instructions:
- Prepare Brown Frosting: Start with your favorite brown frosting recipe.
- Add Maple Syrup: Gradually add maple syrup to the frosting, mixing well after each addition, until you reach the desired maple flavor.
- Add Brown Sugar: Add a small amount of brown sugar to enhance the earthy sweetness.
- Taste and Adjust: Taste the frosting and adjust the maple syrup and brown sugar as needed.
7.5. Variations Table
| Variation | Key Ingredients | Flavor Profile | Best Uses |
|---|---|---|---|
| Salted Caramel | Caramel sauce, sea salt | Sweet and salty, rich caramel flavor | Cupcakes, cakes, cookies |
| Mocha | Strong brewed coffee or espresso, cocoa powder | Coffee-flavored, hint of chocolate | Chocolate cakes, coffee cupcakes |
| Cinnamon Spice | Cinnamon, nutmeg, cloves | Warm and spicy, aromatic | Carrot cakes, pumpkin cupcakes, spice cakes |
| Maple Brown Sugar | Maple syrup, brown sugar | Sweet and earthy, distinct maple flavor | Apple cakes, pecan pies, oatmeal cookies |
7.6. Expert Tips for Creating Variations
- Start with a Good Base: Begin with a well-made brown frosting base for the best results.
- Add Flavors Gradually: Add flavors in small increments and taste as you go to avoid overpowering the frosting.
- Use High-Quality Ingredients: Use high-quality ingredients for the best flavor.
- Consider Texture: Be mindful of the texture of your frosting when adding liquids or other ingredients.
8. How Can I Make Vegan Brown Frosting?
Creating vegan brown frosting is simple with the right ingredients and techniques. By substituting dairy-based components with plant-based alternatives, you can achieve a delicious and creamy frosting that suits vegan dietary needs.
8.1. Substituting Butter
Problem: Traditional frosting recipes rely on butter for richness and texture.
Solution: Replace butter with vegan butter or coconut oil.
- Vegan Butter: Use a high-quality vegan butter stick. These products are specifically formulated to mimic the texture and flavor of dairy butter.
- Coconut Oil: Coconut oil can provide a similar richness, but it may impart a slight coconut flavor. Use refined coconut oil to minimize the coconut taste.
8.2. Substituting Milk
Problem: Many frosting recipes use milk or cream for moisture and consistency.
Solution: Substitute with plant-based milk alternatives such as almond milk, soy milk, oat milk, or coconut milk.
- Almond Milk: Adds a light flavor and good consistency.
- Soy Milk: Provides a creamy texture and neutral flavor.
- Oat Milk: Offers a slightly sweet flavor and creamy texture.
- Coconut Milk: Adds richness but may impart a coconut flavor.
8.3. Vegan Brown Frosting Recipe
This recipe uses vegan butter and almond milk to create a delicious vegan brown frosting.
Ingredients:
- 1 cup vegan butter, softened
- 3 cups powdered sugar
- 1/4 cup almond milk
- 1/4 cup cocoa powder
- 1 teaspoon vanilla extract
- Pinch of salt
Instructions:
- Cream Vegan Butter: In a large mixing bowl, cream the softened vegan butter until smooth and fluffy.
- Add Powdered Sugar: Gradually add the powdered sugar, one cup at a time, mixing well after each addition.
- Incorporate Cocoa Powder: Add the cocoa powder and mix until well combined.
- Add Almond Milk and Vanilla: Gradually add the almond milk and vanilla extract, mixing until the frosting is smooth and creamy.
- Add Salt: Add a pinch of salt to balance the sweetness.
- Adjust Consistency: If the frosting is too thick, add a little more almond milk. If it’s too thin, add more powdered sugar.
- Use Immediately: Use the frosting immediately to ice your cakes, cupcakes, or cookies.
8.4. Vegan Substitutions Table
| Ingredient | Vegan Substitute | Notes |
|---|---|---|
| Butter | Vegan Butter or Coconut Oil | Use high-quality vegan butter sticks; refined coconut oil minimizes coconut flavor. |
| Milk/Cream | Almond Milk, Soy Milk, Oat Milk | Choose based on desired flavor and consistency; coconut milk adds |