What Can You Make With A Food Dehydrator? A food dehydrator opens up a world of culinary possibilities, allowing you to create healthy snacks, preserve seasonal produce, and craft unique ingredients, all detailed on foods.edu.vn. From sweet fruit leathers to savory jerky and nutrient-packed dried vegetables, the options are endless, promoting sustainable eating, reducing food waste, and providing wholesome homemade goods. Let’s delve into the vast range of possibilities, covering everything from preparation to preservation and inspiring you to explore the art of food dehydration.
1. What Are The Best Fruits To Dehydrate With A Food Dehydrator?
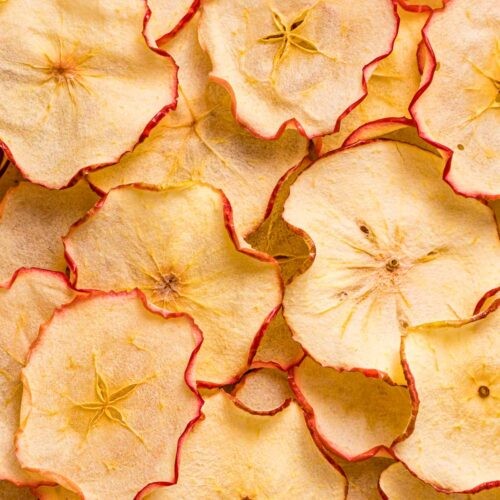
The best fruits to dehydrate with a food dehydrator are those that retain their flavor and texture well during the dehydration process, providing delicious and nutritious snacks. Fruits like apples, bananas, mangoes, and strawberries are particularly well-suited for dehydration due to their high sugar content and ability to concentrate flavors, making them sweet and chewy treats. According to a study published in the Journal of Food Science, the dehydration process intensifies the natural sugars in fruits, enhancing their sweetness and making them a healthier alternative to processed snacks.
-
Apples: Dehydrated apples become delightfully chewy and sweet. For best results, slice them thinly and consider adding a sprinkle of cinnamon before dehydrating.
-
Bananas: Dehydrated bananas are naturally sweet and chewy, making them an excellent snack for energy. They can be sliced into chips or made into fruit leather.
-
Mangoes: Dehydrated mangoes offer a tropical burst of flavor. Choose ripe but firm mangoes for slicing and dehydrating.
-
Strawberries: Dehydrated strawberries are sweet and slightly tart. Slicing them thinly ensures even dehydration.
-
Pineapple: Dehydrated pineapple is a tropical treat that’s both sweet and tangy. Cut into rings or chunks for best results.
-
Blueberries: Dehydrated blueberries become small, intense flavor bombs. Spread them in a single layer on the dehydrator trays.
-
Peaches: Dehydrated peaches offer a taste of summer all year round. Slice them thinly and consider blanching them briefly to prevent browning.
-
Pears: Similar to apples, dehydrated pears become sweet and chewy. They can be spiced with cinnamon or other warm spices.
-
Kiwis: Dehydrated kiwis have a unique sweet and tart flavor. Slice them thinly to ensure they dehydrate evenly.
-
Cranberries: Dehydrated cranberries are tart and chewy, perfect for adding to trail mixes or snacking on their own.
1.1. What Preparation Steps Are Essential For Dehydrating Fruits?
Essential preparation steps for dehydrating fruits include washing, slicing, pre-treating to prevent browning, and arranging on dehydrator trays to ensure optimal airflow. According to the National Center for Home Food Preservation, proper preparation is crucial for ensuring the safety and quality of dehydrated fruits, helping to prevent spoilage and maintain nutritional value.
-
Washing: Thoroughly wash fruits to remove any dirt, pesticides, or residues.
-
Slicing: Slice fruits into uniform pieces, typically about 1/4 inch thick, to ensure even drying.
-
Pre-treating: To prevent browning, especially in fruits like apples, peaches, and pears, pretreat them with lemon juice, ascorbic acid (Vitamin C), or a commercial fruit preservative.
-
Arranging: Arrange the sliced fruits in a single layer on the dehydrator trays, ensuring they are not overlapping to allow for proper airflow.
1.2. What Temperature Should I Use For Dehydrating Fruits?
The ideal temperature for dehydrating fruits is typically between 130°F and 140°F (54°C and 60°C), which helps to remove moisture slowly while preserving the fruit’s flavor and nutrients. Higher temperatures can cause the fruit to harden on the outside, trapping moisture inside, while lower temperatures can increase the risk of spoilage. Research from the University of California, Davis, suggests that maintaining a consistent temperature within this range yields the best results for most fruits.
-
Berries (Strawberries, Blueberries): 135°F (57°C)
-
Apples and Pears: 135°F (57°C)
-
Bananas: 135°F (57°C)
-
Mangoes and Pineapples: 130°F (54°C)
-
Peaches and Plums: 140°F (60°C)
1.3. How Long Does It Typically Take To Dehydrate Fruits?
The typical time to dehydrate fruits varies depending on the type of fruit, the thickness of the slices, and the efficiency of the dehydrator, generally ranging from 6 to 24 hours. Factors like humidity and the fruit’s water content also play a significant role. As noted by the USDA, monitoring the fruit’s moisture level is critical; it should be pliable and leathery but not sticky when properly dehydrated.
| Fruit | Dehydration Time (Hours) |
|---|---|
| Apples | 6-12 |
| Bananas | 8-16 |
| Mangoes | 12-24 |
| Strawberries | 8-16 |
| Pineapple | 12-18 |
| Blueberries | 10-18 |
| Peaches | 8-16 |
| Pears | 6-12 |
| Kiwis | 10-18 |
| Cranberries | 12-24 |

1.4. What Are The Best Practices For Storing Dehydrated Fruits?
Best practices for storing dehydrated fruits include cooling them completely, packaging them in airtight containers, and storing them in a cool, dark, and dry place to prevent moisture absorption and spoilage. According to the FDA, proper storage can significantly extend the shelf life of dehydrated fruits, maintaining their quality and preventing mold growth.
-
Cooling: Allow the dehydrated fruits to cool completely before storing.
-
Airtight Containers: Use airtight containers such as Mason jars, vacuum-sealed bags, or resealable plastic bags.
-
Cool, Dark, Dry Place: Store the containers in a cool, dark, and dry place, away from direct sunlight and heat, to prevent moisture absorption and maintain quality.
-
Check Periodically: Periodically check the stored fruits for any signs of moisture or spoilage, such as mold or stickiness. Discard any affected items immediately.
1.5. What Are The Signs That Dehydrated Fruits Have Gone Bad?
Signs that dehydrated fruits have gone bad include the presence of mold, a change in color or odor, a sticky texture, or any visible signs of moisture. According to food safety guidelines from the Mayo Clinic, consuming spoiled dehydrated fruits can lead to digestive issues or foodborne illnesses, so it’s important to discard any suspect items.
-
Mold: Any visible mold growth indicates spoilage.
-
Color Change: A significant change in color can indicate degradation.
-
Odor: An unusual or off-putting odor suggests spoilage.
-
Texture: A sticky or overly moist texture is a sign of moisture absorption and potential spoilage.
-
Taste: An off or sour taste indicates that the fruit has gone bad.
2. What Vegetables Can Be Dehydrated Using A Food Dehydrator For Long-Term Storage?
Many vegetables can be dehydrated using a food dehydrator for long-term storage, providing a convenient way to preserve nutrients and reduce food waste. Vegetables like tomatoes, carrots, onions, and bell peppers are excellent candidates for dehydration due to their flavor retention and versatility in various recipes. A study by the Department of Food Science at Cornell University highlights that dehydrating vegetables can retain up to 90% of their nutritional value, making them a healthy addition to any diet.
-
Tomatoes: Dehydrated tomatoes are intensely flavored and can be used in sauces, soups, and stews.
-
Carrots: Dehydrated carrots are great for adding to soups, stews, and stir-fries.
-
Onions: Dehydrated onions provide a concentrated flavor for cooking and seasoning.
-
Bell Peppers: Dehydrated bell peppers add color and flavor to a variety of dishes.
-
Mushrooms: Dehydrated mushrooms have an umami-rich flavor and are excellent in soups, stews, and sauces.
-
Zucchini: Dehydrated zucchini chips can be a healthy and crunchy snack.
-
Peas: Dehydrated peas are a convenient addition to soups and stews.
-
Celery: Dehydrated celery adds aromatic depth to soups and broths.
-
Spinach: Dehydrated spinach can be added to smoothies, soups, and sauces for a nutrient boost.
-
Sweet Potatoes: Dehydrated sweet potatoes make a nutritious snack or addition to backpacking meals.
2.1. How Do You Prepare Vegetables For Dehydration?
To prepare vegetables for dehydration, start by washing them thoroughly, then slice or dice them into uniform pieces to ensure even drying, and blanch them to preserve their color and nutrients. According to the University of Georgia’s Extension program, blanching is a crucial step as it helps to stop enzyme activity that can cause changes in flavor, color, and texture during storage.
-
Washing: Thoroughly wash the vegetables to remove dirt and debris.
-
Slicing/Dicing: Cut the vegetables into uniform pieces, typically about 1/4 inch thick, to ensure even drying.
-
Blanching: Blanch the vegetables by steaming or boiling them briefly to stop enzyme activity and preserve their color and nutrients.
-
Cooling: After blanching, quickly cool the vegetables in ice water to stop the cooking process.
-
Arranging: Arrange the vegetables in a single layer on the dehydrator trays, ensuring they are not overlapping to allow for proper airflow.
2.2. What Are The Recommended Dehydration Temperatures For Vegetables?
The recommended dehydration temperatures for vegetables typically range between 125°F and 135°F (52°C and 57°C) to ensure that they dry properly without cooking or hardening. This temperature range helps to preserve the vegetables’ nutrients and flavor while preventing spoilage. Research from the University of Idaho Extension indicates that precise temperature control is essential for achieving optimal dehydration results.
| Vegetable | Dehydration Temperature (°F) | Dehydration Temperature (°C) |
|---|---|---|
| Tomatoes | 135°F | 57°C |
| Carrots | 125°F | 52°C |
| Onions | 130°F | 54°C |
| Bell Peppers | 125°F | 52°C |
| Mushrooms | 125°F | 52°C |
| Zucchini | 130°F | 54°C |
| Peas | 130°F | 54°C |
| Celery | 125°F | 52°C |
| Spinach | 125°F | 52°C |
| Sweet Potatoes | 135°F | 57°C |
2.3. How Can You Tell When Vegetables Are Fully Dehydrated?
You can tell when vegetables are fully dehydrated when they are brittle or leathery, depending on the vegetable type, and contain no visible moisture. A properly dehydrated vegetable should snap easily or bend slightly without feeling sticky. The University of Minnesota Extension recommends testing a few pieces by removing them from the dehydrator and allowing them to cool to room temperature, as they may feel softer while still warm.
-
Brittle or Leathery Texture: The vegetables should have a brittle or leathery texture, depending on the type.
-
No Visible Moisture: There should be no visible moisture or stickiness.
-
Snap Test: Properly dehydrated vegetables should snap easily or bend slightly without feeling sticky.
-
Cooling Test: Remove a few pieces from the dehydrator and allow them to cool to room temperature. They may feel softer while still warm.
2.4. What Is The Best Way To Rehydrate Dehydrated Vegetables?
The best way to rehydrate dehydrated vegetables is to soak them in warm water for 15-30 minutes, or until they return to their original texture. You can also add them directly to soups, stews, or sauces, where they will rehydrate during the cooking process. The Colorado State University Extension notes that the rehydration time can vary depending on the vegetable and the size of the pieces.
-
Soaking in Warm Water: Place the dehydrated vegetables in a bowl and cover them with warm water. Let them soak for 15-30 minutes, or until they return to their original texture.
-
Adding to Soups/Stews: Add the dehydrated vegetables directly to soups, stews, or sauces, where they will rehydrate during the cooking process.
-
Using Rehydration Water: The water used for rehydrating vegetables can be nutritious and flavorful. Use it in your cooking to add extra flavor and nutrients to your dishes.
2.5. How Long Can Dehydrated Vegetables Be Stored?
Dehydrated vegetables can typically be stored for 6-12 months if properly prepared and stored in airtight containers in a cool, dark, and dry place. According to the National Center for Home Food Preservation, proper storage conditions are crucial for maintaining the quality and preventing spoilage of dehydrated vegetables.
-
Airtight Containers: Store the dehydrated vegetables in airtight containers such as Mason jars, vacuum-sealed bags, or resealable plastic bags.
-
Cool, Dark, Dry Place: Store the containers in a cool, dark, and dry place, away from direct sunlight and heat, to prevent moisture absorption and maintain quality.
-
Check Periodically: Periodically check the stored vegetables for any signs of moisture or spoilage, such as mold or stickiness. Discard any affected items immediately.
3. Can I Make Jerky With A Food Dehydrator?
Yes, you can make jerky with a food dehydrator, offering a healthier and more customizable alternative to store-bought options. A food dehydrator allows for precise temperature control, ensuring that the meat is safely and effectively dried to the proper moisture level. According to the USDA, jerky must reach an internal temperature of 160°F (71°C) before dehydration to kill any harmful bacteria.
-
Beef Jerky: Classic and protein-packed, beef jerky is a popular choice.
-
Turkey Jerky: A leaner alternative to beef, turkey jerky is flavorful and nutritious.
-
Venison Jerky: For a gamey flavor, venison jerky is a unique and tasty option.
-
Chicken Jerky: Chicken jerky is a versatile option that can be flavored with various spices and marinades.
-
Salmon Jerky: A healthy and omega-3-rich option, salmon jerky is both flavorful and nutritious.
3.1. What Types Of Meat Are Best Suited For Making Jerky?
The best types of meat for making jerky are lean cuts that are low in fat, as fat can spoil during the dehydration process and shorten the jerky’s shelf life. Beef, turkey, venison, and even salmon are excellent choices, provided they are properly prepared and marinated. The University of Nebraska-Lincoln Extension recommends using cuts like flank steak, top round, or sirloin tip for beef jerky to ensure optimal texture and flavor.
-
Beef: Lean cuts like flank steak, top round, or sirloin tip are ideal for beef jerky.
-
Turkey: Turkey breast is a lean and flavorful option for turkey jerky.
-
Venison: Venison is a gamey and lean meat that makes excellent jerky.
-
Salmon: Salmon fillets, when properly prepared, create a delicious and healthy salmon jerky.
3.2. What Are Some Popular Jerky Marinade Recipes?
Popular jerky marinade recipes often include a combination of soy sauce, Worcestershire sauce, brown sugar, garlic powder, onion powder, black pepper, and liquid smoke to add flavor and tenderize the meat. The specific blend of ingredients can be adjusted to suit personal preferences, creating sweet, savory, or spicy jerky varieties. According to a study by Kansas State University, marinating meat before dehydration can significantly enhance its flavor and texture.
-
Classic Beef Jerky Marinade: Soy sauce, Worcestershire sauce, brown sugar, garlic powder, onion powder, black pepper, and liquid smoke.
-
Spicy Jerky Marinade: Add red pepper flakes, cayenne pepper, or hot sauce to the classic marinade for a spicy kick.
-
Teriyaki Jerky Marinade: Combine soy sauce, honey, ginger, garlic, and sesame oil for a sweet and savory teriyaki flavor.
-
Sweet and Savory Jerky Marinade: Use a combination of brown sugar, apple cider vinegar, soy sauce, and your favorite spices for a balanced flavor profile.
3.3. What Is The Safe Internal Temperature For Making Jerky?
The safe internal temperature for making jerky is 160°F (71°C) to ensure that any harmful bacteria, such as E. coli and Salmonella, are killed during the dehydration process. According to the USDA, this temperature must be reached before or during the dehydration process to ensure the safety of the final product.
-
Heating Before Dehydration: You can heat the meat to 160°F (71°C) before placing it in the dehydrator by baking, steaming, or boiling it.
-
Heating During Dehydration: Ensure that the dehydrator maintains a temperature high enough to bring the internal temperature of the meat to 160°F (71°C) during the process.
3.4. How Long Should Jerky Be Dehydrated?
Jerky should be dehydrated for approximately 4-12 hours, depending on the thickness of the meat, the temperature of the dehydrator, and the desired texture. The jerky is done when it is dry, leathery, and cracks slightly when bent but does not break. The University of Wisconsin-Madison Extension recommends checking the jerky periodically to ensure it does not become too dry.
-
Check for Doneness: The jerky is done when it is dry, leathery, and cracks slightly when bent but does not break.
-
Adjust Time as Needed: Adjust the dehydration time based on the thickness of the meat and the dehydrator’s performance.
3.5. How Should Jerky Be Stored To Maintain Freshness?
Jerky should be stored in airtight containers or vacuum-sealed bags in a cool, dark, and dry place to maintain freshness and prevent spoilage. Properly stored jerky can last for 1-2 months at room temperature or up to a year in the refrigerator or freezer. The National Center for Home Food Preservation emphasizes the importance of removing as much air as possible from the packaging to prevent oxidation and moisture absorption.
-
Airtight Containers: Use airtight containers such as Mason jars, resealable plastic bags, or vacuum-sealed bags.
-
Cool, Dark, Dry Place: Store the containers in a cool, dark, and dry place, away from direct sunlight and heat.
-
Refrigeration/Freezing: For longer storage, keep the jerky in the refrigerator or freezer.
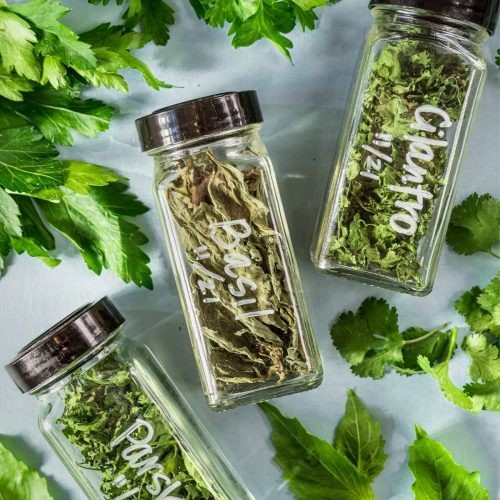
4. What Types Of Herbs And Spices Can Be Dried In A Food Dehydrator?
A wide variety of herbs and spices can be dried in a food dehydrator, preserving their flavors and aromas for culinary use. Herbs like basil, oregano, thyme, and rosemary, as well as spices such as chili peppers and ginger, are commonly dehydrated to extend their shelf life and intensify their flavors. According to research from the University of Kentucky, dehydrated herbs and spices often have a more concentrated flavor than their fresh counterparts.
-
Basil: Dehydrated basil retains its sweet and slightly peppery flavor, perfect for Italian dishes.
-
Oregano: Dehydrated oregano is robust and aromatic, ideal for Mediterranean cuisine.
-
Thyme: Dehydrated thyme has a subtle, earthy flavor that complements many savory dishes.
-
Rosemary: Dehydrated rosemary maintains its piney aroma and is excellent for roasting meats and vegetables.
-
Mint: Dehydrated mint is refreshing and can be used in teas, desserts, and savory dishes.
-
Parsley: Dehydrated parsley is a versatile herb that adds a fresh flavor to many recipes.
-
Chives: Dehydrated chives have a mild onion flavor and are great for garnishing dishes.
-
Sage: Dehydrated sage has a distinct, earthy flavor that pairs well with poultry and stuffing.
-
Chili Peppers: Dehydrated chili peppers can be ground into chili powder or used to add heat to various dishes.
-
Ginger: Dehydrated ginger can be ground into a powder and used in both sweet and savory recipes.
4.1. What Is The Best Way To Prepare Herbs For Dehydration?
The best way to prepare herbs for dehydration is to wash them gently, remove any damaged leaves, and dry them thoroughly before placing them in the dehydrator. Removing excess moisture before dehydration can help prevent mold growth and ensure that the herbs dry evenly. According to the University of Missouri Extension, washing the herbs removes dirt and insects that could affect their quality.
-
Washing: Gently wash the herbs in cool water to remove any dirt, insects, or debris.
-
Removing Damaged Leaves: Remove any damaged, discolored, or wilted leaves.
-
Drying: Thoroughly dry the herbs using a salad spinner or by patting them dry with a clean towel.
-
Arranging: Arrange the herbs in a single layer on the dehydrator trays, ensuring they are not overlapping to allow for proper airflow.
4.2. What Temperature Should A Dehydrator Be Set At For Drying Herbs?
A dehydrator should be set at a low temperature, typically between 95°F and 115°F (35°C and 46°C), for drying herbs to preserve their volatile oils and flavors. Higher temperatures can cause the herbs to lose their essential oils, resulting in a less flavorful end product. Research from Oregon State University suggests that maintaining a low, consistent temperature is crucial for preserving the quality of dried herbs.
4.3. How Long Does It Take To Dehydrate Herbs?
It typically takes 2-4 hours to dehydrate herbs, depending on the type of herb, the humidity, and the efficiency of the dehydrator. The herbs are done when they are brittle and crumble easily when touched. The Clemson University Cooperative Extension recommends checking the herbs periodically to ensure they do not over-dry.
-
Check for Brittleness: The herbs are done when they are brittle and crumble easily when touched.
-
Monitor Humidity: Adjust the drying time based on the humidity level. Higher humidity may require longer drying times.
-
Check Periodically: Check the herbs periodically to ensure they do not over-dry and lose their flavor.
4.4. What Are Some Tips For Maximizing The Flavor Of Dehydrated Herbs?
Tips for maximizing the flavor of dehydrated herbs include drying them at a low temperature, storing them in airtight containers away from light and heat, and crushing them just before use to release their oils. Drying herbs at low temperatures helps to preserve their volatile oils, which contribute to their flavor and aroma. According to a study by the University of Illinois Extension, proper storage is essential for maintaining the quality of dried herbs.
-
Low-Temperature Drying: Dry the herbs at a low temperature (95°F – 115°F) to preserve their volatile oils.
-
Airtight Storage: Store the dried herbs in airtight containers away from light and heat.
-
Crushing Before Use: Crush the dried herbs just before use to release their oils and maximize their flavor.
4.5. How Should Dried Herbs Be Stored For Long-Term Use?
Dried herbs should be stored in airtight containers in a cool, dark, and dry place to preserve their flavor and aroma for long-term use. Proper storage conditions prevent moisture absorption and protect the herbs from light and heat, which can degrade their quality. The Penn State Extension recommends using dark glass jars or opaque containers to further protect the herbs from light exposure.
-
Airtight Containers: Use airtight containers such as glass jars, resealable plastic bags, or vacuum-sealed bags.
-
Cool, Dark, Dry Place: Store the containers in a cool, dark, and dry place, away from direct sunlight and heat.
-
Dark/Opaque Containers: Use dark glass jars or opaque containers to further protect the herbs from light exposure.
5. Can You Make Fruit Leather In A Food Dehydrator?
Yes, you can make fruit leather in a food dehydrator, providing a healthy and delicious snack made from pureed fruits. A food dehydrator allows for consistent, low-temperature drying, which is ideal for creating a chewy, flexible texture. According to the USDA, fruit leather is a great way to preserve seasonal fruits and create a convenient, portable snack.
-
Apple Fruit Leather: A classic and simple fruit leather made from pureed apples.
-
Strawberry Fruit Leather: Sweet and slightly tart, strawberry fruit leather is a favorite among kids and adults.
-
Mango Fruit Leather: Tropical and flavorful, mango fruit leather is a taste of the tropics.
-
Mixed Berry Fruit Leather: Combine various berries for a flavorful and antioxidant-rich fruit leather.
-
Peach Fruit Leather: Sweet and juicy, peach fruit leather captures the essence of summer.
5.1. What Fruits Work Best For Fruit Leather?
Fruits that work best for fruit leather are those that have a naturally high sugar content and a smooth texture when pureed, such as apples, bananas, berries, mangoes, and peaches. These fruits create a pliable and flavorful leather that is both sweet and nutritious. According to the University of California, Davis, the natural pectin in some fruits also helps to create a better texture in the final product.
- Apples: Apples provide a smooth base and natural sweetness for fruit leather.
- Bananas: Bananas add a creamy texture and natural sweetness to fruit leather.
- Berries: Berries such as strawberries, raspberries, and blueberries add flavor and antioxidants to fruit leather.
- Mangoes: Mangoes provide a tropical flavor and smooth texture for fruit leather.
- Peaches: Peaches add a sweet and juicy flavor to fruit leather.
5.2. Do You Need To Add Sugar When Making Fruit Leather?
Whether you need to add sugar when making fruit leather depends on the natural sweetness of the fruit being used. If using naturally sweet fruits like mangoes or ripe bananas, added sugar may not be necessary. However, for tart fruits like raspberries or cranberries, a small amount of honey, maple syrup, or agave nectar can enhance the flavor. According to food science experts at Utah State University, adding a sweetener can also help improve the texture and pliability of the fruit leather.
- Naturally Sweet Fruits: Fruits like mangoes, ripe bananas, and sweet apples may not require added sugar.
- Tart Fruits: Fruits like raspberries, cranberries, and tart apples may benefit from a small amount of added sweetener.
- Sweetener Options: Honey, maple syrup, agave nectar, or even a small amount of sugar can be used to enhance the flavor and texture of fruit leather.
5.3. How Do You Prevent Fruit Leather From Sticking To The Dehydrator Trays?
To prevent fruit leather from sticking to the dehydrator trays, use parchment paper or silicone liners specifically designed for dehydrators. These liners provide a non-stick surface that makes it easy to peel off the fruit leather once it is dehydrated. The National Center for Home Food Preservation recommends lightly greasing the liners with coconut oil or cooking spray for added insurance against sticking.
- Parchment Paper: Cut parchment paper to fit the dehydrator trays and place it underneath the fruit puree.
- Silicone Liners: Use silicone liners designed for dehydrators, which provide a non-stick surface.
- Lightly Greasing: Lightly grease the liners with coconut oil or cooking spray for added insurance against sticking.
5.4. How Long Does It Take To Dehydrate Fruit Leather?
It takes approximately 4-12 hours to dehydrate fruit leather, depending on the thickness of the puree, the type of fruit, and the temperature of the dehydrator. The fruit leather is done when it is no longer sticky to the touch and can be easily peeled off the liner. The University of Minnesota Extension recommends checking the fruit leather periodically to ensure it does not become too dry or brittle.
- Check for Stickiness: The fruit leather is done when it is no longer sticky to the touch.
- Peeling Test: The fruit leather should be easily peeled off the liner without tearing.
- Flexibility: The fruit leather should be pliable and flexible, not brittle or hard.
5.5. How Should Fruit Leather Be Stored?
Fruit leather should be stored in airtight containers or rolled up in plastic wrap and placed in a resealable bag to prevent it from drying out or becoming sticky. Properly stored fruit leather can last for 1-2 months at room temperature or up to a year in the refrigerator or freezer. The USDA emphasizes the importance of protecting the fruit leather from moisture to prevent spoilage.
- Airtight Containers: Store the fruit leather in airtight containers to prevent moisture absorption.
- Plastic Wrap: Roll up the fruit leather in plastic wrap and place it in a resealable bag.
- Refrigeration/Freezing: For longer storage, keep the fruit leather in the refrigerator or freezer.
6. What About Making Pet Treats With A Food Dehydrator?
Making pet treats with a food dehydrator is a fantastic way to provide your furry friends with healthy, homemade snacks free from artificial additives and preservatives. You can dehydrate a variety of pet-friendly ingredients, such as sweet potatoes, chicken breast, and apples, ensuring that your pets enjoy safe and nutritious treats. According to the American Kennel Club, homemade pet treats can be a great alternative for pets with allergies or sensitivities to commercial products.
-
Sweet Potato Chews: Dehydrated sweet potato slices make excellent, chewy treats for dogs.
-
Chicken Jerky for Pets: Lean chicken breast, dehydrated into jerky, is a high-protein treat for both dogs and cats.
-
Apple Slices: Dehydrated apple slices are a healthy and sweet treat for dogs.
-
Beef Liver Treats: Dehydrated beef liver is a nutrient-rich and flavorful treat for dogs.
-
Fish Skin Treats: Dehydrated fish skins provide a crunchy and omega-3-rich snack for cats and dogs.
6.1. What Ingredients Are Safe To Dehydrate For Pet Treats?
Safe ingredients to dehydrate for pet treats include sweet potatoes, chicken breast, apples, carrots, and lean beef. These foods are generally well-tolerated by pets and provide essential nutrients. It’s important to avoid ingredients that are toxic to pets, such as onions, garlic, grapes, and chocolate. The ASPCA provides a comprehensive list of foods that are toxic to pets, ensuring you can make informed choices when preparing homemade treats.
- Sweet Potatoes: Dehydrated sweet potatoes are a great source of fiber and vitamins for dogs.
- Chicken Breast: Lean chicken breast is a high-protein option for both dogs and cats.
- Apples: Apples provide vitamins and fiber, making them a healthy treat for dogs.
- Carrots: Dehydrated carrots are a low-calorie and nutritious snack for pets.
- Lean Beef: Lean beef is a good source of protein for dogs.
6.2. What Ingredients Should Be Avoided When Making Pet Treats?
Ingredients that should be avoided when making pet treats include onions, garlic, grapes, raisins, chocolate, and any artificial sweeteners, as these can be toxic to pets. Always consult with your veterinarian or a pet nutritionist before introducing new foods into your pet’s diet to ensure their safety. The Pet Poison Helpline offers valuable information on toxic substances for pets, helping you avoid dangerous ingredients.
- Onions and Garlic: These contain compounds that can damage red blood cells in pets.
- Grapes and Raisins: These can cause kidney failure in dogs.
- Chocolate: Chocolate contains theobromine, which is toxic to dogs and cats.
- Artificial Sweeteners: Xylitol, commonly found in sugar-free products, is highly toxic to pets.
6.3. How Should Pet Treats Be Prepared For Dehydration?
Pet treats should be prepared for dehydration by slicing them into thin, uniform pieces to ensure even drying and cooking any raw meats to a safe internal temperature before dehydrating. Cooking the meat beforehand helps to eliminate harmful bacteria and ensures the treats are safe for consumption. According to the FDA, cooking meat to the proper temperature is crucial for preventing foodborne illnesses in pets.
- Slicing: Slice the ingredients into thin, uniform pieces to ensure even drying.
- Cooking Meats: Cook raw meats, such as chicken or beef, to a safe internal temperature before dehydrating.
- Avoiding Seasonings: Avoid adding seasonings, salt, or spices, as these can be harmful to pets.
6.4. What Temperature And Time Settings Are Best For Dehydrating Pet Treats?
The best temperature and time settings for dehydrating pet treats are typically between 130°F and 160°F (54°C and 71°C) for 4-12 hours, depending on the thickness of the treats and the type of ingredient. Monitor the treats closely to ensure they are fully dehydrated and safe for your pets to consume. The USDA recommends that meat products reach an internal temperature of 160°F (71°C) to kill harmful bacteria.
- Temperature: Set the dehydrator between 130°F and 160°F (54°C and 71°C).
- Time: Dehydrate for 4-12 hours, depending on the thickness and type of ingredient.
- Monitoring: Monitor the treats closely to ensure they are fully dehydrated and safe for your pets to consume.
6.5. How Should Homemade Pet Treats Be Stored?
Homemade pet treats should be stored in airtight containers in the refrigerator or freezer to maintain freshness and prevent spoilage. Properly stored pet treats can last for 1-2 weeks in the refrigerator or up to 2-3 months in the freezer. The AVMA recommends labeling the treats with the preparation date to ensure you use them within a safe timeframe.
- Airtight Containers: Store the pet treats in airtight containers to prevent moisture absorption and contamination.
- Refrigeration: Keep the treats in the refrigerator for up to 1-2 weeks.
- Freezing: For longer storage, freeze the treats for up to 2-3 months.
7. Can You Make Yogurt In A Food Dehydrator?
Yes, you can make yogurt in a food dehydrator by using its consistent, low-temperature environment to incubate the yogurt and promote the growth of beneficial bacteria. A food dehydrator maintains a steady temperature, typically around 110°F (43°C), which is ideal for yogurt fermentation. According to a study published in the Journal of Dairy Science, maintaining a consistent temperature during incubation is crucial for achieving the desired yogurt texture and flavor.
-
Plain Yogurt: A basic and versatile yogurt that can be used in various recipes.
-
Greek Yogurt: Thicker and creamier than plain yogurt