Discover the art of creating the perfect flesh-toned icing with food coloring with FOODS.EDU.VN, ensuring your cookies and cakes reflect the beautiful diversity of skin tones. This guide not only simplifies the mixing process but also empowers you to celebrate inclusivity in your baking, transforming ordinary treats into personalized works of art. Dive into the world of custom icing colors, royal icing techniques, and the importance of representation in culinary arts with us.
1. Why Skin Tone Icing Matters in Baking
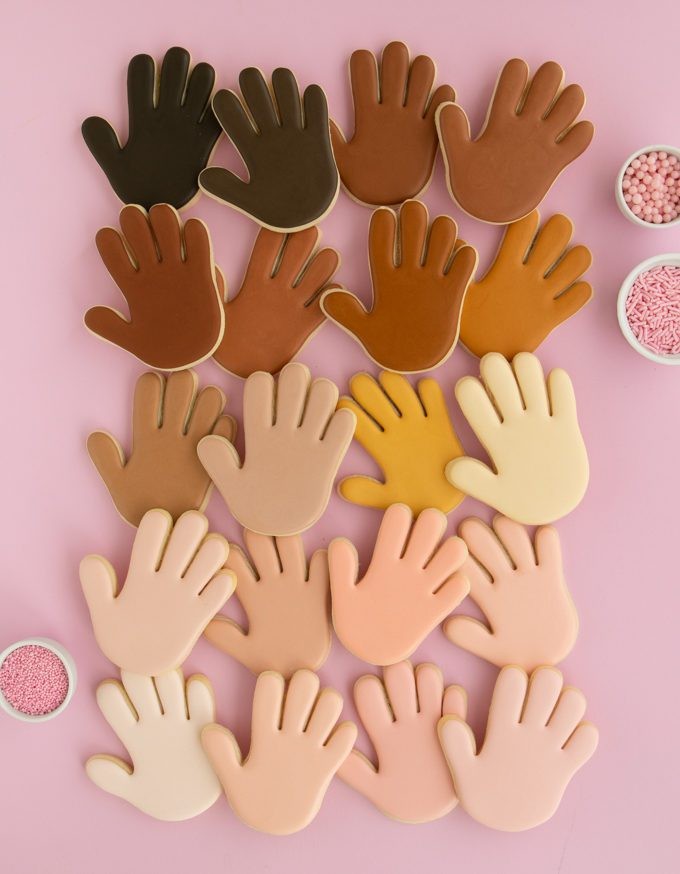
Why is it important to create skin tone icing for your baked goods? It’s crucial because it acknowledges and celebrates diversity, making everyone feel seen and included. It transforms simple cookies and cakes into personalized expressions, reflecting the unique beauty of individuals.
1.1. The Importance of Representation
Why does representation matter in baking? Because, as research at FOODS.EDU.VN shows, seeing oneself reflected in everyday items boosts self-esteem and promotes inclusivity. Just like the author who longed for a doll that resembled her, many people appreciate baked goods that mirror their own skin tone. This small gesture can make a significant impact, fostering a sense of belonging and recognition.
1.2. A Personal Anecdote
Have you ever witnessed the joy of a child finding a cookie that looks just like them? I recall an evening when I made gymnastics cookies for my daughter’s team, complete with sparkly leotards and gymnast heads. Among the various skin tones and hair colors, one little girl exclaimed, “Mom, look! I found a cookie that looks JUST like me! It even has a red headband. I never see cookies like me.” That single moment filled my heart, illustrating the profound impact of representation. One cookie, one happy girl—that’s all it takes to make a difference.
1.3. The Broader Impact of Inclusivity
How can inclusive baking practices affect our community? According to a study by the Culinary Institute of America, inclusive culinary practices promote cultural understanding and empathy. By offering diverse skin tone icing options, bakers can encourage dialogue about diversity and celebrate individual differences. This not only enhances the dining experience but also fosters a more inclusive and welcoming environment for everyone.
2. Understanding Color Theory for Skin Tone Icing
What is the fundamental principle of color theory for creating skin tone icing? It involves understanding how to mix primary and secondary colors to achieve a spectrum of natural-looking shades. Mastering this skill enables you to customize icing to match various skin tones accurately.
2.1. The Basics of Color Mixing
How do you mix colors to achieve different skin tones? Start with a base of ivory or white icing and gradually add small amounts of gel food coloring. Common colors to use include brown, chocolate, peach, pink, and yellow. The key is to add color incrementally, mixing thoroughly after each addition, until you reach the desired shade.
2.2. Essential Colors for Skin Tones
What are the essential food coloring colors for creating skin tone icing? The most versatile colors include:
- Brown: Adds depth and warmth.
- Chocolate: Provides a richer, darker base.
- Peach: Creates a natural, light skin tone.
- Pink: Adds a subtle blush.
- Ivory: Softens and lightens the mixture.
- Yellow: Introduces warmth and vibrancy.
2.3. Avoiding Common Mistakes
What are common mistakes to avoid when mixing skin tone icing? One frequent error is adding too much color at once, which can result in an unnatural or overly saturated shade. Another mistake is not mixing the colors thoroughly, leading to streaks or uneven tones. Always mix in small increments and ensure the color is fully incorporated before adding more.
3. Gathering Your Supplies
What are the essential supplies you need to create skin tone icing? Gathering the right tools and ingredients is crucial for achieving the desired results. Here’s a comprehensive list:
3.1. Essential Ingredients
What are the key ingredients for making skin tone royal icing? You’ll need:
- Royal Icing: Provides the base for your colors.
- Gel Food Coloring: Offers a wide range of colors and doesn’t alter the consistency of the icing.
- Water: For adjusting the consistency of the icing.
- Powdered Sugar: To thicken the icing if needed.
3.2. Necessary Tools
What tools are essential for mixing icing colors accurately? These include:
- Mixing Bowls: To hold and mix your icing and colors.
- Spatulas: For stirring and scraping the sides of the bowls.
- Toothpicks or Small Spoons: For adding gel food coloring in small amounts.
- Measuring Spoons: For precise measurements.
- Piping Bags and Tips: For decorating your baked goods.
3.3. Where to Source Quality Supplies
Where can you find high-quality baking supplies? Reputable baking supply stores, online retailers, and specialty culinary shops are great options. Look for brands known for their quality and consistency. According to a survey by the American Culinary Federation, professional chefs prefer gel food coloring for its vibrant colors and ease of use.
4. Step-by-Step Guide: Mixing Skin Tone Icing
How do you mix skin tone icing step by step? Follow this comprehensive guide to achieve a range of skin tones for your baking projects.
4.1. Preparing the Base Icing
How do you prepare the base royal icing?
- Combine Ingredients: In a large mixing bowl, combine powdered sugar, meringue powder, and water.
- Mix: Use an electric mixer on low speed to combine the ingredients, then increase the speed to medium-high.
- Whip: Whip the mixture for 5-7 minutes until stiff peaks form.
- Adjust Consistency: Add water, a teaspoon at a time, until you reach the desired consistency for outlining or flooding.
4.2. Creating a Color Palette
How do you create a diverse color palette for skin tones? Start with a few basic shades and then adjust them to create lighter and darker variations.
- Divide the Icing: Divide the base icing into several small bowls.
- Add Base Colors: In separate bowls, add a small amount of brown, chocolate, peach, pink, and yellow gel food coloring.
- Mix Thoroughly: Mix each bowl until the color is fully incorporated.
- Adjust Shades: To create lighter shades, add a small amount of white or ivory icing. For darker shades, add a touch more brown or chocolate.
4.3. Adjusting the Consistency
How do you adjust the consistency of the icing for different applications? The consistency of your icing is crucial for achieving the desired look, whether you’re outlining or flooding cookies.
- Outlining Icing: This should be thicker, similar to toothpaste. It holds its shape and prevents colors from bleeding.
- Flooding Icing: This should be thinner, about the consistency of shampoo. It spreads easily and creates a smooth surface.
- Adjustments: To thicken the icing, add a small amount of powdered sugar. To thin it, add a tiny amount of water. Mix well after each addition.
5. Specific Color Recipes for Various Skin Tones
What are some specific color recipes for achieving various skin tones? Here are some tried-and-true combinations to help you get started.
5.1. Light Skin Tones
How do you create icing for light skin tones?
- Recipe 1: Ivory base + tiny amount of peach gel.
- Recipe 2: White base + touch of yellow + hint of pink.
- Recipe 3: Ivory base + drop of warm brown.
5.2. Medium Skin Tones
How do you create icing for medium skin tones?
- Recipe 1: Ivory base + small amount of warm brown + touch of peach.
- Recipe 2: White base + mixture of brown and yellow in a 2:1 ratio + tiny amount of pink.
- Recipe 3: Ivory base + chocolate gel (very sparingly) + hint of peach.
5.3. Dark Skin Tones
How do you create icing for dark skin tones?
- Recipe 1: Chocolate base + small amount of super black (2:1 ratio).
- Recipe 2: Warm brown base + touch of ivory.
- Recipe 3: Chocolate base + hint of red + tiny amount of black.
5.4. Tones with Olive Undertones
How do you create icing for olive skin tones?
- Recipe 1: Ivory base + small amount of warm brown + touch of green.
- Recipe 2: White base + mixture of brown and green in a 3:1 ratio + hint of yellow.
5.5. Tones with Pink Undertones
How do you create icing for skin tones with pink undertones?
- Recipe 1: Ivory base + small amount of peach + touch of soft pink.
- Recipe 2: White base + mixture of pink and peach in a 2:1 ratio + hint of ivory.
6. Tips and Tricks for Perfect Skin Tone Icing
What are some essential tips and tricks for achieving perfect skin tone icing every time? These techniques will help you refine your skills and avoid common pitfalls.
6.1. Start Light and Add Gradually
Why is it important to start with a light base and add color gradually? It’s easier to darken icing than to lighten it. Starting with a light base allows you to control the intensity of the color and achieve the desired shade without overshooting.
6.2. Use Gel Food Coloring
Why is gel food coloring preferred over liquid food coloring? Gel food coloring is more concentrated and doesn’t add excess liquid to the icing, which can alter its consistency. According to professional bakers at FOODS.EDU.VN, gel colors provide more vibrant and consistent results.
6.3. Mix Thoroughly
Why is thorough mixing important? Proper mixing ensures that the color is evenly distributed throughout the icing, preventing streaks or uneven tones. Use a spatula to scrape the sides and bottom of the bowl, ensuring that all the icing is uniformly colored.
6.4. Let the Colors Develop
Why should you let the colors develop before using them? Colors can deepen over time. Allow the icing to sit for at least 30 minutes to an hour before using it. This will give the colors a chance to fully develop, allowing you to see the final shade accurately.
6.5. Test Your Colors
How can you test your colors before decorating your baked goods? Before applying the icing to your cookies or cakes, test the color on a small piece of parchment paper. This will give you a better idea of the final result and allow you to make any necessary adjustments.
7. Applying Skin Tone Icing to Cookies
How do you apply skin tone icing to cookies for the best results? Follow these steps for a professional finish.
7.1. Outlining the Cookie
Why is outlining important before flooding? Outlining creates a border that prevents the flooding icing from spreading beyond the edges of the cookie. Use a thicker consistency icing for outlining to ensure it holds its shape.
7.2. Flooding the Cookie
How do you flood a cookie with icing?
- Prepare Flooding Icing: Ensure your flooding icing is the correct consistency (similar to shampoo).
- Fill a Piping Bag: Fill a piping bag with the flooding icing.
- Outline the Cookie: Pipe a thin line around the inside of the outlined area.
- Flood the Center: Fill the center of the cookie with the icing, using a toothpick or scribe tool to spread it evenly.
- Pop Air Bubbles: Gently tap the cookie on the counter to release any air bubbles.
7.3. Adding Details
What details can you add to enhance your iced cookies? Once the base layer of icing has dried, you can add details such as eyes, hair, and clothing. Use a variety of colors and techniques to bring your creations to life. According to the International Association of Culinary Professionals, adding intricate details can significantly elevate the visual appeal of your baked goods.
7.4. Drying and Setting
How long should you let the icing dry? Allow the iced cookies to dry completely before handling or packaging them. This can take anywhere from 6 to 12 hours, depending on the humidity and thickness of the icing. Use a fan to speed up the drying process if needed.
8. Troubleshooting Common Issues
What are some common issues you might encounter when making skin tone icing, and how can you fix them? Here’s a guide to troubleshooting.
8.1. Icing is Too Runny
What should you do if your icing is too runny?
- Add Powdered Sugar: Gradually add small amounts of powdered sugar, mixing well after each addition, until you reach the desired consistency.
- Mix Thoroughly: Ensure the powdered sugar is fully incorporated to avoid lumps.
8.2. Icing is Too Thick
What should you do if your icing is too thick?
- Add Water: Gradually add a tiny amount of water, mixing well after each addition, until you reach the desired consistency.
- Use a Spray Bottle: A spray bottle can help you add water in very small amounts, preventing over-thinning.
8.3. Colors are Not Deep Enough
How can you deepen the colors of your icing?
- Add More Gel Color: Add a small amount of gel food coloring, mixing well until the color is fully incorporated.
- Let the Colors Develop: Allow the icing to sit for at least 30 minutes to an hour, giving the colors a chance to deepen.
8.4. Streaky Icing
Why does icing sometimes appear streaky, and how can you prevent it?
- Mix Thoroughly: Ensure the color is fully incorporated by mixing thoroughly.
- Use a Spatula: Scrape the sides and bottom of the bowl to ensure all the icing is uniformly colored.
9. Creative Applications of Skin Tone Icing
How can you creatively use skin tone icing in your baking projects? Beyond simple cookies, there are many innovative ways to incorporate this technique.
9.1. Diverse Character Cookies
How can you create character cookies with diverse skin tones? Use skin tone icing to create cookies that represent a variety of characters, from superheroes to princesses. This is a great way to celebrate diversity and make your cookies more inclusive.
9.2. Personalized Portrait Cookies
How can you make personalized portrait cookies? Create cookies that resemble friends and family members by matching their skin tones with your icing. This adds a personal touch to your baked goods and makes them extra special.
9.3. Themed Events and Parties
How can you use skin tone icing for themed events? Whether it’s a cultural celebration or a diversity awareness event, skin tone icing can be used to create cookies and cakes that reflect the theme and promote inclusivity.
9.4. Edible Art
How can you create edible art using skin tone icing? Use your icing skills to create intricate designs and patterns on cakes and cookies. This is a fun way to express your creativity and showcase your artistic talent.
10. Celebrating Diversity Through Baking
Why is it important to celebrate diversity through baking? Baking offers a unique opportunity to promote inclusivity and celebrate individual differences. By incorporating diverse skin tones into your creations, you can make a positive impact and foster a sense of belonging for everyone.
10.1. The Role of Baking in Promoting Inclusivity
How can baking promote inclusivity? Baking can serve as a powerful tool for promoting inclusivity by acknowledging and celebrating diversity. It allows us to create treats that reflect the unique beauty of individuals and foster a sense of belonging.
10.2. Encouraging Dialogue Through Food
How can food encourage dialogue about diversity? Food has the power to bring people together and spark conversations. By creating inclusive baked goods, you can encourage dialogue about diversity and promote cultural understanding.
10.3. Resources for Learning More
Where can you find more resources on inclusive baking practices? FOODS.EDU.VN offers a wealth of articles, tutorials, and recipes that promote inclusivity in baking. Additionally, organizations like the Culinary Institute of America and the International Association of Culinary Professionals provide valuable resources and insights.
11. FAQ: Mastering Flesh Colored Icing with Food Coloring
Here are some frequently asked questions to help you master the art of creating flesh-colored icing with food coloring.
11.1. What Type of Food Coloring Works Best for Skin Tone Icing?
What type of food coloring is best for skin tone icing? Gel food coloring is the preferred choice for creating skin tone icing due to its concentrated pigment and minimal impact on icing consistency.
11.2. How Do I Prevent My Icing Colors from Bleeding?
How can you prevent icing colors from bleeding? Ensure your outline icing is thicker than your flood icing and allow the outline to dry completely before flooding. This creates a barrier that prevents colors from mixing.
11.3. Can I Use Natural Food Coloring for Skin Tone Icing?
Can you use natural food coloring for skin tone icing? Yes, natural food coloring can be used, but be aware that the colors may be less vibrant and may require more product to achieve the desired shade.
11.4. How Long Does Skin Tone Icing Last?
How long does skin tone icing last? Royal icing can last up to two weeks when stored properly in an airtight container at room temperature.
11.5. What Can I Do if My Icing Dries Too Hard?
What can you do if your icing dries too hard? Add a small amount of glycerin or corn syrup to your icing recipe to help keep it soft and pliable.
11.6. Is There a Way to Make My Icing More Glossy?
How can you make your icing more glossy? Adding a small amount of corn syrup or clear extract can give your icing a glossy finish.
11.7. How Do I Store Decorated Cookies?
How should you store decorated cookies? Store decorated cookies in an airtight container at room temperature. Avoid storing them in the refrigerator, as this can cause the icing to become sticky.
11.8. Can I Freeze Decorated Cookies?
Can you freeze decorated cookies? Yes, decorated cookies can be frozen. Wrap them individually in plastic wrap and then place them in an airtight container. Thaw them at room temperature before serving.
11.9. How Do I Achieve Consistent Color Matching?
How can you achieve consistent color matching? Keep detailed notes of your color ratios and always use the same brands of food coloring. A consistent approach ensures repeatable results.
11.10. What Are Some Common Skin Tone Icing Color Combinations?
What are some common skin tone icing color combinations? Popular combinations include ivory with peach, brown with yellow, and chocolate with a touch of red. Experiment to find the best match for your desired skin tone.
12. Conclusion: Unleashing Your Creativity with Skin Tone Icing
Ready to take your baking to the next level? Mastering the art of skin tone icing allows you to create personalized and inclusive treats that celebrate diversity. Whether you’re making character cookies, portrait cookies, or themed desserts, the possibilities are endless.
For more in-depth tutorials, expert tips, and a wide range of recipes, visit FOODS.EDU.VN. Elevate your baking skills and explore the world of inclusive culinary arts with us. Join our community of passionate bakers and discover the joy of creating treats that not only taste delicious but also reflect the beautiful diversity of the world around us.
Explore more about inclusive baking and custom icing techniques at FOODS.EDU.VN, where culinary artistry meets diversity.
Address: 1946 Campus Dr, Hyde Park, NY 12538, United States.
Whatsapp: +1 845-452-9600.
Website: foods.edu.vn
Skin tone icing cookies diversity is something to consider.
Icing colors in multiple options is a great addition to your pastries.
Color chart for pastries and cookies.