If you’re looking for a delightful pastry that combines buttery layers with a sweet, nutty filling, look no further than the bear claw. This charming pastry, with its distinctive shape resembling a bear’s claw, is a treat that’s sure to impress. Adapted from a classic Danish pastry technique, this recipe brings the joy of homemade baking right to your kitchen. Imagine biting into a bear claw, the outside boasting a golden brown, flaky crust giving way to a soft interior, all wrapped around a generous swirl of homemade almond paste. It’s a sweet, nutty, and utterly satisfying experience, perfect for breakfast, brunch, or a special dessert.
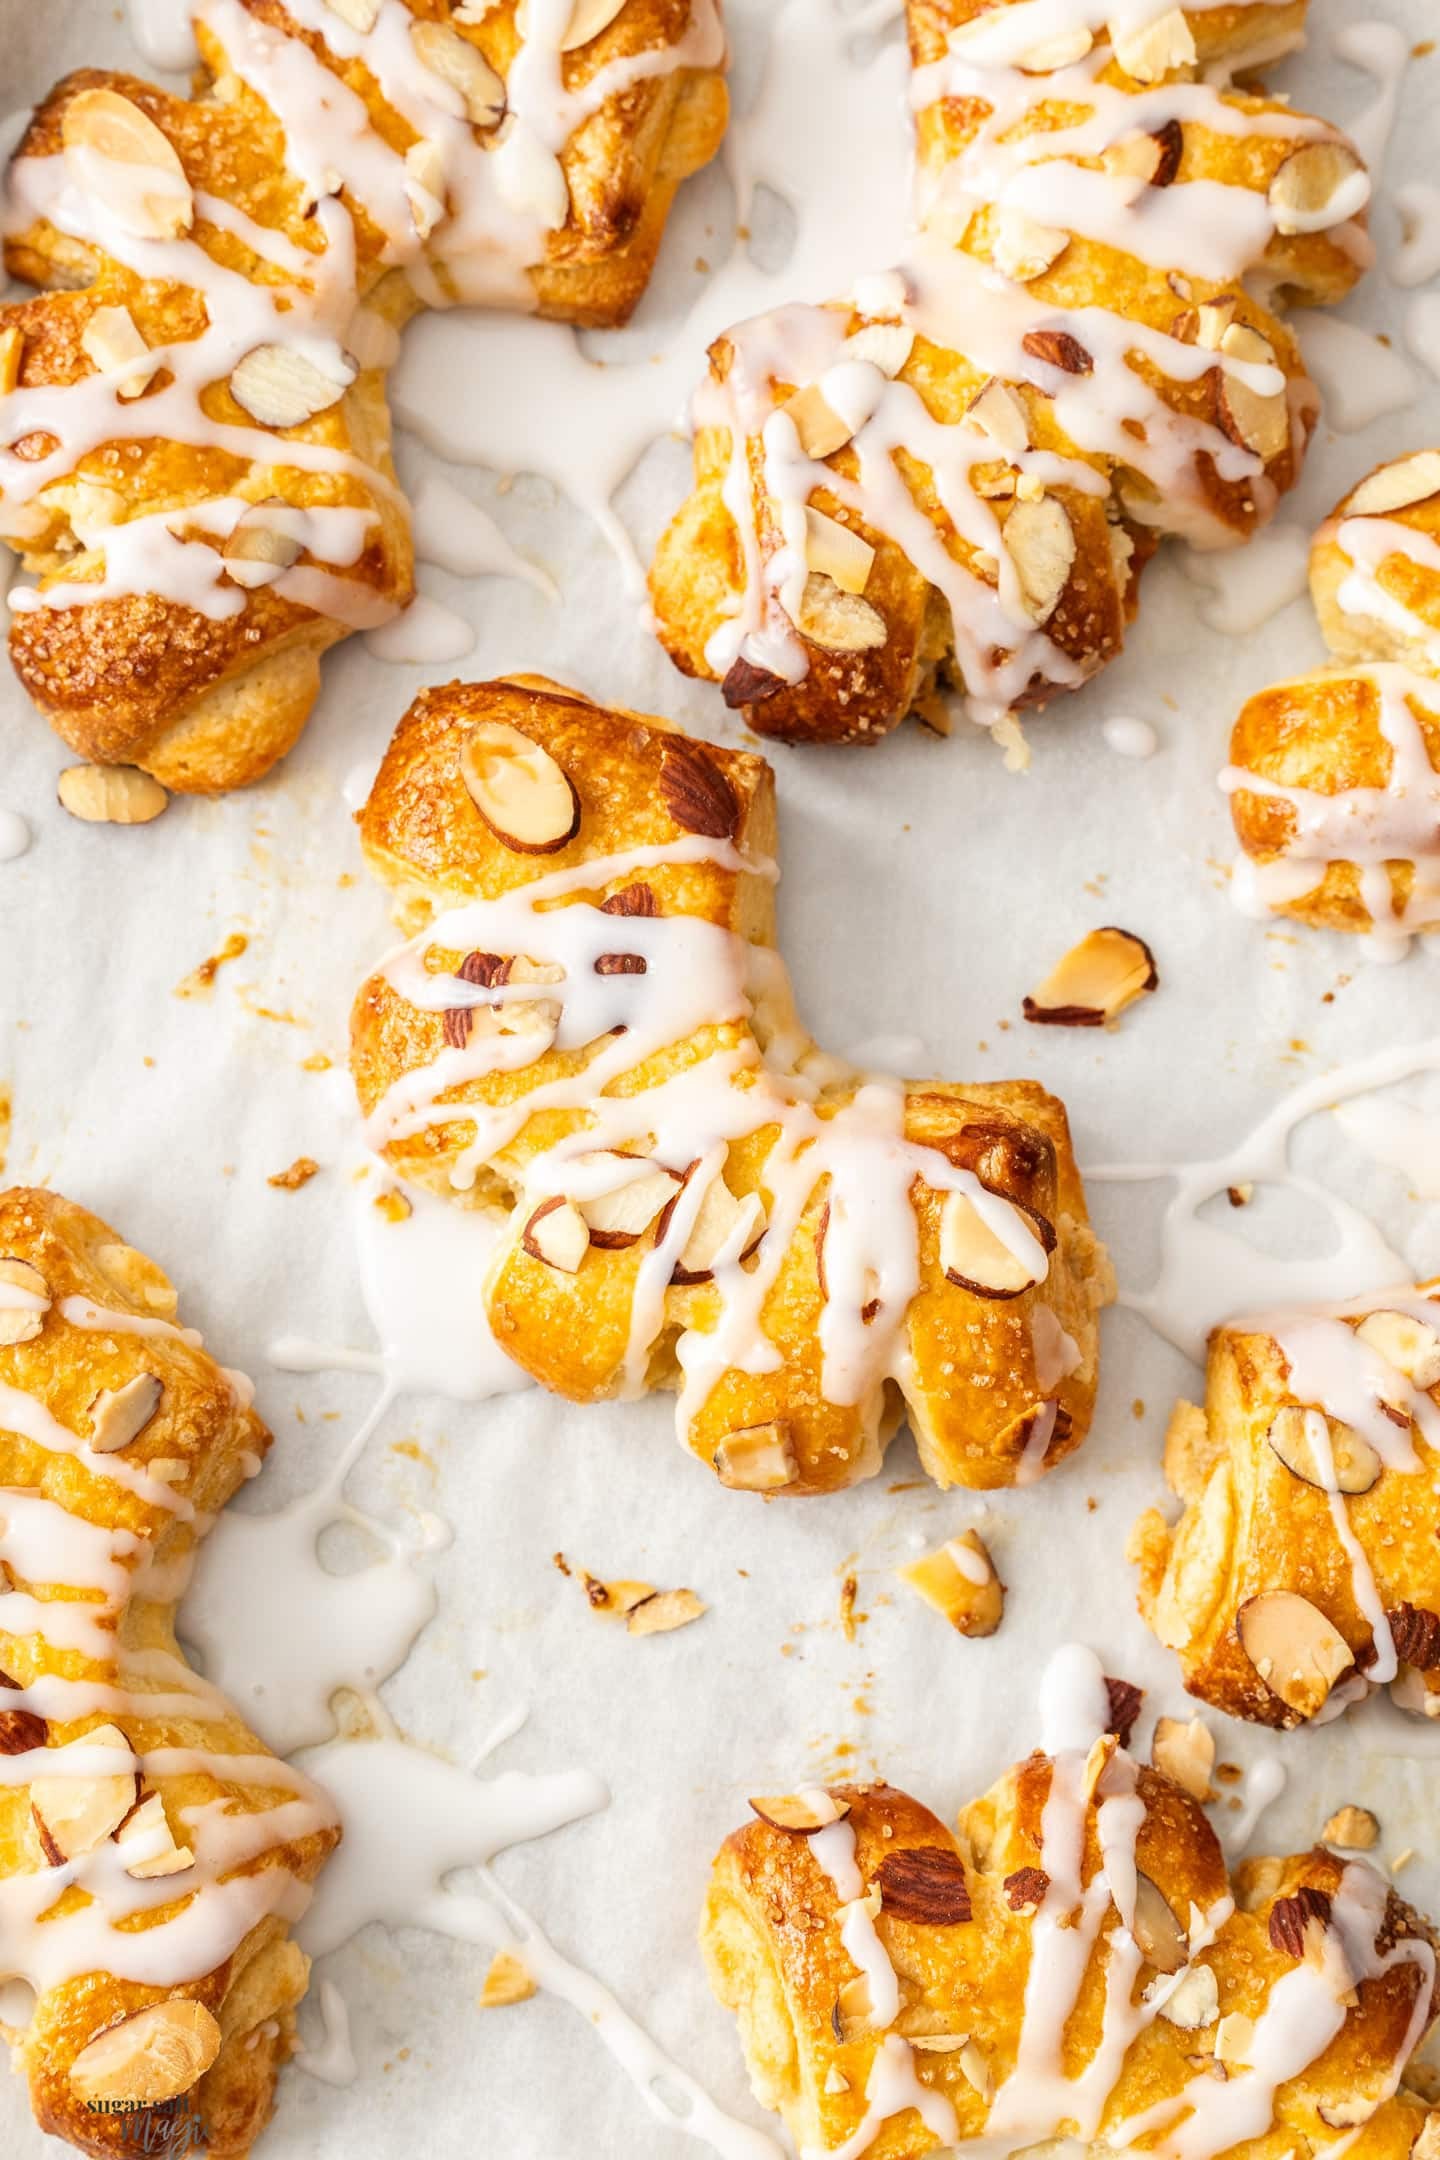 Top down view of a bear claw pastry.
What is Bear Claw Pastry?
The bear claw isn’t just any pastry; it’s a specific type of Danish pastry that holds a special place in American baking history. Believed to have originated in California in the early 20th century, the bear claw is recognized for its unique, hand-like shape with ‘claws’ created by strategic cuts and spreading during baking. What truly sets it apart is the rich almond filling nestled within layers of flaky, buttery dough. Often topped with sliced almonds and a sprinkle of sugar, the bear claw offers a delightful combination of textures and flavors. It’s a testament to the creativity of pastry chefs who transformed simple dough into an iconic and beloved treat.
Why You’ll Love This Bear Claw Recipe
Creating bear claws at home might sound ambitious, but this recipe is designed to be approachable and rewarding for home bakers. Here’s why you’ll be reaching for your apron:
- Incredibly Delicious: The combination of flaky pastry and sweet almond filling is simply irresistible. Each bite is a perfect balance of buttery richness and nutty sweetness.
- Easier Than Croissants: While both croissants and bear claws utilize laminated dough, the technique for bear claws is significantly simplified, making it a fantastic introduction to layered pastry.
- Homemade Almond Paste Option: This recipe encourages making your own almond paste, adding an extra layer of homemade goodness and allowing you to control the flavor and sweetness.
- Step-by-Step Guidance: With detailed instructions and helpful photos, this guide walks you through each step, ensuring your bear claw baking adventure is a success, even if you’re new to pastry making.
- Impressive Results: Imagine presenting warm, homemade bear claws to your family or friends. These pastries look as impressive as they taste, making them perfect for special occasions or weekend indulgences.
Ingredients for Bear Claw Pastry
To embark on your bear claw baking journey, you’ll need a selection of basic baking ingredients, along with the star of the show – almond paste. If you can’t find ready-made almond paste, don’t worry, this recipe makes it easy to prepare from scratch. For those seeking a shortcut, puff pastry can be used, although the homemade dough truly elevates the texture and flavor.
Pastry Ingredients:
- Flour: All-purpose flour forms the base of this pastry, providing structure and the right texture for layering.
- Sugar: Granulated sugar adds sweetness to the dough and aids in browning, creating that beautiful golden crust.
- Milk: Whole milk is recommended for richness, but you can use other types of milk, including plant-based alternatives, with slight variations in flavor and texture.
- Butter: Unsalted butter, kept cold, is crucial for creating the flaky layers in the pastry. The grating and folding technique evenly distributes the butter throughout the dough.
- Instant Yeast: Instant yeast simplifies the dough-making process. Active dry yeast can also be used.
- Egg: An egg contributes to the dough’s richness and structure.
Almond Paste Filling Ingredients:
- Softened Butter: Butter in the filling adds moisture and richness, complementing the almond paste.
- Icing Sugar: Powdered sugar sweetens the filling and creates a smooth, creamy texture.
- Almond Paste: The heart of the filling, providing that signature almond flavor. Ensure you are using almond paste and not marzipan, as they have different compositions and sweetness levels.
- Almond Extract: Enhances the almond flavor, giving the filling an extra aromatic boost. Use extract, not essence, for a more authentic taste.
- Egg White: Binds the filling ingredients together and adds a slight lightness.
Topping Ingredients:
- Egg Yolk (for Egg Wash): Beaten with a little water, egg wash gives the pastries a glossy, golden-brown finish.
- Demerara Sugar: Also known as turbinado sugar, its large crystals provide a delightful crunch and visual appeal to the pastry topping.
- Flaked Almonds: Add a final touch of almond flavor and a delicate crunch. Unblanched or blanched sliced almonds both work well.
- Icing Sugar & Water (for Drizzle): A simple glaze made with icing sugar and water (or milk, or lemon juice) adds a touch of sweetness and visual elegance after baking.
Step-by-Step Guide to Making Bear Claw Pastry
Making bear claws is a rewarding process, broken down into manageable steps. Follow this guide, and you’ll be enjoying freshly baked bear claws in no time. Remember to check the recipe card at the end for precise measurements and baking times.
Making the Pastry Dough
-
Activate the Yeast: In a bowl, warm half of the milk until it’s just lukewarm. Dissolve a bit of sugar and instant yeast in it. Let it sit for 5-10 minutes until it becomes frothy, indicating the yeast is active. This step is a quick insurance to ensure your dough will rise properly.
-
Combine Dry and Wet Ingredients: In a large mixing bowl, whisk together flour, remaining sugar, and salt. In a separate bowl, whisk together the remaining milk and egg with the yeast mixture. Pour the wet ingredients into the dry ingredients.
-
Mix and Knead the Dough: Use a spoon or spatula to mix until a shaggy dough forms. Turn the dough out onto a lightly floured surface and knead for just a few minutes until it comes together into a mostly smooth ball. Flatten the dough slightly into a disc.
Combining the wet and dry ingredients to form the initial dough for homemade bear claw pastry.
Kneading the dough on a lightly floured surface to develop a smooth texture.
Rolling and Folding the Dough (Lamination)
This is where the magic happens, creating those beautiful layers of flaky pastry.
-
First Roll and Butter Incorporation: Roll the dough into a large rectangle. Using a box grater on the coarse side, grate cold butter evenly over the surface of the dough. Work quickly to keep the butter cold.
-
Letter Fold: Fold the dough in thirds, like folding a letter. Bring one short side of the rectangle over to cover the middle third, then fold the opposite short side over the top.
-
First Turn: Fold the resulting long rectangle in half to form a square. This completes the first ‘turn’, layering butter and dough.
Performing a letter fold to create layers in the bear claw pastry dough.
-
Repeat Rolling and Folding: Roll the square back into a large rectangle. Repeat the letter fold as before. This is your second turn.
-
Multiple Turns for Flakiness: Repeat the rolling and letter folding process three more times, for a total of five turns. With each turn, the dough will become smoother and less sticky. If the dough resists rolling, let it rest for 5 minutes before continuing.
-
Chill the Dough: Divide the dough into two squares. You’ll notice the beautiful layers you’ve created! Wrap each square tightly in plastic wrap and refrigerate for at least 4 hours, or up to 24 hours. Chilling is crucial for the butter to firm up and the dough to relax, making it easier to work with and ensuring flaky layers.
Cross-section of the laminated dough, revealing the distinct layers of butter and dough.
Shaping and Filling the Bear Claws
-
Roll and Cut Strips: On a lightly floured surface, roll out one square of chilled dough into a larger square, about 11 inches (27cm). Trim the edges to create a perfect square, and then cut it into three equal strips.
-
Prepare Almond Filling: In a bowl, beat together softened butter, icing sugar, almond paste, almond extract, and egg white until smooth and creamy. Transfer the filling to a piping bag for easy application.
-
Fill the Pastry Strips: Pipe a line of almond filling down the center of each pastry strip.
-
Enclose the Filling: Fold one long edge of the dough over the filling to meet the other edge, encasing the almond paste. Gently press the edges to seal.
Piping almond paste filling down the center of pastry strips ready to be shaped into bear claws.
-
Shape the Claws: Cut each filled strip into three equal pieces. On the filled side of each piece, make four slits perpendicular to the filling, creating the ‘claws’.
-
Rest and Prepare for Baking: Gently curve each pastry into a bear claw shape, splaying the ‘claws’ slightly open. Place them on a baking sheet lined with parchment paper. Let them rest for 30-60 minutes at room temperature. This resting period allows the gluten to relax and the yeast to slightly activate again, resulting in a more tender pastry.
Shaping the bear claw pastries and arranging them on a baking sheet before resting and baking.
Baking Your Bear Claws
-
Preheat and Prepare: Preheat your oven to 395°F (200°C). Brush the rested bear claws with egg wash. Sprinkle generously with demerara sugar and flaked almonds.
-
Bake to Golden Perfection: Bake for 18-20 minutes, or until the bear claws are beautifully golden brown and puffed up. Bake one tray at a time for even baking.
-
Cool and Drizzle: Let the baked bear claws cool on a wire rack to room temperature. Prepare a simple glaze by mixing icing sugar with a teaspoon of water (or milk or lemon juice) until it reaches a drizzlable consistency. Drizzle the glaze over the cooled pastries.
Golden brown, freshly baked bear claw pastries, ready to be glazed and enjoyed.
Tips for Perfect Bear Claws
- Weigh Your Ingredients: For consistent and best results, especially in baking, use a kitchen scale to weigh your ingredients, particularly flour and sugar. This ensures accuracy and avoids variations caused by cup measurements.
- Don’t Over-Flour: When rolling out the dough, use only as much flour as needed to prevent sticking. Excess flour can make the dough dry and tough. Dust your work surface and rolling pin lightly, and check frequently to ensure the dough isn’t sticking.
- Keep Butter Cold: Cold butter is key to creating flaky layers. Work quickly when grating and folding the butter, and ensure the dough is properly chilled between turns.
- Chilling Time is Essential: Don’t rush the chilling process. Adequate chilling time allows the butter to solidify and the dough to relax, making it easier to roll and resulting in flakier pastries.
- Rest Before Baking: The final resting period before baking is important for allowing the dough to puff up slightly and become more tender.
Frequently Asked Questions (FAQs)
What exactly is a bear claw?
A bear claw is a type of sweet Danish pastry filled with almond paste and shaped to resemble a bear’s claw. It’s a popular pastry, especially in the United States, known for its flaky layers and delicious almond flavor. Its origin is traced back to California in the early 20th century.
How to Store Bear Claws
Baked bear claws are best enjoyed fresh, but they can be stored in an airtight container at room temperature for 2-3 days. After the first day, they are best slightly warmed in a microwave for about 10 seconds to refresh their texture. For longer storage, you can freeze unbaked pastry dough and filling separately. Thaw them in the refrigerator overnight before assembling and baking.
More Pastry Recipes to Explore
If you enjoyed making bear claws, why not try your hand at other delicious pastries? Explore these recipes for more baking inspiration:
- Cream Cheese Strawberry Danish: A delightful twist on classic Danish pastry with a creamy cheese and fruity strawberry filling.
- Lemon Curd Danish Pastries: Tangy and sweet lemon curd encased in flaky Danish dough – a perfect balance of flavors.
Did you try this recipe for bear claws? Leave a rating and comment below the recipe – your feedback is valuable and helps other bakers!
Hungry for more baking adventures? Subscribe to our newsletter for free recipes delivered straight to your inbox. You can also find us on Facebook, Pinterest and Instagram for more delicious inspiration!
Bear Claw Pastry Recipe
Yield: 18 pastries
Prep Time: 45 minutes
Cook Time: 18 minutes
Chilling/Resting Time: 4 hours 30 minutes
Total Time: 5 hours 33 minutes
(5 stars, 18 ratings)
These bear claws (or bear claw pastry) are buttery, soft, and flaky Danish dough filled with a sweet almond filling and topped with sugar and almonds. They’re fun to make and totally irresistible.
Print Recipe Rate Recipe Pin Recipe
Ingredients
FOR THE PASTRY (see notes for puff pastry)
- 1 cup cold milk (250ml)
- 2 ½ teaspoons instant or active dry yeast (notes 1)
- 425 g plain flour (all-purpose flour) (3 ¼ cups / 15oz)
- ⅓ cup white granulated sugar (66g / 2.3oz)
- ½ teaspoon salt
- 1 large egg
- 226 g cold unsalted butter (1 cup/8oz)
ALMOND PASTE FILLING
- 45 g softened butter (3 tablespoons / 1 ½oz)
- ½ cup icing sugar
- 300 g almond paste, room temperature (10.5oz)
- ½ teaspoon almond extract
- 1 egg white
TOPPING
- 1 egg yolk beaten with a teaspoon of water (egg wash)
- 1 teaspoon demerara sugar (turbinado sugar)
- ¼ cup flaked almonds
- 1 cup icing sugar (powdered sugar)
- 2-3 teaspoons water (or milk or lemon juice)
For best results, always weigh ingredients where a weight is provided.
Equipment
- Large mixing bowls
- Measuring cups and spoons or kitchen scale
- Box grater
- Rolling pin
- Piping bag
- Baking sheets
- Parchment paper
- Wire rack
Instructions
- Prep the yeast: Warm ½ cup of the milk in the microwave or a small saucepan, just until warm to the touch (not hot) or about 40C/104F. Too hot and you’ll kill the yeast, too cold and the yeast won’t bloom.
- To the warm milk, add 1 tablespoon sugar and all the yeast and mix. Let it sit for 5-10 minutes to become frothy. If it doesn’t look frothy, the yeast is no good and you’ll need to start again with a new pack of yeast.
- Combine dough ingredients: To a large bowl add the flour, remaining sugar, and the salt. Give it a whisk to combine.
- Whisk the remaining ½ cup milk and the egg into the yeast mixture until well combined, then pour it into the dry ingredients.
- Use a spoon or spatula to mix the ingredients together to a rough and sticky dough.
- Turn the dough out onto a lightly floured surface and just knead it enough to pull it together fully. Re-dust the work top with flour if needed but be careful not to add too much flour as it will dry out the dough. Form a simple rectangle.
- First roll & adding butter: Roll out to a large rectangle roughly 30x40cm (12x16inches). Use a box grater to grate the cold butter over the top – as quickly as you can so it doesn’t start melting in your hand. Fold the dough letter style in thirds (fold the shortest side over the middle third, then the other side over that). Fold the whole thing in two, into a square.
- Roll and folds: Roll it out to a large rectangle again sprinkling over a little flour to stop it sticking to the rolling pin or worktop if needed. Fold, letter style again, then repeat this roll and fold 3 more times.– Each time you fold it, brush off any excess flour from the folded section.– The last time, the dough will be getting quite tight and tough to roll out. If it’s too tight, just let it sit there for 5 minutes to give it a chance to relax and come back to it. You could stop at the third time but that extra roll and fold makes a huge difference.
- Cut the dough into two square pieces, cover with plastic wrap and chill in the fridge for 4 or up to 24 hours.
- The bear claw filling: Add the butter and sugar to the bowl of a stand mixer with paddle attachment or into a large bowl if using a handheld electric mixer. Start beating on low.
- Once it starts coming together, add half the almond paste, torn into smaller pieces. Beat to combine.
- Add the egg white and almond extract and beat until combined and smooth before beating in the remaining almond paste.
- Transfer to a piping bag with roughly a ½ inch opening.
- Cut, fill and shape the bear claws: On a lightly very lightly floured surface, roll the first piece out to just over 27cm square (11 inches square) – I say just over so that you have enough overhang to trim the edges square. Trim the edges from the rolled dough to square them up so that it is now exactly 27cm/11 inches square.
- Cut the rolled dough into 3 even strips, 9cm/3 ½ inches wide.
- you can repeat the rolling and cutting process for the second square of dough or wrap it tightly in plastic wrap and freeze for a second batch at a later time.
- Pipe a line of almond paste mixture down the center of each one using about 1/6 of the filling per strip of pastry. If you’re freezing half the dough, you can also freeze half the filling separately.
- For each strip, run a damp finger along the right-hand edge, then fold the long edges together, over the filling. With the edge of your hand on the seam, gently press on the filled side to flatten it very slightly.
- The logs might have stretched out so just tap the ends in to get it back to around 27cm/11inches long. Cut each log into 3 even pieces.
- Seam side facing away from you, cut 4 slits, 2cm/¾ inch deep, in the folded/filled side of each pastry.
- Place the pastries onto a large baking sheet lined with baking paper and carefully curve them so the “claws” splay open a little.
- Sit at room temperature for 30 minutes to rest and puff a little and try to keep away from any warm spots. They won’t rise up much, that’s ok but resting is important.
- Preheat the oven to 200C (180C fan) / 395F.
- Brush the tops of the pastries with egg wash. Sprinkle over demerara sugar and sliced almonds.
- Bake for 18-20 minutes or until golden, 1 tray at a time, until golden brown.
- Totally optional: Some of the almond paste pushes out between the claws and it still looks gorgeous but to get the look of the individual claws, I just use a knife to gently push that filling back inside the claw while still hot.
- Let the pastries cool at least to room temperature, then mix together the icing sugar and water so that it’s just pourable (not too runny) and drizzle over the pastries.
- Please take a moment to leave a comment & rating. It’s appreciated and so helpful.
Recipe Notes
- Yeast: You can use instant or active dry yeast.
- Puff pastry: You can use puff pastry in place of the homemade Danish dough. While it will have a different texture, they’ll still be delicious. Use 2 puff pastry sheets, each one should cut into 9 pieces almost the same size as recommended in the recipe.
- For best results, you should always weigh ingredients like flour and sugar. Kitchen scales are relatively cheap but if you can’t weigh the ingredients, use the spoon and level method (don’t scoop).
MORE DELICIOUS PASTRIES!
Nutritional Information:
Calories: 351kcal
Author: Marie Roffey
Course: Breakfast, Dessert
Cuisine: American
Have you tried this recipe? Don’t forget to leave a rating and comment below and let me know how it was! I love hearing from you. Nutrition information is approximate and derived from an online calculator. The brands you use may cause variations.
Nutrition Facts
Bear Claw Pastry
Amount Per Serving
Calories 351 Calories from Fat 171
% Daily Value*
Fat 19g 29%
Saturated Fat 9g 56%
Trans Fat 0.5g
Polyunsaturated Fat 2g
Monounsaturated Fat 7g
Cholesterol 55mg 18%
Sodium 176mg 8%
Potassium 123mg 4%
Carbohydrates 41g 14%
Fiber 2g 8%
Sugar 21g 23%
Protein 6g 12%
Vitamin A 428IU 9%
Vitamin C 0.02mg 0%
Calcium 59mg 6%
Iron 2mg 11%
*Percent Daily Values are based on a 2000 calorie diet.