Have you ever wanted to capture the beauty of your culinary creations? Food Photography opens up a world of exciting opportunities, from food blogging and captivating Instagram feeds to crafting stunning e-books and showcasing products. Beyond its practical applications, food photography is a fantastic creative outlet, allowing you to play with colors, textures, and develop your unique artistic style. As a food photography enthusiast at foods.edu.vn, I frequently encounter aspiring photographers seeking guidance. Let’s dive into this introductory guide to food photography and explore how you can take mouth-watering photos!
Choosing Your Camera for Food Photography
The first step in your food photography journey is selecting the right camera. If you’re just starting, a point-and-shoot camera can be an excellent entry point due to its affordability and user-friendliness. These cameras are designed for simplicity – simply point and shoot, making them easy to learn the basics.
For those seeking more control and image quality, a DSLR (Digital Single Lens Reflex) camera is a significant step up. While DSLRs come with a higher price tag and a steeper learning curve, the investment is often worthwhile. DSLR cameras use a mirror and prism system that allows you to see exactly what the lens sees, offering greater precision in framing and focus. Switching to a DSLR from a point-and-shoot drastically improved image clarity and color accuracy for me. DSLRs also excel in various lighting conditions, providing manual controls to adapt to different scenarios. If budget is a concern, exploring the used market online can be a great way to find a lightly used DSLR at a more accessible price.
Regardless of whether you choose a point-and-shoot, DSLR, or even your smartphone camera, the fundamental principles of composition and lighting remain the same in food photography.
Achieving Bright and Appetizing Food Photos
To create bright and inviting food photographs, understanding the exposure triangle – shutter speed, aperture, and ISO – is crucial. These three elements work together to control the brightness and overall look of your images.
Mastering Shutter Speed
Shutter speed refers to the duration the camera’s shutter remains open, allowing light to reach the sensor. In low-light situations, slowing down the shutter speed allows more light to enter, brightening the image. This technique is particularly useful on overcast days or when shooting indoors with limited natural light. However, longer shutter speeds can also introduce motion blur, especially when shooting handheld. To prevent blur, using a tripod is recommended for slower shutter speeds. A general rule of thumb for handheld shooting is to maintain a shutter speed of at least 1/125th of a second. If your hands are less steady, or for even sharper images, using a tripod below 1/100th of a second is advisable.
Understanding Aperture
Aperture is the opening within the lens that controls the amount of light passing through. It also plays a significant role in determining the depth of field – the area of the image that appears sharp and in focus. A wider aperture (lower f-number, e.g., f/2.8, f/3.5) lets in more light and creates a shallow depth of field, blurring the background and emphasizing the subject. This is excellent for drawing attention to specific details in your food. Conversely, a narrower aperture (higher f-number, e.g., f/11, f/14) reduces the amount of light but increases the depth of field, bringing both foreground and background elements into sharper focus.
For a deeper dive into aperture and its creative uses, resources like Minimalist Baker’s guide on aperture offer valuable insights.
Optimizing ISO Sensitivity
ISO represents your camera sensor’s sensitivity to light. It’s generally best to adjust ISO last, after setting shutter speed and aperture, as high ISO settings can degrade image quality by introducing digital noise, particularly in darker areas. Aim to keep your ISO below 500 whenever possible. However, in dimly lit environments where a tripod isn’t available and your aperture is already wide open, increasing ISO may be necessary to achieve a properly exposed image.
Harnessing Light for Stunning Food Photography
Natural light is often the most flattering and desirable light source for food photography. While professional artificial lights mimicking natural light are available, it’s highly recommended to master natural light before investing in artificial setups.
Avoid relying on standard indoor kitchen lighting, as it typically casts an unflattering yellow tint on food. If indoor lighting is unavoidable, especially in the evening or on gloomy days, adjust your camera’s white balance to the Tungsten setting. This setting adds blue tones to counteract the yellow cast, creating a more neutral and appealing image. To further enhance your low-light food photography skills, consider exploring resources like my free Low Light Food Photography E-Course, designed to help you maximize available light in challenging situations.
Experiment with light direction to discover different moods and effects. Backlighting, where the light source is positioned behind the food, is a technique I frequently use. Positioning your subject on a table with a window behind it often creates a beautiful rim light and highlights textures. However, don’t hesitate to experiment with front lighting and side lighting to see which direction best complements your subject and personal style. Lighting preferences can vary depending on the dish and the desired aesthetic.
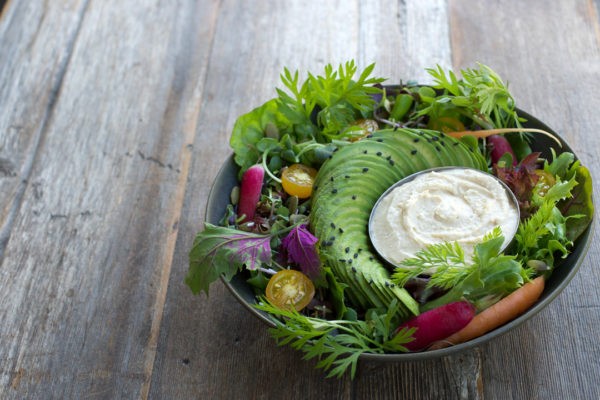
Backlighting in Food Photography
The image above is an example of backlighting. Notice how the light originates from behind the salad bowl, creating a bright and airy feel.
Side Lighting in Food Photography
In the side-by-side images above, the left photo demonstrates side lighting from the left, while the right photo showcases side lighting from the right. Observe how side lighting creates shadows that emphasize the food’s texture and form.
When using backlighting, especially on darker days, shadows can become too pronounced. To mitigate this, use a reflector to bounce light back onto the shadowed areas of your food. Photography reflectors are readily available, but you can also improvise with white foam core, poster board, napkins, or even a roll of paper towel to bounce light and brighten shadows.
Composition Techniques for Eye-Catching Food Photos
Composition is key to creating visually appealing food photographs. The rule of thirds is a fundamental guideline that can significantly enhance your photos. Imagine dividing your image into nine equal squares using two vertical and two horizontal lines. Placing your main point of interest at one of the intersections of these lines naturally draws the viewer’s eye and creates a more dynamic composition. Many cameras and photo editing software offer a rule of thirds grid overlay to assist with composition.
Consider creating depth by placing your primary subject in the foreground and allowing secondary elements to blur in the background. This technique guides the viewer’s gaze through the image, adding visual interest and storytelling.
Choosing Vertical or Horizontal Orientation
Experiment with both vertical and horizontal orientations for your food photos. Vertical shots are well-suited for platforms like Instagram and Pinterest, where portrait-oriented images dominate. Horizontal photos are generally ideal for blogs, website banners, and Facebook, accommodating landscape formats. Capturing both orientations ensures versatility in how you can use your food photography.
Exploring Different Angles in Food Photography
Angle of view plays a crucial role in how food is perceived in photographs. Here are a few common and effective angles:
- 45-Degree Angle: This angle mimics the perspective of someone sitting down to eat the dish. It’s a versatile angle that effectively captures texture and detail, often focusing on the front portion of the food.
- Overhead Angle (Top-Down): Shooting directly from above provides a complete view of the entire dish, especially useful for showcasing patterns and arrangements. While it may minimize texture, it ensures even focus across the dish if all elements are at a similar height.
- Straight-On Angle (Eye-Level): This angle is effective for highlighting the height and layers of food, such as stacked sandwiches, burgers, or beverages.
The photo above demonstrates a 45-degree angle, offering a natural and inviting perspective.
This image is an overhead shot, perfect for displaying the full arrangement and components of the dish.
This photo is a straight-on, eye-level shot, ideal for showcasing the vertical aspects of food items.
Food Styling Techniques for Enhanced Visual Appeal
Food styling is essential to making your dishes look their absolute best in photos. Adding fresh, raw ingredients or herbs alongside cooked food can bring vibrancy and freshness, especially to dishes with predominantly brown tones like chili. Revitalize herbs and microgreens by soaking them in cold water for about 30 minutes and discarding any wilted pieces before styling. Use garnishes that complement the dish and add pops of color and visual interest. Ideally, garnishes should hint at ingredients within the dish, such as a basil leaf on pesto.
Simple additions like basil leaves, lemon slices, and chopped nuts elevate the visual appeal, adding color, interest, and excitement compared to a plain pasta salad.
Plating Strategies for Food Photography
When plating for food photography, identify the “hero” – the most visually appealing element of your dish. If you’re photographing tempeh steaks and one is perfectly browned, position it prominently in the foreground or on top to draw focus.
Full bowls and plates are generally more appealing in food photography. Even if a typical serving is smaller, fill your bowls generously for photos, stopping just short of overflowing. Smaller plates and bowls can be advantageous as they prevent food from looking lost and make it easier to create full-looking servings.
Sauces can quickly absorb into food, especially during setup. Reserve some sauce to add just before shooting to maintain the food’s fresh appearance. For salads, consider taking initial photos before dressing, as oil and acid can cause greens to wilt quickly.
Selecting the Best Food Photography Props
Choose props that are neutral and enhance, rather than distract from, the food. Avoid busy patterns on plates that can compete with the food and make it visually overwhelming. Matte grey or white dishes are excellent choices as they minimize glare and keep the focus squarely on the food. My personal favorites are matte dishes in neutral tones.
The left image shows food against a simple background, while the right image incorporates a napkin that subtly complements the cauliflower’s purple hues, adding a layer without overpowering the subject.
Wooden background boards are highly recommended. You can purchase them from online marketplaces like Etsy, create your own using online tutorials, or have one custom-made. Opt for wooden boards with matte finishes and interesting textures to minimize glare and add visual depth.
While clean, uncluttered backgrounds are often preferred to keep the focus on the food, you can also incorporate ingredients or elements that suggest the cooking process to add context and storytelling. Other prop ideas include colorful napkins, flowers, or unique vintage serving utensils sourced from secondhand shops.
Consider incorporating a hand model to show interaction with the food, adding a human element and scale.
5 Essential Props for Beginner Food Photographers:
- Wooden background board or large cutting board
- Monotone plate and bowl (matte finish preferred)
- Vintage cutlery (explore thrift stores)
- Cloth napkin or dish towel
- Stemless wine glass or Mason jars (for drinks and parfaits)
Don’t let limited props or basic camera equipment hinder your creativity. You can create stunning food photography simply by focusing on fresh, colorful food and developing your unique style. Remember that mastering food photography is a journey of practice and evolution. It’s perfectly normal to not love your early photos immediately. Embrace the process, practice consistently, and enjoy the delicious art you create!
Further Reading
All photos by: Anna Pelzer