FOODS.EDU.VN is here to help you discover everything you need to know about food coloring fondant, from selecting the right type of color to achieving the perfect shade. Unlock the secrets to vibrantly colored fondant and elevate your cake decorating skills with our easy-to-follow tips and expert advice, ensuring your edible creations are visually stunning and professionally finished. Learn about gel colors, liquid colors, and powder colors, as well as color mixing techniques for superior results.
1. Understanding Fondant and Food Coloring
Fondant, a smooth, pliable icing, is a favorite among cake decorators for its ability to create flawless, elegant finishes. Fondant, sometimes called sugar paste, gives a smooth, matte surface for decorating cakes and cookies. It can be rolled out, molded, and sculpted into various shapes, making it ideal for creating intricate designs and personalized decorations.
Food coloring plays a crucial role in achieving the desired aesthetic for your fondant creations. Selecting the right type of food color and understanding how it interacts with fondant is vital for achieving vibrant, consistent, and long-lasting results. Different types of food coloring can affect the fondant’s texture and consistency, so choosing the right one is essential for optimal results.
1.1. What is Fondant?
Fondant is a type of icing made primarily from sugar, water, and corn syrup or glucose. It has a smooth, dough-like consistency, which makes it ideal for covering cakes and creating decorations. Fondant can be rolled out to create a smooth surface or molded into various shapes and figures.
There are two main types of fondant: rolled fondant and poured fondant.
- Rolled fondant is the most common type and is used for covering cakes and making decorations.
- Poured fondant is a liquid form used as a glaze for petit fours and other small pastries.
Rolled fondant is pliable, making it ideal for sculpting and creating detailed designs. It provides a smooth, even surface that is perfect for painting or adding other decorative elements.
1.2. Types of Food Coloring
There are several types of food coloring available, each with its own unique properties and best-use cases. The most common types include:
- Gel Food Coloring: Highly concentrated and ideal for achieving deep, vibrant colors without adding excess liquid to the fondant.
- Liquid Food Coloring: Less concentrated than gel colors, better suited for delicate shades and large batches.
- Powdered Food Coloring: Versatile and can be used in both dry and wet applications.
- Oil-Based Food Coloring: Specifically formulated for use with chocolate and other fat-based products.
- Natural Food Coloring: Derived from natural sources, such as fruits, vegetables, and spices, offering a more subtle color palette.
Choosing the right type of food coloring ensures the best results for your fondant projects. Gel colors are preferred for their concentration and minimal impact on fondant consistency, while powdered colors offer versatility for various applications.
1.3. How Food Coloring Interacts with Fondant
The interaction between food coloring and fondant depends on the type of coloring used and the composition of the fondant. Gel colors, being highly concentrated, can disperse evenly without making the fondant sticky or overly soft. Liquid colors, if used in excess, can change the fondant’s texture, making it more difficult to work with.
Powdered colors need to be mixed thoroughly to avoid speckling. Oil-based colors are designed to blend seamlessly with fat-based ingredients, ensuring a smooth, consistent color. Understanding these interactions will help you choose the right coloring method and achieve the desired effect.
2. Choosing the Right Food Coloring for Fondant
Selecting the appropriate food coloring is crucial for achieving the desired color intensity and maintaining the fondant’s consistency. Here’s a detailed look at the different types of food coloring and their suitability for fondant.
2.1. Gel Food Coloring: Pros and Cons
Gel food coloring is a popular choice among cake decorators due to its highly concentrated nature. It is available in a wide range of colors and is excellent for achieving vibrant, deep shades.
Pros:
- Highly Concentrated: A small amount goes a long way, making it cost-effective.
- Vibrant Colors: Produces intense, true-to-color results.
- Minimal Liquid: Does not significantly alter the fondant’s consistency.
- Easy to Mix: Blends smoothly and evenly into the fondant.
Cons:
- Can Stain: Due to its high concentration, it can stain hands and surfaces.
- Over Coloring: It is easy to add too much color, so start with a small amount.
- Initial Expense: Can be more expensive than liquid food coloring.
Gel food coloring is ideal for creating bold, striking colors in your fondant without compromising its texture.
2.2. Liquid Food Coloring: Pros and Cons
Liquid food coloring is a widely available and affordable option, often found in grocery stores. However, it is less concentrated than gel colors and can affect the fondant’s consistency if used in large quantities.
Pros:
- Affordable: Generally less expensive than gel or powdered colors.
- Readily Available: Easy to find in most grocery stores.
- Good for Light Shades: Suitable for achieving pastel or light colors.
Cons:
- Less Concentrated: Requires more product to achieve the desired color intensity.
- Can Alter Consistency: Adding too much liquid can make the fondant sticky and difficult to handle.
- Fades Easily: Colors may fade over time, especially when exposed to light.
Liquid food coloring is best used when a subtle tint is desired, or when working with large batches where a slight change in consistency is manageable.
2.3. Powdered Food Coloring: Pros and Cons
Powdered food coloring is a versatile option that can be used in both dry and wet applications. It is particularly useful for achieving deep colors and for painting directly onto fondant.
Pros:
- Highly Concentrated: Provides intense color with minimal product.
- Versatile: Can be mixed with liquids to create edible paints.
- Long Shelf Life: Typically has a longer shelf life than liquid or gel colors.
- No Alteration of Consistency: Does not change the fondant’s texture when used dry.
Cons:
- Can be Dusty: May create a dusty mess if not handled carefully.
- Requires Thorough Mixing: Must be mixed thoroughly to avoid speckling.
- Limited Availability: May not be as readily available as liquid or gel colors.
Powdered food coloring is an excellent choice for detailed work, such as painting intricate designs on fondant, and for achieving rich, saturated colors.
2.4. Oil-Based Food Coloring: When to Use
Oil-based food coloring is specifically formulated for use with chocolate, candy, and other fat-based products. It is designed to disperse evenly in fatty mediums, providing consistent and vibrant color.
When to Use:
- Chocolate Fondant: Essential for coloring chocolate fondant, as water-based colors can cause the chocolate to seize.
- Candy Melts: Ideal for coloring candy melts used for creating decorations.
- Buttercream: Can be used to color buttercream frosting, especially when a deep color is desired.
Oil-based colors should not be used with regular fondant, as they may not mix properly and can leave a greasy residue.
2.5. Natural Food Coloring: Is It a Good Option?
Natural food coloring is derived from natural sources such as fruits, vegetables, and spices. It is a healthier alternative to synthetic dyes but may not provide the same level of vibrancy.
Pros:
- Healthier Option: Made from natural ingredients, avoiding artificial additives.
- Subtle Colors: Provides soft, natural-looking shades.
Cons:
- Less Vibrant: Colors may not be as bright or intense as synthetic dyes.
- Can Affect Flavor: Some natural colors can impart a slight flavor to the fondant.
- Limited Color Range: The range of available colors is more limited compared to synthetic options.
- More Expensive: Natural food colorings are often more expensive.
Natural food coloring is a good option for those looking to avoid artificial ingredients and prefer a more subtle, natural color palette.
3. Step-by-Step Guide to Coloring Fondant
Coloring fondant is a straightforward process, but following the right steps ensures even color distribution and prevents unwanted changes in texture. Here’s a detailed guide to help you achieve perfectly colored fondant every time.
3.1. Preparing Your Work Area
Before you begin, it is important to set up your work area to prevent messes and ensure a smooth process.
Steps:
- Cover Your Surface: Use a clean, non-stick rolling mat or parchment paper to protect your work surface.
- Gather Supplies: Have your fondant, food coloring, mixing tools, and gloves (optional) within easy reach.
- Protect Your Hands: Wear disposable gloves to prevent the food coloring from staining your skin.
- Prepare Fondant: Ensure your fondant is at room temperature and pliable. If it is too firm, knead it gently until it becomes soft and easy to work with.
3.2. Choosing the Right Amount of Fondant
Selecting the right amount of fondant is essential to avoid wasting material and ensure you have enough to complete your project.
Tips:
- Estimate Needs: Determine the amount of fondant needed based on the size of your cake or decorations.
- Start with More: It is always better to have a little extra than to run out mid-project.
- Color Separately: If you need multiple colors, divide the fondant into separate portions before coloring.
3.3. Applying the Food Coloring
The method of applying food coloring depends on the type you are using. Here’s how to apply gel, liquid, and powdered colors effectively.
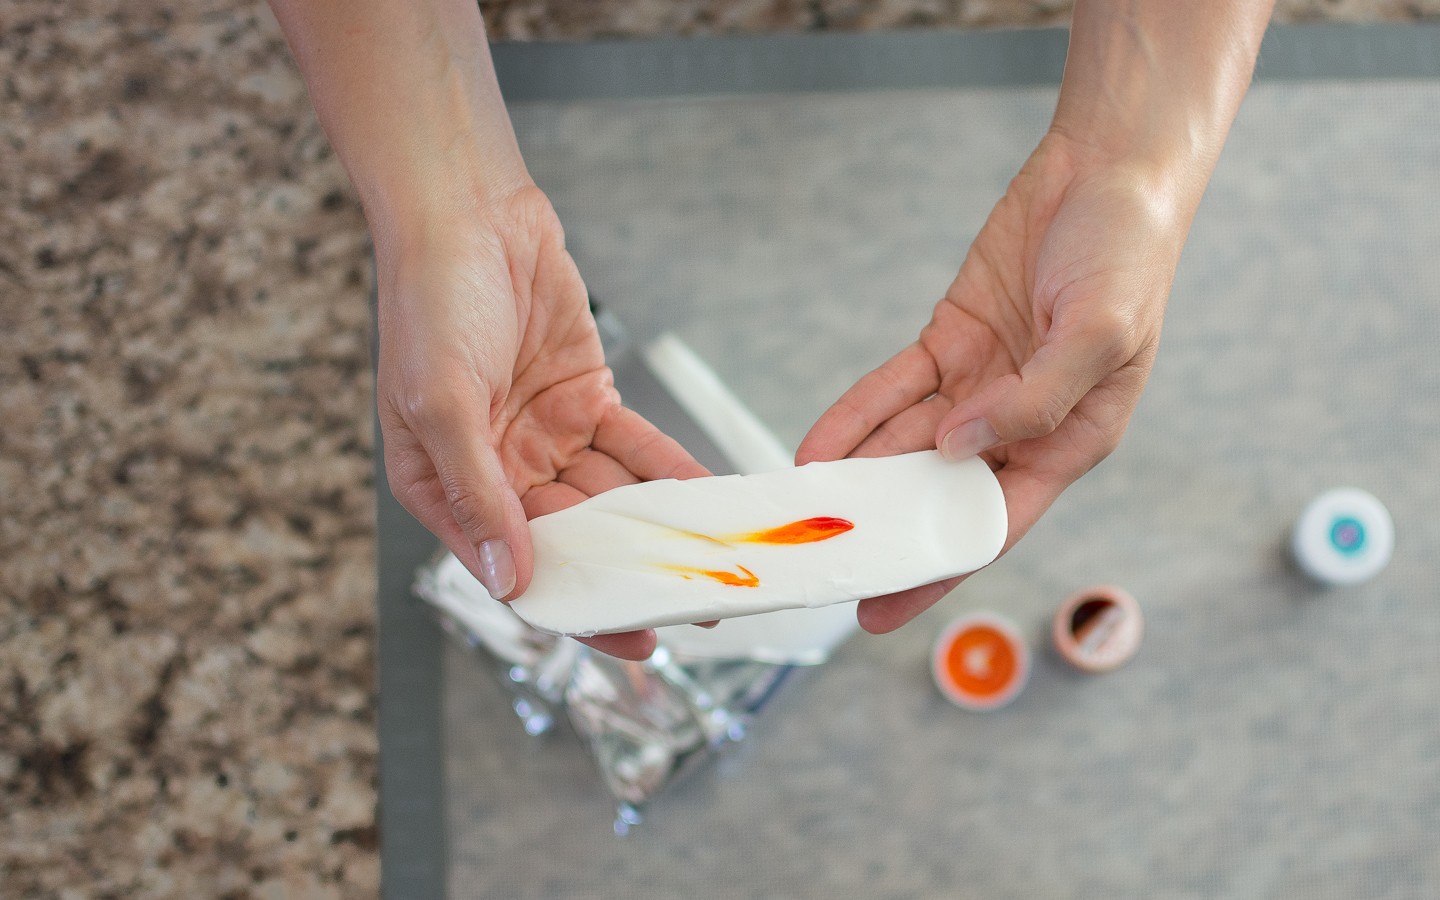
3.3.1. Using Gel Food Coloring
Gel food coloring is highly concentrated, so use it sparingly.
Steps:
- Use a Toothpick: Dip a toothpick or the tip of a paring knife into the gel food coloring.
- Apply to Fondant: Dab the color onto the fondant, keeping it in one general area.
- Start Small: Begin with a small amount of color, as you can always add more later.
3.3.2. Using Liquid Food Coloring
Liquid food coloring is less concentrated, so you will need to use more to achieve the desired color.
Steps:
- Use a Dropper: Use a dropper to add the liquid food coloring to the fondant.
- Apply Gradually: Add the color a few drops at a time, mixing well between additions.
- Monitor Consistency: Be mindful of the fondant’s consistency, as too much liquid can make it sticky.
3.3.3. Using Powdered Food Coloring
Powdered food coloring can be used in two ways: dry or mixed with a liquid to create an edible paint.
Dry Application:
- Dust onto Fondant: Lightly dust the powdered color onto the fondant.
- Knead Thoroughly: Knead the fondant until the color is evenly distributed.
Wet Application (Edible Paint):
- Mix with Liquid: Mix a small amount of powdered color with a few drops of clear alcohol (such as vodka) or lemon extract to create a paint.
- Apply with Brush: Use a fine brush to paint the color onto the fondant.
3.4. Mixing the Color into the Fondant
Proper mixing is essential to achieve an even, consistent color throughout the fondant.
Steps:
- Fold the Fondant: Fold the fondant over the food coloring to enclose it.
- Knead and Twist: Start kneading and twisting the fondant to distribute the color.
- Continue Mixing: Continue kneading until the color is uniform throughout the fondant.
- Check for Streaks: Ensure there are no streaks or pockets of concentrated color.
3.5. Achieving the Desired Shade
Achieving the desired shade may require multiple additions of food coloring.
Tips:
- Add Gradually: Add small amounts of color at a time, mixing well after each addition.
- Check Against Target: Compare the fondant color to your target shade under good lighting.
- Keep Records: If replicating a specific color, keep a record of the amount of food coloring used.
3.6. Troubleshooting Common Issues
Even with careful application, some issues may arise during the coloring process. Here’s how to troubleshoot common problems.
- Streaky Color: Continue kneading the fondant until the color is evenly distributed.
- Sticky Fondant: If the fondant becomes too sticky, add a small amount of powdered sugar or cornstarch.
- Faded Color: If the color fades over time, use gel or powdered colors for more vibrant, long-lasting results.
- Speckled Color: Ensure powdered colors are thoroughly mixed to avoid speckling.
4. Color Mixing Techniques for Fondant
Creating custom colors for fondant can elevate your cake decorating to new heights. Understanding color theory and mastering mixing techniques allows you to achieve unique and personalized shades.
4.1. Basic Color Theory for Fondant
Understanding basic color theory is essential for mixing colors effectively.
Key Concepts:
- Primary Colors: Red, yellow, and blue are the primary colors that cannot be created by mixing other colors.
- Secondary Colors: Green, orange, and purple are created by mixing two primary colors.
- Tertiary Colors: Created by mixing a primary color with a neighboring secondary color (e.g., red-orange, blue-green).
- Complementary Colors: Colors opposite each other on the color wheel (e.g., red and green, blue and orange) create contrast and vibrancy.
- Analogous Colors: Colors that are next to each other on the color wheel (e.g., blue, blue-green, green) create harmony and balance.
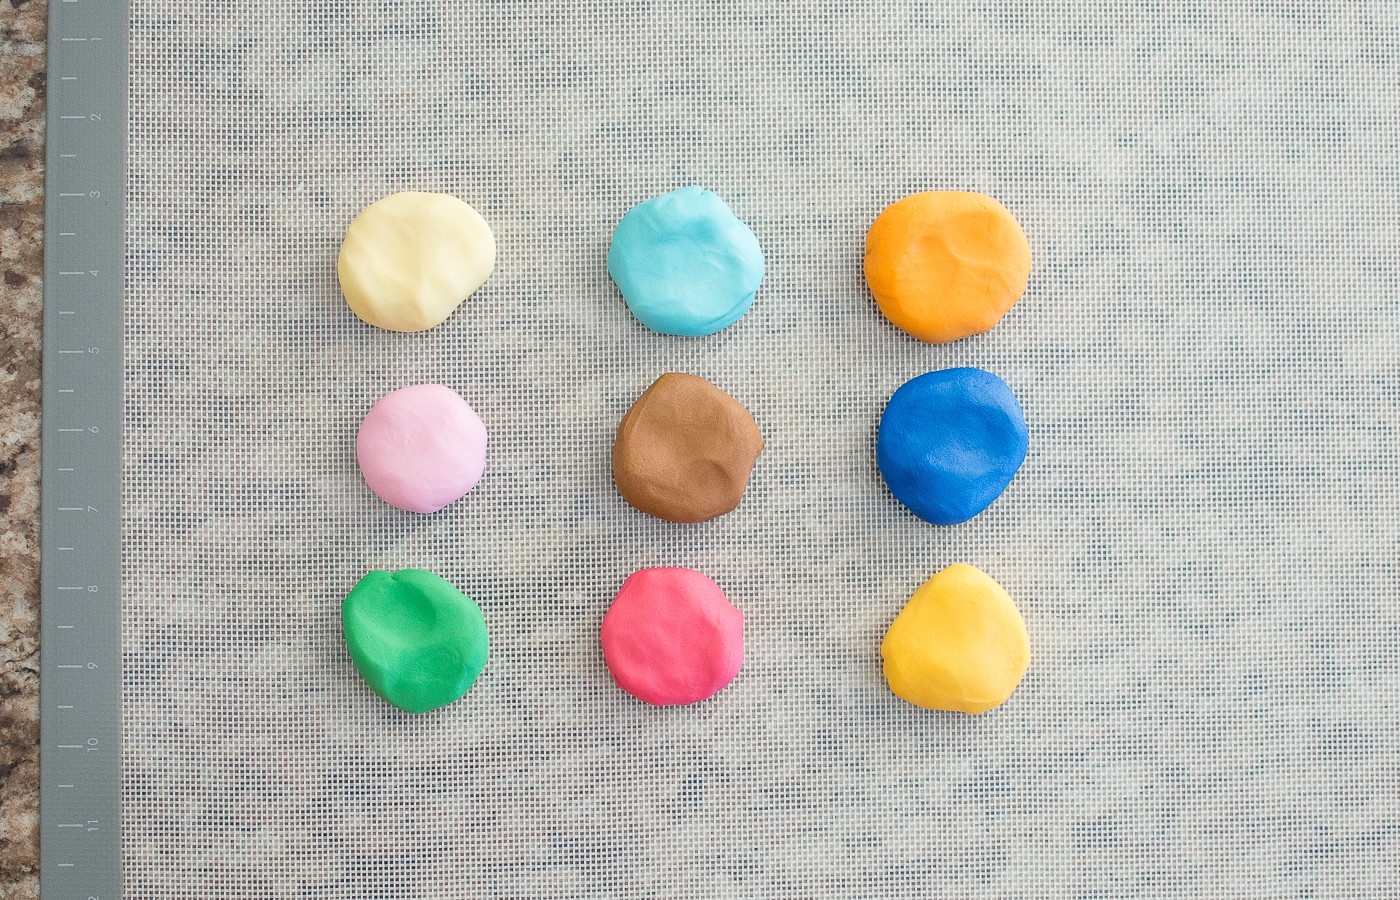
4.2. Creating Custom Colors
Creating custom colors involves mixing different food colors to achieve the desired shade.
Steps:
- Start with White Fondant: Begin with a base of white fondant for accurate color mixing.
- Add Colors Gradually: Add small amounts of food coloring at a time, mixing well between additions.
- Use a Color Chart: Refer to a color chart or color wheel for guidance on mixing specific colors.
- Keep Records: Document the ratios of colors used to replicate the shade in the future.
4.3. Tips for Achieving Specific Shades
Achieving specific shades requires careful attention to detail and precise mixing.
Tips:
- Pastel Colors: To create pastel colors, add a tiny amount of food coloring to white fondant.
- Dark Colors: To create dark colors, start with a base color that is close to the desired shade and add darker colors gradually.
- Neutral Colors: To create neutral colors, mix complementary colors in small amounts.
- Bright Colors: Use gel food coloring for the most vibrant results.
- Test Colors: Before coloring the entire batch of fondant, test the color on a small piece to ensure it matches your target shade.
4.4. Common Color Combinations and Their Results
Here are some common color combinations and the shades they produce:
| Color Combination | Resulting Shade |
|---|---|
| Red + Yellow | Orange |
| Yellow + Blue | Green |
| Blue + Red | Purple |
| Red + White | Pink |
| Blue + Yellow + Red | Brown |

4.5. Adjusting Colors After Mixing
It is common to need to adjust the color after mixing.
Tips:
- Too Light: Add more of the base color to deepen the shade.
- Too Dark: Add more white fondant to lighten the shade.
- Incorrect Hue: Add small amounts of the necessary colors to adjust the hue.
- Record Adjustments: Keep track of all adjustments made to replicate the color in the future.
5. Working with Dark Colors: Red and Black
Achieving true red and black fondant can be challenging, as these colors often require a large amount of food coloring. Here’s how to achieve these colors effectively.
5.1. Challenges of Coloring Fondant Red
Coloring fondant red can be difficult due to the large amount of red food coloring required.
Challenges:
- Fading: Red colors tend to fade over time, especially when exposed to light.
- Bitter Taste: Adding too much red food coloring can result in a bitter taste.
- Sticky Texture: The fondant can become sticky and difficult to work with.
5.2. Techniques for Achieving True Red Fondant
To achieve a true red fondant, consider these techniques:
- Use Gel Food Coloring: Gel colors provide the most vibrant and long-lasting results.
- Start with a Red Base: Begin with a pre-colored red fondant to reduce the amount of additional coloring needed.
- Knead Thoroughly: Knead the fondant well to ensure the color is evenly distributed.
- Allow Time to Develop: Let the colored fondant rest for a few hours or overnight to allow the color to deepen.
- Use Red Color Booster: Add a red color booster to enhance the intensity of the color.
5.3. Challenges of Coloring Fondant Black
Coloring fondant black presents similar challenges to coloring it red.
Challenges:
- Fading: Black colors can also fade over time.
- Bitter Taste: Adding too much black food coloring can result in a bitter taste.
- Sticky Texture: The fondant can become sticky and difficult to work with.
5.4. Techniques for Achieving True Black Fondant
To achieve a true black fondant, consider these techniques:
- Use Gel Food Coloring: Gel colors provide the most vibrant and long-lasting results.
- Start with a Dark Base: Begin with a pre-colored dark chocolate or dark gray fondant.
- Knead Thoroughly: Knead the fondant well to ensure the color is evenly distributed.
- Allow Time to Develop: Let the colored fondant rest for a few hours or overnight to allow the color to deepen.
- Use Black Color Booster: Add a black color booster to enhance the intensity of the color.
5.5. Alternatives to Coloring Fondant Dark Colors
If you want to avoid the challenges of coloring fondant red or black, consider these alternatives:
- Buy Pre-Colored Fondant: Purchase pre-colored red or black fondant from a reputable supplier.
- Use Black Cocoa Powder: Add black cocoa powder to the fondant to deepen the color naturally.
- Paint the Fondant: Color white fondant and then paint it with edible black paint.
6. Tips and Tricks for Perfect Fondant Coloring
Achieving perfectly colored fondant involves more than just adding food coloring. Here are some tips and tricks to help you get the best results every time.
6.1. Start with High-Quality Fondant
The quality of your fondant plays a significant role in the final result.
Tips:
- Choose a Reputable Brand: Select a well-known and trusted brand of fondant.
- Check the Expiration Date: Ensure the fondant is fresh and has not expired.
- Consider Flavor: Choose a flavor that complements your cake or decorations.
- Proper Storage: Store fondant properly to maintain its quality and prevent it from drying out.
6.2. Kneading Techniques for Even Color Distribution
Proper kneading is essential for even color distribution.
Techniques:
- Use Your Palms: Use the palms of your hands to knead the fondant.
- Fold and Press: Fold the fondant over and press it down to distribute the color.
- Twist and Stretch: Twist and stretch the fondant to ensure the color is evenly mixed.
- Avoid Over Kneading: Over kneading can make the fondant tough, so knead it only until the color is uniform.
6.3. Preventing Air Bubbles
Air bubbles can create imperfections in your fondant finish.
Tips:
- Knead Thoroughly: Kneading helps to remove air bubbles from the fondant.
- Use a Fondant Smoother: Use a fondant smoother to press out any remaining air bubbles after covering the cake.
- Prick Bubbles: If air bubbles appear after the fondant has been applied, prick them with a needle and smooth the surface.
6.4. Storing Colored Fondant
Proper storage is crucial to prevent the fondant from drying out or changing color.
Tips:
- Wrap Tightly: Wrap the colored fondant tightly in plastic wrap to prevent air exposure.
- Double Bag: Place the wrapped fondant in a resealable plastic bag for extra protection.
- Store in a Cool, Dark Place: Store the fondant in a cool, dark place away from direct sunlight.
- Avoid Refrigeration: Refrigeration can cause the fondant to become hard and difficult to work with.
6.5. Working with Different Fondant Brands
Different fondant brands may have different consistencies and react differently to food coloring.
Tips:
- Read the Instructions: Follow the manufacturer’s instructions for best results.
- Experiment: Experiment with different brands to find one that works best for you.
- Adjust Coloring: Adjust the amount of food coloring based on the fondant’s consistency and color absorption.
7. Addressing Common Fondant Problems
Even with the best techniques, you may encounter common fondant problems. Here’s how to address them.
7.1. Dry and Cracked Fondant
Dry and cracked fondant is a common issue, especially in dry environments.
Solutions:
- Add Glycerin: Add a small amount of glycerin to the fondant to increase its moisture content.
- Knead with Shortening: Knead the fondant with a small amount of vegetable shortening to add moisture and pliability.
- Steam the Fondant: Gently steam the fondant to rehydrate the surface.
7.2. Sticky Fondant
Sticky fondant can be difficult to work with and can result in a messy finish.
Solutions:
- Add Powdered Sugar: Add a small amount of powdered sugar or cornstarch to the fondant to absorb excess moisture.
- Knead on a Sugared Surface: Knead the fondant on a surface dusted with powdered sugar.
- Use Shortening: Rub a small amount of vegetable shortening on your hands and work surface to prevent sticking.
7.3. Fondant That Tears Easily
Fondant that tears easily may be too thin or dry.
Solutions:
- Roll Thicker: Roll the fondant to a slightly thicker consistency.
- Add Tylose Powder: Add a small amount of tylose powder to the fondant to increase its elasticity.
- Allow to Rest: Let the rolled fondant rest for a few minutes before applying it to the cake to allow it to relax and become more pliable.
7.4. Uneven Color Distribution
Uneven color distribution can result in a patchy or streaky finish.
Solutions:
- Knead Thoroughly: Continue kneading the fondant until the color is evenly distributed.
- Add Color Gradually: Add small amounts of food coloring at a time, mixing well between additions.
- Use a Food Processor: For large batches, use a food processor to ensure even color distribution.
7.5. Color Bleeding
Color bleeding can occur when dark colors transfer to lighter colors, especially in humid environments.
Solutions:
- Allow to Dry Completely: Allow the colored fondant pieces to dry completely before assembling the cake.
- Use a Barrier: Apply a thin layer of clear piping gel or edible glue between the colored fondant pieces.
- Store Properly: Store the finished cake in a cool, dry place to prevent color bleeding.
FOODS.EDU.VN is dedicated to providing you with the most comprehensive and reliable information on all things culinary. For more in-depth tips, tricks, and tutorials on fondant and cake decorating, visit our website at FOODS.EDU.VN, call us at +1 845-452-9600, or stop by our location at 1946 Campus Dr, Hyde Park, NY 12538, United States.
8. Advanced Fondant Techniques
Once you’ve mastered the basics of fondant coloring, you can explore advanced techniques to create even more stunning designs.
8.1. Marbling Fondant
Marbling fondant involves blending two or more colors to create a marbled effect.
Steps:
- Color Fondant: Color two or more portions of fondant in different shades.
- Roll into Ropes: Roll each portion of fondant into a rope.
- Twist Together: Twist the ropes together to create a marbled effect.
- Knead Gently: Knead the twisted fondant gently to blend the colors slightly.
- Roll Out: Roll out the marbled fondant and use it to cover your cake or create decorations.
8.2. Ombre Fondant
Ombre fondant involves creating a gradient effect with different shades of the same color.
Steps:
- Color Fondant: Color several portions of fondant in progressively lighter or darker shades of the same color.
- Roll into Strips: Roll each portion of fondant into a strip.
- Arrange Strips: Arrange the strips side by side, creating a gradient effect.
- Roll Together: Gently roll the strips together to blend the colors slightly.
- Roll Out: Roll out the ombre fondant and use it to cover your cake or create decorations.
8.3. Painting on Fondant
Painting on fondant allows you to add intricate details and designs to your creations.
Steps:
- Prepare Edible Paint: Mix powdered food coloring with a few drops of clear alcohol (such as vodka) or lemon extract to create an edible paint.
- Apply with Brush: Use a fine brush to paint the color onto the fondant.
- Allow to Dry: Allow the paint to dry completely before adding additional layers or details.
8.4. Stenciling on Fondant
Stenciling on fondant involves using stencils to create precise and intricate designs.
Steps:
- Secure Stencil: Secure the stencil to the fondant using a stencil holder or edible glue.
- Apply Color: Apply powdered food coloring or edible paint over the stencil using a brush or sponge.
- Remove Stencil: Carefully remove the stencil to reveal the design.
8.5. Airbrushing Fondant
Airbrushing fondant allows you to create smooth, even color gradients and add shading and highlights to your designs.
Steps:
- Prepare Airbrush: Fill the airbrush with edible airbrush color.
- Apply Color: Apply the color to the fondant in thin, even layers.
- Adjust Pressure: Adjust the air pressure and distance from the fondant to achieve the desired effect.
9. Safety Considerations When Coloring Fondant
Safety should always be a priority when working with food coloring.
9.1. FDA-Approved Food Coloring
Ensure that all food coloring you use is FDA-approved and safe for consumption.
Tips:
- Check Labels: Read the labels carefully to ensure the food coloring is approved for use in food products.
- Buy from Reputable Suppliers: Purchase food coloring from trusted suppliers to ensure its safety and quality.
- Avoid Industrial Dyes: Do not use industrial dyes or non-food-grade colors in your fondant.
9.2. Allergen Information
Be aware of potential allergens in food coloring, especially if you are baking for someone with allergies.
Tips:
- Read Labels: Check the labels for allergen information, such as gluten, nuts, or dairy.
- Use Allergen-Free Options: Choose allergen-free food coloring options if necessary.
- Inform Consumers: If you are selling or sharing your creations, inform consumers about potential allergens.
9.3. Staining Precautions
Food coloring can stain hands, clothing, and surfaces.
Tips:
- Wear Gloves: Wear disposable gloves to prevent staining your hands.
- Protect Clothing: Wear an apron or old clothing to protect against spills and stains.
- Cover Surfaces: Cover your work surface with a non-stick mat or parchment paper.
- Clean Spills Immediately: Clean up spills immediately with soap and water.
9.4. Safe Handling and Storage
Proper handling and storage of food coloring are essential to maintain its quality and safety.
Tips:
- Store in a Cool, Dark Place: Store food coloring in a cool, dark place away from direct sunlight.
- Keep Tightly Sealed: Keep the containers tightly sealed to prevent the food coloring from drying out or becoming contaminated.
- Dispose of Properly: Dispose of expired or unused food coloring properly according to local regulations.
9.5. Legal Regulations Regarding Food Coloring
Be aware of any legal regulations regarding the use of food coloring in your area, especially if you are selling your creations.
Tips:
- Research Local Laws: Research local laws and regulations regarding the use of food coloring in food products.
- Comply with Regulations: Ensure that you comply with all applicable regulations to avoid legal issues.
- Label Products Properly: Label your products properly, including a list of all food coloring used.
10. The Future of Fondant and Food Coloring
The world of fondant and food coloring is constantly evolving, with new trends and innovations emerging all the time.
10.1. Trends in Fondant Design
Stay up-to-date with the latest trends in fondant design to keep your creations fresh and exciting.
Current Trends:
- Geometric Designs: Clean, modern designs featuring geometric shapes and patterns.
- Floral Accents: Delicate floral accents and sugar flowers.
- Metallic Finishes: Elegant metallic finishes using edible gold and silver leaf.
- Hand-Painted Details: Intricate hand-painted details and illustrations.
- Sculptural Elements: Bold sculptural elements and 3D designs.
10.2. New Food Coloring Technologies
New food coloring technologies are constantly being developed, offering more vibrant, natural, and sustainable options.
Emerging Technologies:
- Natural Food Coloring Enhancements: Techniques to enhance the vibrancy and stability of natural food coloring.
- Edible Inks: Advanced edible inks for printing detailed designs on fondant.
- Sustainable Food Coloring Sources: Development of sustainable and eco-friendly food coloring sources.
- Personalized Color Creation: Systems for creating personalized food coloring blends on demand.
10.3. Sustainability in Food Coloring
Sustainability is becoming increasingly important in the food industry, including the production of food coloring.
Sustainable Practices:
- Eco-Friendly Sourcing: Sourcing food coloring from sustainable and environmentally responsible suppliers.
- Reduced Waste: Minimizing waste in the production and packaging of food coloring.
- Biodegradable Packaging: Using biodegradable packaging materials.
- Ethical Labor Practices: Ensuring ethical labor practices in the production of food coloring.
10.4. Healthier Food Coloring Options
Consumers are increasingly seeking healthier food coloring options that avoid artificial additives and chemicals.
Healthier Alternatives:
- Plant-Based Colors: Using plant-based colors derived from fruits, vegetables, and herbs.
- Organic Food Coloring: Choosing organic food coloring options.
- Additive-Free Formulas: Selecting food coloring formulas that are free from artificial additives and preservatives.
10.5. The Role of FOODS.EDU.VN in Culinary Education
FOODS.EDU.VN is committed to providing comprehensive culinary education and resources, including the latest information on fondant and food coloring.
Our Commitment:
- Expert Tutorials: Providing expert tutorials and guides on fondant techniques and food coloring.
- Product Reviews: Offering unbiased reviews of food coloring products and brands.
- Community Forum: Creating a community forum for sharing tips, advice, and inspiration.
- Continuing Education: Offering continuing education courses and workshops for culinary professionals and enthusiasts.
Visit FOODS.EDU.VN today and discover a world of culinary knowledge and inspiration.
Mastering the art of coloring fondant opens up a world of creative possibilities for cake decorators. With the right techniques and a little practice, you can create stunning, vibrant, and personalized designs that will impress your friends, family, and clients. For more information, guidance, and inspiration, visit FOODS.EDU.VN, call us at +1 845-452-9600, or visit our campus at 1946 Campus Dr, Hyde Park, NY 12538, United States. Let foods.edu.vn be your partner in culinary excellence.
FAQ: Food Coloring Fondant
Here are 10 frequently asked questions about food coloring fondant, along with detailed answers to help you master this essential cake decorating skill.
-
What is the best type of food coloring to use for fondant?
Gel food coloring is generally considered the best type to use for fondant due to its highly concentrated nature. Gel colors provide vibrant, deep shades without adding excess liquid, which can alter the fondant’s consistency.
-
How much food coloring should I use for fondant?
Start with a small amount of food coloring, as you can always add more later to achieve the desired shade. For gel colors, begin with a toothpick-sized amount and knead it into the fondant. For liquid colors, add a few drops at a time.
-
How do I prevent the fondant from becoming sticky when adding food coloring?
To prevent the fondant from becoming sticky, use gel food coloring, which contains minimal liquid. If using liquid food coloring, add it sparingly. If the fondant becomes too sticky, add a small amount of powdered sugar or cornstarch to absorb the excess moisture.
-
Can I use natural food coloring for fondant?
Yes, you can use natural food coloring for fondant, but keep in mind that natural colors may not be as vibrant as synthetic dyes. Natural colors also tend to fade over time and can sometimes impart a slight flavor to the fondant.
-
How do I achieve a true red or black color for fondant?
Achieving true red or black fondant can be challenging, as these colors require a large amount of food coloring. To achieve these colors, use gel food coloring, start with a pre-colored base (such as red or dark chocolate fondant), knead thoroughly, allow time for the color to develop, and use a color booster.
-
How do I store colored fondant?
To store colored fondant, wrap it tightly in plastic wrap to prevent air exposure, place the wrapped fondant in a resealable plastic bag, and store it in a cool, dark place away from direct sunlight. Avoid refrigerating the fondant, as this can cause it to become hard and difficult to work with.
-
What should I do if my fondant is dry and cracked?
If your fondant is dry and cracked, add a small amount of glycerin or vegetable shortening to increase its moisture content. Knead the fondant well to distribute the moisture evenly. You can also try steaming the fondant gently to rehydrate the surface.
-
How can I prevent air bubbles in my fondant?
To prevent air bubbles in your fondant, knead it thoroughly to remove any trapped air. Use a fondant smoother to press out any remaining air bubbles after covering the cake