Food Background is essential for creating visually appealing and engaging food photography, and FOODS.EDU.VN is here to guide you through every step. Understanding the right backdrops can transform your food images, making them more attractive and professional. Explore FOODS.EDU.VN for expert advice on food styling, culinary arts, and the art of visual storytelling in food photography, enhancing your food presentation skills and improving your overall culinary creativity.
1. Understanding the Importance of Food Backgrounds
Food backgrounds are the foundation of captivating food photography. They set the stage, enhance the subject, and convey the desired mood and style. A well-chosen background can elevate a simple dish into a stunning visual narrative, making it crucial for anyone involved in food media.
1.1. What is a Food Background?
A food background is the surface or setting on which food is placed for photography. It can be anything from a simple wooden table to an elaborately designed backdrop, serving as a canvas that complements the food. The background’s color, texture, and material all contribute to the overall aesthetic of the image.
1.2. Why are Food Backgrounds Important?
- Enhances Visual Appeal: The right background can make food look more appetizing. A complementary color or texture can highlight the food’s best features.
- Sets the Mood: Backgrounds help create the desired atmosphere. A rustic wooden surface can evoke a sense of warmth and tradition, while a sleek, modern backdrop can convey sophistication.
- Tells a Story: A background can add context and narrative to your food photography. Including elements like utensils, ingredients, or linens can suggest a story about the dish or its preparation.
- Professionalism: Using quality backgrounds elevates the professionalism of your food photography, which is essential for attracting clients or building a following.
1.3. Key Elements of an Effective Food Background
- Texture: Adds depth and interest, making the image more visually engaging.
- Color: Sets the tone and complements the food. Neutral colors are versatile, while bolder colors can create a specific mood.
- Material: Influences the overall style, whether it’s rustic wood, sleek marble, or modern concrete.
- Size: Should be large enough to accommodate the scene without overwhelming the subject.
- Finish: Matte finishes are preferable as they reduce glare and reflections.
2. Types of Food Backgrounds
Choosing the right type of food background is crucial for achieving the desired aesthetic in your photographs. Each material offers unique textures, colors, and visual effects that can significantly enhance your food presentation.
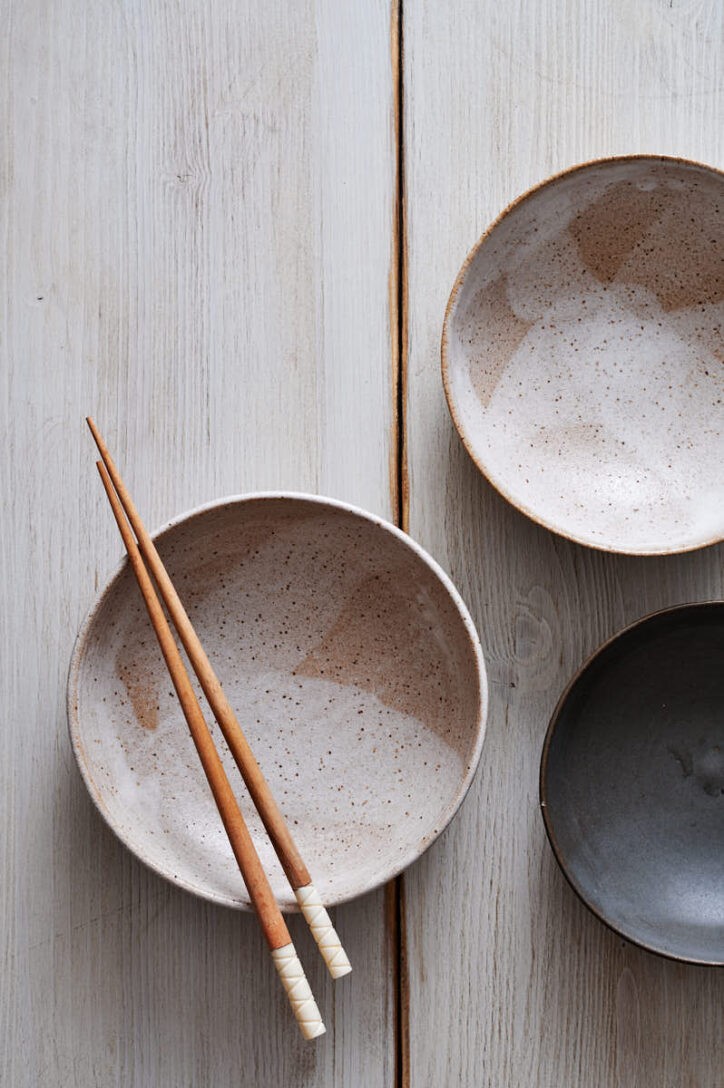
2.1. Wood Backgrounds
Wood backgrounds are a classic choice for food photography, offering warmth, texture, and a rustic feel. They come in various types, each with its unique characteristics.
-
Characteristics of Wood Backgrounds:
- Warmth: Adds a cozy and inviting feel to photos.
- Texture: Provides natural, tactile interest.
- Versatility: Works well with many types of food.
-
Types of Wood Backgrounds:
- Reclaimed Wood: Offers a rustic, aged look with unique imperfections.
- Smooth Wood: Provides a clean, modern aesthetic.
- Painted Wood: Allows for a variety of colors and finishes.
-
Best Uses:
- Rustic dishes like pies, stews, and grilled meats.
- Comfort food such as cookies, cakes, and homemade bread.
- Farm-to-table style photography.
2.2. Stone and Marble Backgrounds
Stone and marble backgrounds bring a touch of elegance and sophistication to food photography. Their smooth textures and natural patterns can elevate the visual appeal of various dishes.
-
Characteristics of Stone and Marble Backgrounds:
- Elegance: Adds a luxurious and refined look.
- Texture: Provides subtle patterns and variations.
- Coolness: Complements warm-toned foods.
-
Types of Stone and Marble Backgrounds:
- White Marble: Offers a clean, bright, and classic look.
- Grey Stone: Provides a neutral and versatile surface.
- Colored Marble: Adds a unique and dramatic touch.
-
Best Uses:
- Delicate pastries and desserts.
- Seafood dishes like sushi and oysters.
- High-end cuisine and gourmet creations.
2.3. Fabric Backgrounds
Fabric backgrounds are versatile and can add texture, color, and softness to food photography. Different fabrics can create various moods, from cozy to elegant.
-
Characteristics of Fabric Backgrounds:
- Softness: Adds a gentle and inviting feel.
- Texture: Provides a variety of visual interests, from smooth to wrinkled.
- Color: Offers endless options to match any dish or theme.
-
Types of Fabric Backgrounds:
- Linen: Adds a natural and rustic texture.
- Silk: Provides a smooth and luxurious look.
- Cotton: Offers a versatile and casual feel.
-
Best Uses:
- Comfort food and home-cooked meals.
- Baked goods and desserts.
- Styled scenes with linens and napkins.
2.4. Paper and Cardboard Backgrounds
Paper and cardboard backgrounds are affordable and easy to use, making them a popular choice for beginner food photographers. They can be painted, textured, or used as is to create various effects.
- Characteristics of Paper and Cardboard Backgrounds:
- Affordability: Budget-friendly and easily accessible.
- Versatility: Can be customized with paint, texture, or patterns.
- Simplicity: Provides a clean and minimalist look.
- Types of Paper and Cardboard Backgrounds:
- Seamless Paper: Offers a smooth and uniform surface.
- Textured Paper: Adds visual interest with patterns or embossing.
- Painted Cardboard: Allows for custom colors and finishes.
- Best Uses:
- Simple and clean food shots.
- DIY projects and experimenting with different styles.
- Product photography for smaller items.
2.5. Vinyl Backgrounds
Vinyl backgrounds are durable, easy to clean, and come in a wide variety of textures and colors, making them a practical choice for food photographers.
- Characteristics of Vinyl Backgrounds:
- Durability: Resistant to stains and scratches.
- Easy to Clean: Can be wiped clean with a damp cloth.
- Variety: Available in numerous textures, colors, and patterns.
- Types of Vinyl Backgrounds:
- Wood Grain Vinyl: Mimics the look of real wood.
- Marble Vinyl: Replicates the appearance of marble.
- Solid Color Vinyl: Provides a uniform and clean surface.
- Best Uses:
- Messy food shoots.
- High-volume photography projects.
- Commercial food photography.
2.6. Concrete Backgrounds
Concrete backgrounds offer a modern, industrial look that can add a unique edge to food photography. Their neutral tones and subtle textures make them a versatile option.
- Characteristics of Concrete Backgrounds:
- Modern Aesthetic: Provides a contemporary and urban feel.
- Neutral Tones: Complements a wide range of food colors.
- Texture: Offers subtle variations and visual interest.
- Types of Concrete Backgrounds:
- Smooth Concrete: Provides a clean and minimalist surface.
- Textured Concrete: Adds depth and character.
- Painted Concrete: Allows for customization with different colors.
- Best Uses:
- Contemporary and trendy food dishes.
- Minimalist food photography.
- Urban-inspired scenes.
3. Choosing the Right Color for Your Food Background
The color of your food background plays a significant role in how your food is perceived. Understanding color theory and how different colors interact with food can help you create visually appealing and appetizing images.
3.1. Understanding Color Theory
Color theory is the science and art of using color. It explains how colors mix, match, and contrast with each other. Key concepts include:
- Hue: The pure color (e.g., red, blue, green).
- Saturation: The intensity of the color.
- Value: The lightness or darkness of the color.
3.2. How Colors Affect Food Photography
- Complementary Colors: Colors opposite each other on the color wheel (e.g., red and green, blue and orange) create contrast and make the food pop.
- Analogous Colors: Colors next to each other on the color wheel (e.g., blue, blue-green, green) create harmony and a calming effect.
- Monochromatic Colors: Different shades and tints of the same color create a cohesive and subtle look.
3.3. Best Background Colors for Different Types of Food
- Neutral Colors (White, Grey, Beige):
- Characteristics: Versatile, clean, and timeless.
- Best For: Brightly colored foods, allowing the food to be the focal point.
- Warm Colors (Red, Orange, Yellow):
- Characteristics: Inviting, energetic, and appetite-stimulating.
- Best For: Comfort foods, spicy dishes, and breakfast items.
- Cool Colors (Blue, Green, Purple):
- Characteristics: Calming, sophisticated, and refreshing.
- Best For: Seafood, salads, and desserts.
- Dark Colors (Black, Dark Grey, Dark Brown):
- Characteristics: Dramatic, elegant, and moody.
- Best For: High-end cuisine, desserts, and cocktails.
3.4. Tips for Using Color Effectively
- Consider the Food’s Natural Colors: Choose a background color that complements the food’s natural hues.
- Use Color Contrast Wisely: Create visual interest by using complementary colors, but avoid overwhelming the viewer.
- Test Different Colors: Experiment with various background colors to see what works best for each dish.
- Use Color to Tell a Story: Choose colors that evoke the desired mood and theme.
4. Textures That Enhance Food Photography
Texture plays a vital role in food photography, adding depth, interest, and realism to your images. The right texture can make food look more appetizing and visually appealing.
4.1. Importance of Texture in Food Photography
- Adds Depth: Texture creates a three-dimensional effect, making the image more engaging.
- Enhances Realism: Realistic textures make the food look more tangible and appealing.
- Creates Visual Interest: Varied textures add complexity and prevent the image from looking flat.
4.2. Types of Textures to Look For
- Rough Textures:
- Examples: Reclaimed wood, rough stone, coarse fabric.
- Best For: Rustic dishes, comfort food, and farm-to-table scenes.
- Smooth Textures:
- Examples: Marble, glass, smooth paper.
- Best For: Elegant dishes, desserts, and minimalist photography.
- Natural Textures:
- Examples: Wood grain, stone patterns, fabric weaves.
- Best For: Organic and natural food photography.
- Artificial Textures:
- Examples: Painted surfaces, textured paper, vinyl backgrounds.
- Best For: Controlled and stylized food shots.
4.3. How to Use Texture to Your Advantage
- Combine Textures: Mix smooth and rough textures to create contrast and visual interest.
- Highlight Food Texture: Choose backgrounds that complement the texture of the food itself.
- Use Lighting to Enhance Texture: Side lighting and backlighting can accentuate textures.
- Avoid Overwhelming Textures: Ensure the background texture doesn’t distract from the food.
5. The Impact of Size and Scale in Food Backgrounds
The size and scale of your food background can significantly impact the overall composition and visual appeal of your food photography. Choosing the right size ensures that your subject is properly framed and the scene feels balanced.
5.1. Determining the Right Size for Your Background
- Consider the Subject Size: The background should be large enough to accommodate the food and any props without feeling cramped.
- Think About the Composition: Decide whether you want a close-up shot or a wider scene, and choose the background size accordingly.
- Account for Camera Angle: Consider the angle from which you’ll be shooting. A higher angle may require a larger background.
5.2. Standard Background Sizes for Food Photography
- Small (60cm x 60cm / 24″ x 24″):
- Best For: Close-up shots of single items, small dishes, and product photography.
- Medium (75cm x 100cm / 30″ x 40″):
- Best For: Most food photography setups, allowing for a variety of compositions.
- Large (120cm x 120cm / 47″ x 47″):
- Best For: Larger scenes, multiple dishes, and overhead shots.
5.3. Creating Depth and Dimension with Scale
- Use Foreground Elements: Add elements like utensils, ingredients, or linens in the foreground to create depth.
- Vary the Height: Use risers or stands to elevate certain elements and add dimension to the scene.
- Consider the Rule of Thirds: Position key elements along the lines or intersections of the rule of thirds to create a balanced composition.
5.4. Practical Tips for Using Size and Scale
- Start with a Versatile Size: A medium-sized background is a good starting point for most food photography.
- Use Multiple Backgrounds: Combine smaller backgrounds to create larger scenes.
- Experiment with Different Sizes: Try various sizes to see what works best for your style and subject.
6. Where to Buy Food Backgrounds
Investing in quality food backgrounds can significantly improve your photography. Here are some reputable places to purchase a variety of backgrounds to suit your needs.
6.1. Online Marketplaces
- Etsy: Offers a wide range of handmade and vintage backgrounds from independent sellers.
- Pros: Unique and custom options.
- Cons: Quality can vary.
- Amazon: Provides a vast selection of backgrounds from various brands.
- Pros: Convenient and often offers competitive pricing.
- Cons: Can be overwhelming to navigate.
6.2. Specialty Backdrop Companies
- Captured by Lucy: Specializes in high-quality, textured vinyl and fabric backgrounds.
- Pros: Durable, easy to clean, and visually appealing.
- Cons: Can be more expensive than other options.
- Texturit: Offers handmade, textured backgrounds made from wood and other materials.
- Pros: Unique and high-quality textures.
- Cons: Limited selection and higher price point.
- Woodville: Provides a variety of wooden backgrounds with different finishes and colors.
- Pros: Wide selection and customizable options.
- Cons: Can be heavy and require more storage space.
- Poppy Bee Surfaces: Known for their handcrafted, painted wood surfaces with a rustic aesthetic.
- Pros: Beautiful and unique designs.
- Cons: May require more care and maintenance.
- Duo Boards: Offers double-sided, lightweight boards with various textures and colors.
- Pros: Versatile and easy to store.
- Cons: Limited size options.
6.3. Local Craft and Hardware Stores
- Craft Stores (e.g., Michaels, Hobby Lobby): Offer a variety of paper, fabric, and foam boards that can be used as backgrounds.
- Pros: Affordable and easily accessible.
- Cons: Limited selection of professional-grade backgrounds.
- Hardware Stores (e.g., Home Depot, Lowe’s): Provide options for wood, concrete, and other materials that can be used to create DIY backgrounds.
- Pros: Cost-effective and customizable.
- Cons: Requires more effort to create a finished background.
6.4. Factors to Consider When Buying
- Budget: Determine how much you’re willing to spend on backgrounds.
- Material: Choose a material that suits your style and needs (e.g., vinyl for easy cleaning, wood for a rustic look).
- Size: Select a size that accommodates your typical food photography setups.
- Texture and Color: Choose textures and colors that complement the food you photograph.
- Storage: Consider how much space you have for storing backgrounds.
7. DIY Food Backgrounds: Creating Your Own Unique Surfaces
Creating your own food backgrounds can be a fun and cost-effective way to add a personal touch to your photography. DIY backgrounds allow you to customize textures, colors, and sizes to perfectly match your style.
7.1. Benefits of Making Your Own Backgrounds
- Cost-Effective: DIY backgrounds can be much cheaper than purchasing professional ones.
- Customization: You have full control over the materials, colors, and textures.
- Unique Look: DIY backgrounds can add a personal and distinctive touch to your photography.
- Creative Outlet: Making your own backgrounds can be a fun and rewarding creative project.
7.2. Materials for DIY Food Backgrounds
- Wood:
- Types: Plywood, reclaimed wood, wooden planks.
- Uses: Painting, staining, distressing for a rustic look.
- Cardboard:
- Types: Foam core, cardboard sheets.
- Uses: Painting, adding texture with gesso or joint compound.
- Fabric:
- Types: Linen, cotton, canvas.
- Uses: Dyeing, distressing, layering for texture.
- Paper:
- Types: Watercolor paper, kraft paper.
- Uses: Painting, crumpling, tearing for a textured look.
- Concrete Mix:
- Uses: Creating textured concrete surfaces.
7.3. Step-by-Step Guides for Creating DIY Backgrounds
- Painted Wood Background:
- Prepare the Wood: Sand the wood surface and apply a primer.
- Paint: Apply multiple layers of paint, allowing each layer to dry.
- Distress (Optional): Use sandpaper or a scraper to create a distressed look.
- Seal: Apply a matte sealant to protect the paint.
- Textured Cardboard Background:
- Prepare the Cardboard: Cut the cardboard to the desired size.
- Apply Texture: Use gesso or joint compound to create texture.
- Paint: Apply multiple layers of paint, allowing each layer to dry.
- Seal: Apply a matte sealant to protect the paint.
- Fabric-Covered Background:
- Prepare the Base: Use a piece of plywood or foam core as a base.
- Attach Fabric: Stretch the fabric over the base and secure it with glue or staples.
- Distress (Optional): Crumple or wrinkle the fabric for added texture.
7.4. Tips for DIY Success
- Plan Your Design: Sketch out your design before you start.
- Use Quality Materials: Invest in good quality materials for a better result.
- Experiment with Techniques: Try different painting and texturing techniques.
- Seal Your Background: Protect your background with a matte sealant.
8. Lighting and Its Effect on Food Backgrounds
Lighting is crucial in food photography, and it significantly impacts how your food backgrounds appear. Understanding how to use light effectively can enhance textures, colors, and overall mood.
8.1. Natural Light vs. Artificial Light
- Natural Light:
- Pros: Soft, diffused, and natural-looking.
- Cons: Can be inconsistent and dependent on weather and time of day.
- Artificial Light:
- Pros: Consistent, controllable, and available at any time.
- Cons: Can look harsh and artificial if not used correctly.
8.2. Key Lighting Techniques
- Side Lighting:
- Effect: Accentuates texture and creates shadows.
- Best For: Highlighting the details of the background and food.
- Backlighting:
- Effect: Creates a soft glow and separates the subject from the background.
- Best For: Creating a dreamy and ethereal look.
- Front Lighting:
- Effect: Provides even illumination and reduces shadows.
- Best For: Showcasing the colors and details of the food.
8.3. How Lighting Affects Different Background Materials
- Wood: Side lighting enhances the wood grain and texture, while backlighting creates a warm glow.
- Stone and Marble: Front lighting showcases the smooth surface, while side lighting highlights the subtle patterns.
- Fabric: Diffused lighting softens the fabric’s texture, while direct lighting creates strong shadows.
- Paper and Cardboard: Even lighting is best to avoid harsh shadows and glare.
- Vinyl: Soft, diffused lighting reduces reflections and highlights the texture.
- Concrete: Side lighting emphasizes the texture and adds depth.
8.4. Tips for Effective Lighting
- Use a Diffuser: Soften harsh light with a diffuser.
- Reflectors: Use reflectors to bounce light and fill in shadows.
- Adjust Light Intensity: Control the intensity of the light to create the desired mood.
- Experiment with Angles: Try different lighting angles to see what works best for each shot.
9. Food Styling Tips to Complement Your Background
Food styling is an art that can elevate your food photography. Combining effective food styling techniques with the right background can create stunning visuals that entice viewers.
9.1. Key Elements of Food Styling
- Color: Use a variety of colors to make the food look vibrant and appealing.
- Texture: Incorporate different textures to add depth and interest.
- Shape: Arrange the food in visually pleasing shapes and patterns.
- Garnish: Use garnishes to add color, texture, and flavor.
- Composition: Arrange the elements in a balanced and harmonious way.
9.2. How to Style Food Based on Background Type
- Rustic Wood Background:
- Styling: Emphasize natural and organic elements. Use wooden utensils, linen napkins, and fresh herbs.
- Food: Rustic dishes like pies, stews, and homemade bread.
- Elegant Marble Background:
- Styling: Focus on clean lines and sophisticated presentation. Use elegant silverware, crystal glasses, and delicate garnishes.
- Food: Fine dining dishes, desserts, and cocktails.
- Modern Concrete Background:
- Styling: Keep it minimalist and focus on clean, simple shapes. Use geometric plates and utensils.
- Food: Contemporary dishes, minimalist desserts, and trendy cuisine.
- Colorful Fabric Background:
- Styling: Play with complementary colors and textures. Use fabrics that enhance the food’s natural hues.
- Food: Comfort foods, colorful salads, and vibrant desserts.
9.3. Tips for Effective Food Styling
- Start with a Plan: Sketch out your styling ideas before you begin.
- Use Fresh Ingredients: Fresh ingredients look more appealing.
- Don’t Overcrowd the Scene: Keep the styling simple and focused.
- Pay Attention to Details: Small details can make a big difference.
- Practice and Experiment: Food styling is an art that requires practice.
10. SEO Optimization for Food Photography Backgrounds
Optimizing your food photography backgrounds for search engines can help your images reach a wider audience. Here are some key strategies for SEO optimization.
10.1. Keyword Research
- Identify Relevant Keywords: Use tools like Google Keyword Planner, Ahrefs, or SEMrush to find keywords related to food photography backgrounds.
- Examples: “food photography backgrounds,” “best food backdrops,” “DIY food backgrounds,” “rustic food backgrounds,” “marble food backgrounds.”
- Long-Tail Keywords: Focus on longer, more specific keywords to target niche audiences.
- Examples: “best vinyl food photography backgrounds,” “DIY wood food photography backgrounds,” “affordable food photography backdrops.”
10.2. On-Page Optimization
- Image File Names: Use descriptive file names that include relevant keywords.
- Example: Instead of “IMG_1234.jpg,” use “rustic-wood-food-photography-background.jpg.”
- Alt Text: Add descriptive alt text to your images, including relevant keywords.
- Example: “Rustic wood food photography background with a plate of homemade cookies.”
- Title Tags: Use title tags that accurately describe the image and include relevant keywords.
- Meta Descriptions: Write compelling meta descriptions that entice users to click.
- Content Optimization: Incorporate relevant keywords into your blog posts, articles, and product descriptions.
10.3. Off-Page Optimization
- Link Building: Build backlinks from other websites to improve your website’s authority.
- Social Media: Share your images on social media platforms like Instagram, Pinterest, and Facebook.
- Guest Blogging: Write guest posts for other food photography websites and blogs.
10.4. Tools for SEO Optimization
- Google Search Console: Monitor your website’s performance in Google Search.
- Google Analytics: Track your website’s traffic and user behavior.
- Yoast SEO: A popular WordPress plugin that helps you optimize your website for search engines.
By understanding and implementing these SEO strategies, you can increase the visibility of your food photography backgrounds and attract more viewers to your work.
Crafting the perfect food photograph is an intricate process, and the background plays a starring role. From selecting the ideal texture and color to mastering lighting and styling, every detail contributes to the final, mouth-watering image. Whether you choose to purchase professional backdrops or create your own DIY surfaces, the key is to experiment and find what works best for your unique style and subject.
Ready to take your food photography to the next level? FOODS.EDU.VN offers a wealth of resources, from in-depth tutorials on food styling to expert advice on lighting and composition. Visit FOODS.EDU.VN today and unlock your culinary creativity. For more information, visit us at 1946 Campus Dr, Hyde Park, NY 12538, United States, or contact us via WhatsApp at +1 845-452-9600. Let foods.edu.vn be your guide to creating unforgettable food photography.
FAQ about Food Backgrounds
1. What is the most versatile color for a food background?
Neutral colors like white, grey, and beige are the most versatile for food backgrounds because they complement a wide range of food colors and styles.
2. How do I choose the right texture for a food background?
Consider the type of food you’re photographing. Rough textures work well with rustic dishes, while smooth textures are ideal for elegant cuisine.
3. Can I use fabric as a food background?
Yes, fabric can be a great food background. Linen, cotton, and canvas are popular choices for adding texture and color to your photos.
4. What is the best size for a food photography background?
A medium-sized background (75cm x 100cm / 30″ x 40″) is a good starting point for most food photography setups, allowing for a variety of compositions.
5. Where can I buy affordable food photography backgrounds?
Online marketplaces like Etsy and Amazon offer a wide range of affordable food photography backgrounds, as well as local craft and hardware stores.
6. How do I clean a vinyl food background?
Vinyl food backgrounds can be easily cleaned with a damp cloth. Avoid using harsh chemicals that could damage the surface.
7. What is the best lighting for food photography backgrounds?
Side lighting is often the best for highlighting the texture of food photography backgrounds. Use a diffuser to soften harsh light.
8. How can I create my own DIY food background?
You can create your own DIY food background using materials like wood, cardboard, fabric, or paper. Experiment with different painting and texturing techniques.
9. What is the importance of alt text for food photography background images?
Alt text is important for SEO because it helps search engines understand the content of your images. Use descriptive alt text that includes relevant keywords.
10. How do I prevent glare on my food photography backgrounds?
Use matte backgrounds and soft, diffused lighting to prevent glare on your food photography backgrounds.