Dyeing eggs with food coloring is a fun and simple activity, and at foods.edu.vn, we’ll guide you through the process to create vibrant and colorful Easter eggs using common household ingredients. Discover the best techniques, color mixing tips, and creative decorating ideas for your egg-cellent creations. Let’s explore natural dyes, Easter crafts, and egg decoration trends to elevate your Easter celebrations.
1. What Supplies Do I Need to Dye Eggs with Food Coloring?
To dye eggs with food coloring, you’ll need a few basic supplies. Here’s a comprehensive list to ensure you’re well-prepared for this fun and creative activity. Gather these items and get ready to transform ordinary eggs into vibrant works of art.
- Hard-Boiled Eggs: These are the canvas for your colorful creations. Ensure they are properly hard-boiled to prevent cracking during the dyeing process.
- Liquid Food Coloring: Liquid food coloring works best for achieving vibrant and consistent colors. Gel food coloring can also be used, but it needs to be thoroughly dissolved in water.
- White Vinegar: Vinegar helps the eggshells absorb the dye more effectively, resulting in brighter and more even colors.
- Hot Water: Hot water is essential for dissolving the food coloring and vinegar, creating the dye solution.
- Cups or Bowls: Use separate cups or bowls for each color you plan to create. Clear glass or plastic containers are ideal for easy color viewing.
- Spoon or Wire Egg Holder: These tools will help you submerge the eggs in the dye without staining your hands.
- Paper Towels: Keep paper towels handy to dry the dyed eggs and clean up any spills.
- Egg Carton or Drying Rack: Use an empty egg carton or a wire rack to allow the dyed eggs to dry evenly.
- Gloves (Optional): If you want to avoid staining your hands, wear disposable gloves during the dyeing process.
- Tablecloth or Newspaper: Protect your work surface with a tablecloth or newspaper to prevent staining.
2. How Do You Prepare Eggs for Dyeing with Food Coloring?
Preparing eggs properly before dyeing with food coloring is crucial for achieving the best results. Follow these steps to ensure your eggs are ready to absorb the dye evenly and display vibrant colors. This process includes everything from hard-boiling to cooling, ensuring a smooth and effective dyeing experience.
2.1 Hard-Boiling the Eggs
- Place Eggs in a Saucepan: Gently place the eggs in a saucepan in a single layer.
- Cover with Water: Add enough cold water to cover the eggs by about an inch. According to the American Egg Board, this ensures even cooking.
- Bring to a Boil: Heat the saucepan over medium-high heat until the water comes to a rolling boil.
- Remove from Heat: Once boiling, remove the saucepan from the heat and cover it with a lid.
- Let Sit: Allow the eggs to sit in the hot water for 12-15 minutes. This timing ensures the yolks are fully cooked.
- Drain and Cool: Carefully drain the hot water and immediately run cold water over the eggs to stop the cooking process. This also makes the eggs easier to peel later.
2.2 Cooling the Eggs
- Cold Water Bath: Fill a bowl with ice water and place the cooked eggs in the ice bath for at least 10 minutes.
- Refrigerate: After cooling, refrigerate the eggs for at least 30 minutes before dyeing. This helps the dye adhere better to the eggshells. According to a study by the USDA, cooling eggs rapidly can also reduce the risk of bacterial growth.
2.3 Cleaning the Eggs
- Wash Gently: Before dyeing, gently wash the eggs with a mild soap and water to remove any dirt or residue.
- Dry Thoroughly: Ensure the eggs are completely dry before placing them in the dye. This helps the dye adhere evenly.
2.4 Additional Tips
- Use Fresh Eggs: Fresh eggs are easier to peel after boiling.
- Prevent Cracking: To prevent cracking during boiling, add a teaspoon of vinegar to the water.
- Even Cooking: Ensure the eggs are in a single layer in the saucepan for even cooking.
3. How Do You Make Egg Dye with Food Coloring?
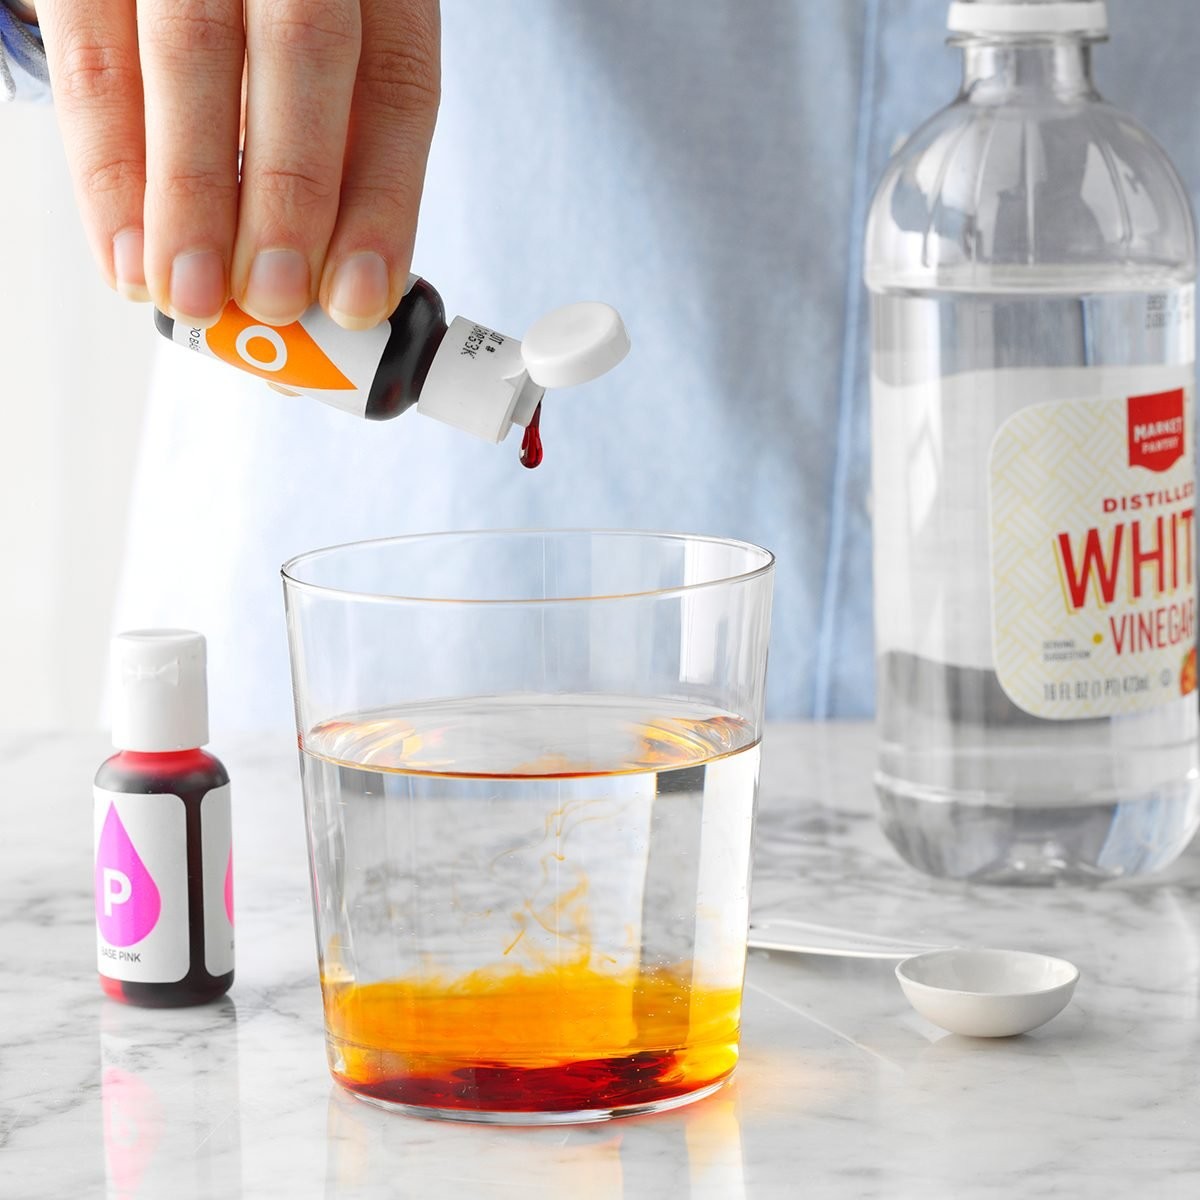
Creating egg dye with food coloring is a straightforward process that involves combining a few simple ingredients. Here’s how to make vibrant and effective egg dye using food coloring:
3.1 Ingredients
- 1/2 cup boiling water
- 1 teaspoon white vinegar
- 10-20 drops liquid food coloring (per color)
3.2 Instructions
- Prepare the Cups: Gather heat-safe cups or bowls, one for each color you plan to make. Clear cups are ideal for easy viewing of the dye color.
- Add Boiling Water: Pour 1/2 cup of boiling water into each cup.
- Add Vinegar: Add 1 teaspoon of white vinegar to each cup. Vinegar helps the dye adhere to the eggshell and enhances the color.
- Add Food Coloring: Add 10-20 drops of liquid food coloring to each cup. The amount of food coloring will determine the intensity of the color. Start with fewer drops for pastel shades and add more for deeper, more vibrant colors.
- Mix Thoroughly: Stir the mixture in each cup until the food coloring is completely dissolved and the color is uniform.
- Adjust Color: If the color is not as vibrant as you’d like, add a few more drops of food coloring until you achieve the desired shade. Remember that the color will appear lighter on the eggshell than it does in the cup.
- Cool Slightly: Allow the dye to cool slightly before using it to dye the eggs. This helps prevent the eggs from cracking due to temperature shock.
3.3 Tips for Best Results
- Use Liquid Food Coloring: Liquid food coloring is recommended for its ease of use and consistent results. Gel food coloring can also be used, but ensure it is fully dissolved to avoid uneven coloring.
- Experiment with Colors: Mix different food coloring drops to create custom colors. For example, red and yellow make orange, red and blue make purple, and yellow and blue make green.
- Use White Vinegar: White vinegar is essential for helping the dye adhere to the eggshell. Other types of vinegar may not work as effectively.
- Protect Your Work Area: Cover your work surface with a tablecloth or newspaper to prevent staining from spills.
- Use Heat-Safe Cups: Ensure the cups or bowls you use are heat-safe to avoid any accidents when pouring boiling water.
3.4 Safety Precautions
- Adult Supervision: Adult supervision is recommended, especially when working with boiling water and young children.
- Avoid Ingestion: Keep the dye solution away from children and pets to prevent accidental ingestion.
- Ventilation: Work in a well-ventilated area to avoid inhaling any fumes from the vinegar.
4. What Are the Best Techniques for Dyeing Eggs with Food Coloring?
Mastering the techniques for dyeing eggs with food coloring can elevate your Easter egg decorating from simple to spectacular. Here are some of the best methods to achieve vibrant, unique, and eye-catching results.
4.1 Basic Dyeing Technique
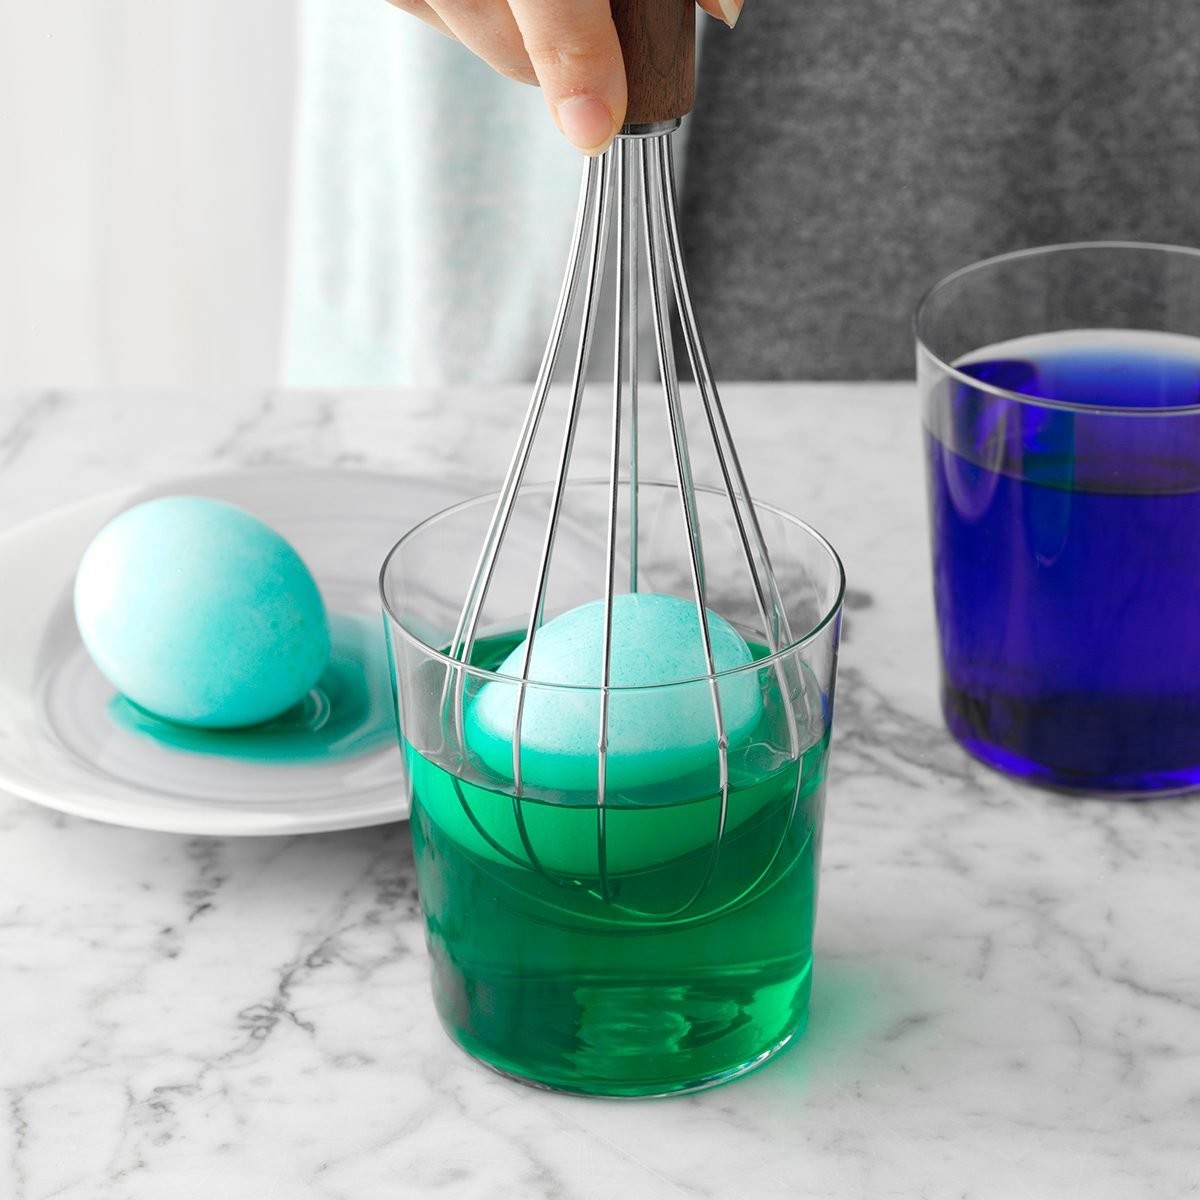
- Submerge the Egg: Using a spoon or wire egg holder, gently lower a hard-boiled egg into the cup of dye.
- Soak the Egg: Ensure the egg is fully submerged in the dye.
- Wait for the Color to Develop: Allow the egg to soak in the dye for 5-10 minutes. The longer the egg stays in the dye, the more vibrant the color will be.
- Check the Color: Periodically remove the egg to check the color. If it’s not dark enough, return it to the dye for a longer soak.
- Remove and Dry: Once the desired color is achieved, carefully remove the egg from the dye and place it on a paper towel or drying rack to dry.
- Dry Thoroughly: Allow the egg to dry completely before handling or storing.
4.2 Marbling Technique
- Prepare the Dye: Follow the basic dye recipe using different colors.
- Add Oil: In a separate shallow dish, add a few drops of vegetable oil or olive oil to each dye color. Swirl gently with a toothpick to create a marbled effect.
- Dip the Egg: Roll a hard-boiled egg in the oil-swirled dye. The oil will resist the dye, creating a marbled pattern.
- Dry the Egg: Remove the egg and let it dry on a paper towel.
4.3 Ombre Technique
- Prepare the Dye: Follow the basic dye recipe, but prepare multiple cups with varying concentrations of the same color. Start with a light shade and gradually increase the amount of food coloring to create darker shades.
- Dip Gradually: Dip the egg into the lightest shade first, leaving a small portion exposed. Soak for a few minutes.
- Dip Further: Dip the egg further into the next darker shade, overlapping the previous color. Soak for a few minutes.
- Repeat: Continue dipping the egg into progressively darker shades, overlapping each time, until you reach the desired ombre effect.
- Dry Thoroughly: Allow the egg to dry completely.
4.4 Splatter Technique
- Prepare the Dye: Follow the basic dye recipe.
- Protect the Egg: Dip the egg into a base color and let it dry completely.
- Splatter with Dye: Using a toothbrush or small brush, dip into a different dye color and gently flick the bristles towards the egg to create a splatter effect.
- Dry Thoroughly: Allow the egg to dry completely.
4.5 Layering Technique
- Prepare the Dye: Follow the basic dye recipe using different colors.
- Dip and Dry: Dip the egg into one color and let it dry completely.
- Dip Again: Dip the egg into a different color, either partially or completely, to create layers of color.
- Dry Thoroughly: Allow the egg to dry completely after each layer.
4.6 Tips for Best Results
- Use a Wire Egg Holder or Slotted Spoon: These tools make it easier to submerge and remove the eggs without damaging them or staining your hands.
- Experiment with Colors: Mix different food coloring drops to create custom colors and unique shades.
- Use White Eggs for Brighter Colors: White eggs will display the dye colors more vibrantly than brown eggs.
- Protect Your Work Area: Cover your work surface with a tablecloth or newspaper to prevent staining.
- Allow Eggs to Dry Completely: Make sure the eggs are completely dry before handling or storing to prevent smudging.
5. How Can You Mix Food Coloring to Create Unique Egg Dye Colors?
Creating unique egg dye colors by mixing food coloring is a fun and creative way to personalize your Easter eggs. By understanding basic color theory and experimenting with different combinations, you can achieve a wide range of beautiful and vibrant shades. Here’s how to mix food coloring effectively:
5.1 Understanding Primary and Secondary Colors
- Primary Colors: The primary colors are red, yellow, and blue. These colors cannot be created by mixing other colors together.
- Secondary Colors: Secondary colors are created by mixing two primary colors.
- Red + Yellow = Orange
- Yellow + Blue = Green
- Red + Blue = Purple
5.2 Mixing Techniques
- Start with Primary Colors: Begin with the primary colors (red, yellow, and blue) and mix them to create secondary colors.
- Use Small Amounts: Add food coloring in small drops to avoid over-saturating the dye. It’s easier to add more color than to dilute it.
- Mix Thoroughly: Stir the food coloring mixture well to ensure the color is uniform.
- Test the Color: Before dyeing your eggs, test the color by dipping a small piece of paper towel or a spare eggshell into the dye. This will give you a better idea of the final result.
- Adjust as Needed: If the color is not what you want, adjust by adding more of the primary colors until you achieve the desired shade.
5.3 Color Combinations and Shades
- Orange: Mix red and yellow in equal parts for a bright orange. Adjust the ratio to create different shades of orange (more red for a reddish-orange, more yellow for a yellowish-orange).
- Green: Mix yellow and blue in equal parts for a basic green. Add more yellow for a brighter, grass-green, or more blue for a deeper, forest-green.
- Purple: Mix red and blue in equal parts for a standard purple. Add more red for a warmer, reddish-purple, or more blue for a cooler, bluish-purple.
- Pink: Add a small amount of red to water for a light pink. Increase the amount of red for a deeper pink.
- Teal: Mix blue and green. Add a touch of white (if using gel food coloring) or dilute with more water for a lighter teal.
- Brown: Mix red, yellow, and blue in varying proportions. Start with equal parts and adjust until you get the desired shade of brown.
- Black: Mix equal parts of red, yellow, and blue, but use a larger quantity of each to create a concentrated, dark color.
5.4 Creating Pastel Colors
To create pastel colors, start with a white base and add very small amounts of food coloring until you achieve the desired light shade. You can create a white base by adding white gel food coloring to the water or by using a commercially available white egg dye.
5.5 Tips for Best Results
- Use Liquid Food Coloring: Liquid food coloring blends more easily than gel food coloring.
- Keep a Color Chart: Create a color chart by mixing different food coloring drops and recording the ratios. This will help you recreate your favorite colors in the future.
- Experiment: Don’t be afraid to experiment with different combinations to discover new and unique colors.
- Use White Eggs: White eggs will display the dye colors more vibrantly.
- Protect Your Work Area: Cover your work surface to prevent staining.
6. What Are Some Creative Ideas for Decorating Dyed Eggs?
Once you’ve mastered the art of dyeing eggs with food coloring, the next step is to explore creative decorating ideas that will make your Easter eggs truly stand out. Here are several innovative and fun ways to embellish your dyed eggs:
6.1 Polka Dots
- Dye the Egg: Dye the egg in a base color and let it dry completely.
- Apply Dots: Use a cotton swab or the rounded end of a toothpick to apply small dots of a different color onto the egg.
- Vary the Size: Create a whimsical effect by varying the size of the dots.
- Let Dry: Allow the dots to dry completely before handling.
6.2 Stripes
- Dye the Egg: Dye the egg in a base color and let it dry completely.
- Apply Tape: Use thin strips of masking tape or washi tape to create stripes on the egg.
- Dye Again: Dye the egg in a different color, covering the taped areas.
- Remove Tape: Once the second color has dried, carefully remove the tape to reveal the stripes.
6.3 Glitter Eggs
- Dye the Egg: Dye the egg in your desired color and let it dry slightly (it should still be a bit tacky).
- Apply Glue: Use a small brush to apply craft glue to the areas where you want the glitter.
- Sprinkle Glitter: Sprinkle glitter generously over the glued areas.
- Shake Off Excess: Gently shake off any excess glitter and let the egg dry completely.
6.4 Marbleized Eggs with Shaving Cream
- Prepare Shaving Cream: Fill a shallow dish with shaving cream and smooth the surface.
- Add Dye: Drip food coloring onto the shaving cream and swirl with a toothpick to create a marbled effect.
- Roll the Egg: Roll a hard-boiled egg in the shaving cream mixture, ensuring it is fully coated.
- Let Sit: Let the egg sit in the shaving cream for about 15-20 minutes.
- Rinse Gently: Rinse the egg gently under cool water to remove the shaving cream, revealing a marbled pattern.
- Dry Thoroughly: Let the egg dry completely.
6.5 Decoupage Eggs
- Dye the Egg: Dye the egg in a base color and let it dry completely.
- Prepare Decoupage Material: Cut out small shapes or designs from tissue paper, napkins, or printed images.
- Apply Glue: Use a small brush to apply a thin layer of decoupage glue (such as Mod Podge) to the area where you want to apply the design.
- Place Design: Carefully place the design onto the glued area and smooth it out with your fingers or a soft brush.
- Seal with Glue: Apply another thin layer of decoupage glue over the design to seal it.
- Let Dry: Let the egg dry completely.
6.6 Wax Resist Designs
- Apply Wax: Use a wax crayon or a wax resist tool to draw designs on the egg.
- Dye the Egg: Dye the egg in your desired color. The wax will resist the dye, leaving the design in the original color.
- Remove Wax (Optional): If desired, gently heat the egg with a hairdryer or in a warm oven to melt the wax. Wipe away the melted wax with a soft cloth.
6.7 Natural Elements
- Leaf Prints: Press small leaves or flowers against the egg before dyeing. Wrap the egg tightly in cheesecloth or pantyhose to hold the natural elements in place. Dye the egg and then carefully remove the wrappings to reveal the leaf prints.
- Twine Wrapping: Wrap twine or yarn around the egg to create textured patterns. Secure the ends with glue and let dry.
6.8 Tips for Best Results
- Use White Eggs: White eggs will display the decorated designs more vibrantly.
- Let Eggs Dry Completely: Ensure each layer of dye, glue, or glitter is completely dry before adding the next layer.
- Use Non-Toxic Materials: Ensure all materials used for decorating are non-toxic and safe for handling, especially if children are involved.
- Protect Your Work Area: Cover your work surface to prevent messes and staining.
- Get Creative: Don’t be afraid to experiment with different techniques and materials to create unique and personalized designs.
7. How Do Natural Dyes Compare to Food Coloring for Dyeing Eggs?
When it comes to dyeing eggs, both natural dyes and food coloring offer unique benefits and drawbacks. Understanding these differences can help you choose the best option for your needs, whether you prioritize vibrant colors, eco-friendliness, or ease of use. Here’s a detailed comparison to help you make an informed decision:
7.1 Natural Dyes
-
Pros:
- Eco-Friendly: Natural dyes are derived from plants, fruits, vegetables, and other natural sources, making them biodegradable and environmentally friendly.
- Non-Toxic: Natural dyes are safe for children and pets, as they do not contain synthetic chemicals.
- Unique Colors: Natural dyes often produce softer, more muted, and earthy tones that can be difficult to achieve with synthetic food coloring.
- Educational: Using natural dyes can be a fun and educational activity, teaching children about natural resources and sustainability.
-
Cons:
- Less Vibrant: Natural dyes typically produce less vibrant and intense colors compared to synthetic food coloring.
- More Time-Consuming: Preparing natural dyes can be more time-consuming, as it often involves simmering or steeping natural ingredients.
- Less Predictable: The color outcome can be less predictable with natural dyes, as it depends on the quality and concentration of the natural ingredients.
- Fading: Colors from natural dyes may fade more quickly over time compared to synthetic dyes.
7.2 Food Coloring
-
Pros:
- Vibrant Colors: Synthetic food coloring produces bright, intense, and consistent colors that are highly appealing.
- Easy to Use: Food coloring is easy to use and readily available in most grocery stores.
- Quick Results: Dyeing eggs with food coloring is a quick process, providing fast and reliable results.
- Wide Range of Colors: Food coloring is available in a wide range of colors, allowing for endless creative possibilities.
-
Cons:
- Synthetic Chemicals: Food coloring contains synthetic chemicals that may be a concern for some individuals, particularly those with allergies or sensitivities.
- Less Eco-Friendly: Synthetic dyes are not biodegradable and can contribute to environmental pollution.
- Potential Staining: Food coloring can easily stain skin, clothing, and surfaces, requiring caution during use.
- Artificial Appearance: The colors produced by food coloring can sometimes appear artificial and less natural compared to natural dyes.
7.3 Color Sources for Natural Dyes
| Color | Source | Preparation |
|---|---|---|
| Yellow | Turmeric, carrot tops | Simmer turmeric powder or carrot tops in water for 30 minutes. Strain the liquid and use it as a dye. |
| Orange | Onion skins | Boil onion skins in water for 30-45 minutes. Strain the liquid and use it as a dye. |
| Pink | Beet juice, raspberries | Use beet juice directly or boil chopped beets in water for 15-20 minutes. For raspberries, crush and strain them to obtain the juice. |
| Red | Pomegranate juice, hibiscus flowers | Use pomegranate juice directly or boil hibiscus flowers in water for 30 minutes. Strain the liquid and use it as a dye. |
| Purple | Red cabbage | Chop red cabbage and boil it in water for 30-45 minutes. Strain the liquid and use it as a dye. |
| Blue | Red cabbage (with baking soda) | Boil chopped red cabbage in water for 30-45 minutes. Strain the liquid and add a teaspoon of baking soda to turn the color blue. |
| Green | Spinach, liquid chlorophyll | Boil spinach leaves in water for 30 minutes. Strain the liquid and use it as a dye. Alternatively, add liquid chlorophyll to water. |
| Brown | Coffee, tea | Use strong brewed coffee or tea as a dye. For a deeper color, boil coffee grounds or tea bags in water for 30 minutes. Strain the liquid and use it as a dye. |
| Beige | Walnut shells | Boil walnut shells in water for 45-60 minutes. Strain the liquid and use it as a dye. |
| Dark Gray | Black beans | Soak black beans in water overnight. Boil the beans in the same water for about an hour. Strain the liquid and use it as a dye. |
7.4 Tips for Using Natural Dyes
- Use White Eggs: White eggs will display natural dye colors more vibrantly.
- Add Vinegar: Adding vinegar to the dye bath helps the color adhere to the eggshell.
- Soak Longer: Natural dyes may require longer soaking times to achieve the desired color intensity.
- Experiment: Don’t be afraid to experiment with different natural ingredients and techniques to achieve unique and beautiful results.
8. How Do You Store Dyed Eggs Safely?
Proper storage of dyed eggs is crucial for maintaining their quality and safety, especially if you plan to eat them. Following these guidelines will help prevent bacterial growth and ensure your dyed eggs remain fresh and safe to consume.
8.1 Refrigeration
- Refrigerate Promptly: Refrigerate hard-boiled eggs within two hours of dyeing. According to the USDA, eggs left at room temperature for more than two hours should be discarded to prevent bacterial growth.
- Store in the Refrigerator: Store the dyed eggs in the refrigerator at a temperature of 40°F (4°C) or below.
- Use an Egg Carton: Place the eggs in an egg carton to prevent them from rolling around and cracking.
- Avoid Overcrowding: Do not overcrowd the refrigerator to ensure proper air circulation, which helps maintain a consistent temperature.
8.2 Handling
- Wash Hands: Always wash your hands thoroughly with soap and water before handling dyed eggs.
- Use Clean Utensils: Use clean utensils, such as spoons or tongs, to handle the eggs.
- Avoid Cracks: Discard any eggs with cracks in the shell, as bacteria can easily penetrate through the cracks and contaminate the egg.
8.3 Storage Time
- Consume Within One Week: Hard-boiled eggs, including dyed eggs, should be consumed within one week of cooking. According to the FDA, this helps ensure they remain safe to eat.
- Discard After One Week: Discard any remaining dyed eggs after one week to avoid the risk of foodborne illness.
8.4 Freezing
- Do Not Freeze: Hard-boiled eggs, including dyed eggs, should not be frozen. Freezing can alter the texture of the egg whites, making them rubbery and unpalatable.
8.5 Storage Tips
- Label and Date: Label the container or egg carton with the date the eggs were cooked to keep track of their freshness.
- Store Separately: Store dyed eggs separately from other foods to prevent cross-contamination.
- Maintain Temperature: Avoid frequent opening and closing of the refrigerator to maintain a consistent temperature.
8.6 Safety Precautions
- Discard Suspicious Eggs: If you notice any unusual odor, discoloration, or slimy texture on the dyed eggs, discard them immediately.
- Monitor Temperature: Use a refrigerator thermometer to monitor the temperature and ensure it remains at or below 40°F (4°C).
- Proper Cooking: Ensure the eggs are properly hard-boiled to kill any bacteria. The yolks should be firm and fully cooked.
9. What Are the Potential Risks of Using Food Coloring to Dye Eggs?
While dyeing eggs with food coloring is a popular and fun activity, it’s important to be aware of the potential risks involved. Understanding these risks can help you take necessary precautions to ensure a safe and enjoyable experience.
9.1 Allergic Reactions
- Food Coloring Allergies: Some individuals may be allergic to certain food colorings. Common allergens include Red Dye No. 40, Yellow Dye No. 5 (Tartrazine), and Blue Dye No. 1.
- Symptoms: Allergic reactions can range from mild symptoms like skin rashes, hives, and itching to more severe symptoms such as difficulty breathing, swelling of the face, lips, or tongue, and anaphylaxis.
- Precautions: Check the ingredient list of the food coloring to identify potential allergens. If you have a known allergy, choose food coloring that does not contain the allergen. Perform a skin patch test before using the food coloring to check for any adverse reactions.
9.2 Skin Staining
- Staining Potential: Food coloring can easily stain skin, especially the hands and fingers.
- Prevention: Wear disposable gloves while dyeing eggs to prevent skin staining. Apply a barrier cream or lotion to your hands before wearing gloves for added protection.
- Removal: If staining occurs, wash your hands immediately with soap and water. Use a gentle scrub brush to help remove the dye. You can also try using a mixture of baking soda and water or lemon juice to help lift the stain.
9.3 Ingestion of Dye
- Accidental Ingestion: There is a risk of accidental ingestion of dye, especially when dyeing eggs with young children.
- Toxicity: While most food colorings are considered non-toxic in small amounts, consuming large quantities can cause adverse effects.
- Precautions: Keep food coloring out of reach of children and supervise them closely during the dyeing process. Use food-grade dyes specifically designed for coloring food. Avoid using craft dyes or other non-food-grade colorings.
9.4 Cross-Contamination
- Contamination Risk: Dyeing eggs can pose a risk of cross-contamination, especially if the eggs are cracked or improperly handled.
- Bacterial Growth: Bacteria, such as Salmonella, can contaminate the eggs through cracks in the shell, leading to foodborne illness.
- Precautions: Use only hard-boiled eggs that are free from cracks. Store dyed eggs properly in the refrigerator at a temperature of 40°F (4°C) or below. Consume dyed eggs within one week of cooking.
9.5 Environmental Concerns
- Environmental Impact: Synthetic food colorings are not biodegradable and can contribute to environmental pollution.
- Disposal: Improper disposal of food coloring and dye solutions can contaminate water sources and harm aquatic life.
- Precautions: Use natural dyes instead of synthetic food colorings to reduce the environmental impact. Dispose of dye solutions responsibly by diluting them with water and pouring them down the drain.
9.6 Tips for Minimizing Risks
- Read Labels: Always read the labels of food coloring products to identify potential allergens and follow safety instructions.
- Use Food-Grade Dyes: Use only food-grade dyes specifically designed for coloring food.
- Supervise Children: Supervise children closely during the dyeing process and keep food coloring out of their reach.
- Store Properly: Store dyed eggs properly in the refrigerator to prevent bacterial growth.
- Practice Good Hygiene: Wash your hands thoroughly before and after handling dyed eggs.
10. What are Some Alternatives to Food Coloring for Dyeing Eggs?
If you’re looking for alternatives to food coloring for dyeing eggs, there are several natural and creative options available. These alternatives can provide unique colors, reduce exposure to synthetic chemicals, and offer an eco-friendly approach to egg dyeing. Here are some popular alternatives:
10.1 Natural Dyes
- Plant-Based Dyes: Use natural dyes derived from plants, fruits, and vegetables to color eggs. Common sources include:
- Beets: Boil chopped beets in water to create a pink or red dye.
- Red Cabbage: Boil chopped red cabbage in water to create a blue or purple dye.
- Turmeric: Simmer turmeric powder in water to create a yellow dye.
- Onion Skins: Boil onion skins in water to create an orange or brown dye.
- Spinach: Boil spinach leaves in water to create a green dye.
- Preparation: Simmer the natural ingredients in water for 30-60 minutes to extract the color. Strain the liquid and add a teaspoon of vinegar to help the dye adhere to the eggshell.
- Soaking: Soak the eggs in the natural dye for at least 30 minutes, or longer for more vibrant colors.
10.2 Food-Based Dyes
- Fruit Juice: Use fruit juices like grape juice, cranberry juice, or pomegranate juice to dye eggs.
- Coffee or Tea: Use strong brewed coffee or tea to create a brown or beige dye.
- Preparation: Simply soak the eggs in the fruit juice, coffee, or tea until the desired color is achieved.
10.3 Shaving Cream Marbling
- Shaving Cream: Fill a shallow dish with shaving cream and smooth the surface.
- Food Coloring or Natural Dye: Add drops of food coloring or natural dye to the shaving cream and swirl with a toothpick to create a marbled effect.
- Rolling: Roll the eggs in the shaving cream mixture, ensuring they are fully coated.
- Sitting: Let the eggs sit in the shaving cream for about 15-20 minutes.
- Rinsing: Rinse the eggs gently under cool water to remove the shaving cream, revealing a marbled pattern.
10.4 Silk Tie Dyeing
- Silk Ties: Use old silk ties with intricate patterns to transfer the designs onto the eggs.
- Wrapping: Wrap the egg tightly in a piece of silk tie, with the patterned side against the eggshell.
- Boiling: Wrap the silk-covered egg in a piece of white cloth and secure it with string. Boil the wrapped egg in water with a tablespoon of vinegar for 20 minutes.
- Unwrapping: Remove the egg from the water and let it cool. Carefully unwrap the cloth and silk to reveal the transferred design.
10.5 Decoupage
- Materials: Use tissue paper, napkins, or printed images to decorate eggs using decoupage techniques.
- Applying Glue: Apply a thin layer of decoupage glue (such as Mod Podge) to the area where you want to apply the design.
- Placing Design: Carefully place the design onto the glued area and smooth it out with your fingers or a soft brush.
- Sealing with Glue: Apply another thin layer of decoupage glue over the design to seal it.
10.6 Wax Resist
- Materials: Use a wax crayon or a wax resist tool to draw designs on the egg.
- Dyeing: Dye the egg in your desired color. The wax will resist the dye, leaving the design in the original color.
- Removing Wax (Optional): If desired, gently heat the egg with a hairdryer or in a warm oven to melt the wax. Wipe away the melted wax with a soft cloth.
10.7 Glitter
- Dyeing: Dye the egg in your desired color and let it dry slightly.
- Applying Glue: Use a small brush to apply craft glue to the areas where you want the glitter.
- Sprinkling Glitter: Sprinkle glitter generously over the glued areas.
- Shaking Off: Gently shake off any excess glitter and let the egg dry completely.
10.8 Tips for Using Alternatives
- Use White Eggs: White eggs will display the alternative colors and designs more vibrantly.
- Experiment: Don’t be afraid to experiment with different techniques and materials to create unique and personalized designs.
- Protect Your Work Area: Cover your work surface to prevent messes and staining.
- Allow Drying Time: Ensure each layer of dye, glue, or glitter is completely dry before adding the next layer.
Dyeing eggs with food coloring is a cherished tradition that brings joy and creativity to Easter celebrations. With the right techniques, you can create stunning, vibrant eggs that will impress your family and friends. From mixing custom colors to trying out innovative decorating ideas, the possibilities are endless