Do you want to give your culinary creations a luxurious, eye-catching touch? Knowing How Do You Make The Color Gold With Food Coloring can elevate your cakes, cookies, and other treats. FOODS.EDU.VN is here to guide you through the process, ensuring you achieve that perfect golden shimmer.
We’ll explore the best methods for creating edible gold paint and share tips for achieving stunning results. Unlock a world of culinary artistry with our expert advice, from understanding food coloring to creating edible gold finishes and food decoration, perfect for cake decoration.
1. Understanding Food Coloring and Its Types
Food coloring is a dye, pigment, or substance that imparts color to food or drink. It comes in various forms, each with unique properties and applications. Understanding these differences is key to achieving the desired gold color.
1.1. Liquid Food Coloring
Liquid food coloring is perhaps the most common type found in grocery stores. It’s water-based and easy to blend, making it suitable for coloring large batches of batter or icing.
Pros:
- Widely available.
- Easy to blend.
- Affordable.
Cons:
- Less concentrated, requires more to achieve deep colors.
- Can thin out batters and icings if overused.
1.2. Gel Food Coloring
Gel food coloring, also known as gel paste, is much more concentrated than liquid coloring. It has a thicker consistency and delivers intense color with just a small amount. This is an excellent choice when you want vibrant colors without altering the consistency of your recipe.
Pros:
- Highly concentrated.
- Vibrant colors.
- Doesn’t significantly alter consistency.
Cons:
- Can be more expensive than liquid coloring.
- May require more effort to blend thoroughly.
1.3. Powdered Food Coloring
Powdered food coloring is a dry form of coloring that’s ideal for applications where you want to avoid adding any liquid. It’s often used in chocolate work and dry mixes.
Pros:
- No added liquid.
- Concentrated color.
- Long shelf life.
Cons:
- Can be tricky to blend evenly.
- May require special techniques for certain applications.
1.4. Natural Food Coloring
Derived from natural sources like fruits, vegetables, and spices, these colorings offer a more wholesome approach.
Pros:
- Made from recognizable food sources.
- Appeals to those avoiding artificial additives.
- Can offer subtle flavor enhancements.
Cons:
- Colors may be less vibrant than artificial options.
- Some natural colorings can be heat-sensitive.
1.5. Oil-Based Food Coloring
Specifically designed for use with chocolate and other fat-based products, as water-based colorings can cause seizing.
Pros:
- Mixes seamlessly with fats.
- Maintains the smooth texture of chocolate.
- Prevents separation and streaking.
Cons:
- Not suitable for water-based applications.
- Can be more limited in color selection.
2. Achieving the Golden Color: Color Mixing Techniques
Creating a true gold color with food coloring can be a bit of an art. It typically involves mixing several colors to achieve the desired shade. Here’s how to do it effectively:
2.1. Understanding the Color Wheel
The color wheel is your best friend when it comes to mixing colors. Gold is not a primary or secondary color, so you’ll need to create it by combining existing colors. The key is to understand which colors complement each other and how they interact.
2.2. Basic Color Combinations for Gold
- Yellow and Brown: The foundation of most gold colors involves a yellow base with a touch of brown. Start with a good quality yellow gel food coloring and gradually add brown until you achieve a warm, golden hue.
- Yellow, Orange, and a Hint of Red: For a richer, more vibrant gold, combine yellow and orange. A tiny amount of red can add depth, but be careful not to add too much, or you’ll end up with a reddish-gold.
- Yellow and Green: This creates a pale gold that may look more neutral than yellow gold.
- Lemon Yellow, Golden Yellow, and Bronze: Using various shades of yellow and a touch of bronze food coloring can create a complex and realistic gold color.
2.3. Tips for Mixing Colors
- Start with Yellow: Always begin with yellow as your base color. It’s easier to add small amounts of other colors to adjust the shade than to try and lighten a dark color.
- Use Gel Food Coloring: Gel colors provide the most concentrated and consistent results.
- Mix Small Amounts: Add colors in very small increments, mixing thoroughly after each addition. This prevents you from accidentally overshooting your target color.
- Keep a Record: If you find a color combination you love, write it down! This will make it easier to recreate the color in the future.
2.4. Creating Metallic Gold
To achieve a metallic gold effect, you’ll need to use luster dust or edible gold dust in addition to your base color.
- Color Your Base: First, color your fondant, icing, or batter with the gold color you’ve mixed using the techniques above.
- Apply Luster Dust: Once your base is colored, use a soft brush to apply edible gold luster dust. The luster dust will give your creation a shimmering, metallic finish.
- Mix with Alcohol: For painting detailed designs, mix the luster dust with a small amount of vodka or lemon extract to create a paint. The alcohol will evaporate, leaving behind the shimmering gold color.
 Mixing edible gold luster dust with vodka
2.5. Troubleshooting
- Color Too Dark: If your gold is too dark, add more yellow to lighten it.
- Color Too Red: If your gold has a reddish hue, add a touch of green or yellow to balance it out.
- Color Not Metallic Enough: If your gold lacks the desired shimmer, apply another layer of luster dust.
3. Step-by-Step Guide: Making Edible Gold Paint
Edible gold paint is perfect for adding fine details and shimmering accents to your baked goods. Here’s a detailed guide on how to make it:
3.1. Ingredients You’ll Need
- Edible Gold Luster Dust: This is what provides the metallic shimmer. Ensure it’s specifically labeled as “edible.”
- High-Proof Alcohol (Vodka or Everclear): Alcohol evaporates quickly, leaving behind only the gold luster dust.
- Small Dish or Palette: For mixing the paint.
- Fine-Tipped Brush: For precise application.
3.2. Step-by-Step Instructions
- Prepare Your Workspace: Set up your workspace with all the necessary ingredients and tools.
- Pour Luster Dust: Place a small amount of edible gold luster dust into your mixing dish. Start with about 1/4 teaspoon, as you can always add more.
- Add Alcohol: Gradually add high-proof alcohol (vodka or Everclear) to the luster dust, a few drops at a time. Mix with your brush until you achieve a smooth, paint-like consistency. The mixture should be fluid enough to spread easily but not too watery.
- Mix Thoroughly: Ensure there are no clumps and that the luster dust is fully incorporated into the alcohol.
- Test the Paint: Before applying to your final product, test the paint on a small, inconspicuous area to ensure the color and consistency are correct.
- Apply the Paint: Use a fine-tipped brush to carefully paint your desired design onto your cake, cookies, or other treats.
- Let it Dry: Allow the paint to dry completely. The alcohol will evaporate, leaving behind a beautiful, shimmering gold finish.
3.3. Tips for Perfecting Your Edible Gold Paint
- Use High-Quality Luster Dust: The quality of your luster dust will significantly impact the final result. Invest in a reputable brand for the best shimmer.
- Adjust Consistency: If the paint is too thick, add a drop or two more of alcohol. If it’s too thin, add a bit more luster dust.
- Clean Your Brush: Keep your brush clean by rinsing it in alcohol periodically during use.
- Work in Layers: For a more intense gold color, apply multiple thin layers of paint, allowing each layer to dry before applying the next.
3.4. Alternative Methods and Ingredients
- Lemon Extract: If you prefer not to use alcohol, lemon extract can be used as a substitute. However, it may leave a slight lemon flavor.
- Edible Gold Gel: Some brands offer edible gold gel, which can be used directly or mixed with a bit of alcohol for painting.
- Commercial Edible Gold Paint: For convenience, you can purchase pre-made edible gold paint from specialty baking supply stores.
4. Applications: Using Edible Gold on Different Treats
Edible gold can elevate a wide variety of treats, from cakes to cookies to chocolates. Here’s how to apply it effectively to different surfaces:
4.1. Cakes
- Fondant: Edible gold paint works beautifully on fondant. Use a fine brush to paint intricate designs or cover entire surfaces for a luxurious look.
- Buttercream: For buttercream, it’s best to apply gold leaf or a thicker gold paint to prevent the color from bleeding into the frosting.
- Ganache: A light dusting of gold luster dust can add a sophisticated touch to ganache-covered cakes.
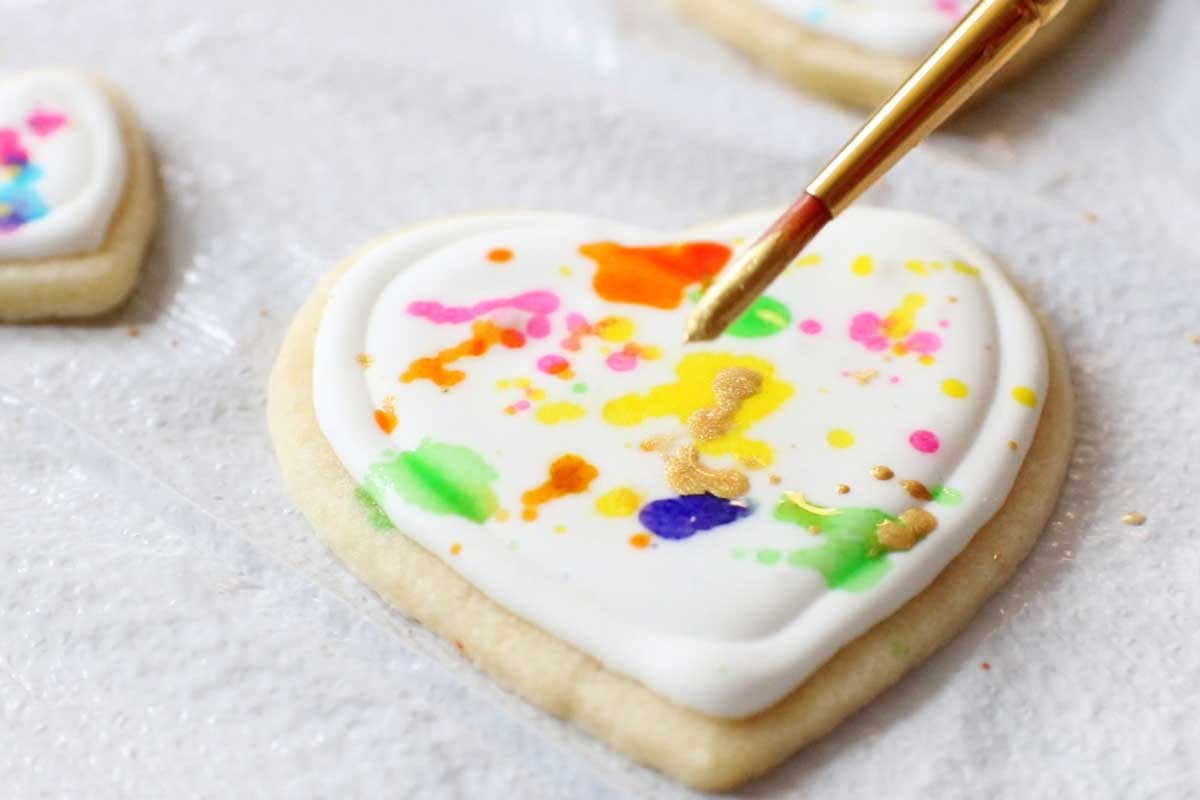
4.2. Cookies
- Royal Icing: Edible gold paint is perfect for adding details to royal icing designs. You can also use gold luster dust to create a shimmering background.
- Sugar Cookies: Brush edible gold paint onto sugar cookies for an elegant touch. Consider using stencils for precise designs.
4.3. Chocolates
- Chocolate Truffles: Dip truffles in melted chocolate and then dust with edible gold powder for a glamorous finish.
- Chocolate Decorations: Paint chocolate molds with edible gold paint before filling them with melted chocolate for intricate gold details.
4.4. Macarons
- Shell Decoration: Use a fine brush to paint delicate gold patterns on macaron shells.
- Dusting: Lightly dust the tops of macarons with edible gold powder for a subtle shimmer.
4.5. Other Treats
- Cupcakes: Add gold sprinkles or paint gold accents on cupcake frosting.
- Cake Pops: Dip cake pops in melted chocolate and then drizzle with edible gold paint.
- Dessert Sauces: Swirl edible gold paint into dessert sauces for a luxurious presentation.
5. Creative Ideas: Enhancing Your Culinary Creations
Edible gold can be used in countless creative ways to enhance your culinary creations. Here are a few ideas to get you started:
5.1. Gold Leaf Accents
Gold leaf is incredibly thin sheets of edible gold that can be applied to various surfaces for a luxurious touch.
- Application: Use a small brush to carefully apply the gold leaf to your cake, cookies, or chocolates. The surface should be slightly sticky to help the gold leaf adhere.
- Techniques: Create a cracked gold leaf effect by gently pressing the gold leaf onto the surface and then lightly brushing it away in certain areas.
5.2. Stenciled Designs
Stencils can help you create precise and intricate gold designs on your baked goods.
- Application: Place the stencil on your cake or cookie and then use a brush or airbrush to apply edible gold paint or luster dust.
- Techniques: Experiment with different stencil designs and layering techniques to create unique effects.
5.3. Airbrushing
Airbrushing allows you to apply edible gold paint evenly and smoothly over large surfaces.
- Application: Use an airbrush to spray a thin layer of edible gold paint onto your cake, cookies, or chocolates.
- Techniques: Create ombre effects by gradually building up the color from light to dark.
5.4. Incorporating Gold into Cake Pops
Cake pops provide a perfect canvas for edible gold embellishments.
- Dipped Glamour: After dipping cake pops in chocolate, let them set slightly, then use edible gold leaf to add a shimmering effect.
- Golden Drizzle: Drizzle edible gold paint in a swirling pattern over the cake pops for a sophisticated touch.
- Luster Dust Coating: Roll the cake pops in edible gold luster dust to give them a fully gilded appearance.
5.5. Enhancing Cupcakes with Gold
Cupcakes, whether for a party or a simple treat, can be elevated with edible gold.
- Frosted Elegance: Add edible gold flakes to the frosting of cupcakes for a touch of luxury.
- Stencil Designs: Use stencils to apply gold dust patterns on the frosting, creating elegant designs.
- Gold-Infused Toppers: Make cupcake toppers with edible gold paint, such as stars or monograms, for personalized decorations.
6. Safety and Storage: Ensuring the Best Results
6.1. Choosing Edible Gold Products
- Read Labels: Always check the label to ensure that the product is specifically marked as “edible gold” or “edible luster dust.”
- Avoid Imitations: Be wary of products that claim to be gold but don’t have proper labeling. These may contain non-edible materials.
- Purchase from Reputable Suppliers: Buy your edible gold products from trusted suppliers who specialize in baking and confectionery supplies.
6.2. Safe Handling Practices
- Use Clean Tools: Always use clean brushes, dishes, and utensils when working with edible gold.
- Avoid Contamination: Prevent cross-contamination by keeping edible gold products separate from other ingredients.
- Wear Gloves: Consider wearing gloves to prevent oils from your hands from affecting the gold.
6.3. Storage Guidelines
- Keep in a Cool, Dry Place: Store edible gold products in a cool, dry place away from direct sunlight.
- Seal Tightly: Ensure that the containers are tightly sealed to prevent moisture from entering.
- Check Expiration Dates: Pay attention to expiration dates and discard any products that are past their prime.
7. Overcoming Common Challenges
7.1. Achieving Even Coverage
- Use a Soft Brush: Use a soft, high-quality brush to apply edible gold paint or luster dust.
- Apply Thin Layers: Apply thin, even layers to prevent streaks and uneven coverage.
- Practice Your Technique: Practice on a scrap surface before applying to your final product.
7.2. Preventing Smudging
- Allow Paint to Dry Completely: Ensure that the edible gold paint is completely dry before handling your baked goods.
- Avoid Touching: Avoid touching the gold areas to prevent smudging.
- Use a Protective Coating: If necessary, apply a thin layer of edible glaze to protect the gold finish.
7.3. Dealing with Humidity
- Work in a Dry Environment: If possible, work in a dry environment to prevent the edible gold from becoming sticky or clumpy.
- Use a Dehumidifier: Use a dehumidifier to reduce the humidity in your workspace.
- Store in an Airtight Container: Store your finished products in an airtight container to protect them from moisture.
8. Expert Tips and Tricks
8.1. Enhancing the Gold Sheen
- Use a White Base: Applying edible gold over a white base can enhance its sheen and brightness.
- Layer Colors: Layer different shades of gold to create depth and dimension.
- Highlight with Silver: Adding small accents of edible silver can make the gold stand out even more.
8.2. Creating Unique Textures
- Crackle Effect: Create a crackle effect by applying a thin layer of edible glue to your surface and then pressing on edible gold leaf.
- Sponging: Use a sponge to dab edible gold paint onto your surface for a textured look.
- Brushing: Use a stiff brush to create brushstroke effects with edible gold paint.
8.3. Achieving Realistic Gold Effects
- Study Real Gold: Observe real gold to understand how it reflects light and how different textures affect its appearance.
- Use Reference Images: Use reference images of gold jewelry and other gold objects to guide your designs.
- Experiment with Lighting: Experiment with different lighting conditions to see how they affect the appearance of your edible gold creations.
9. The Science Behind Edible Gold
9.1. What is Edible Gold Made Of?
Edible gold is typically made of pure gold (22-24 karats) that has been processed into very thin sheets or flakes. It is chemically inert, meaning it doesn’t react with the body and passes through undigested.
9.2. Is Edible Gold Safe to Consume?
Yes, edible gold is considered safe to consume in small quantities. It has been used for centuries in various cultures for decorative purposes in food and beverages.
9.3. The Role of Luster Dust
Luster dust is a type of edible glitter that adds shimmer and shine to baked goods. It is made from non-toxic colorings and mica, a naturally occurring mineral.
10. Trendsetting with Gold: Inspiration and Ideas
10.1. Current Trends in Edible Gold Decoration
- Metallic Cakes: Cakes covered entirely in edible gold are a popular trend for weddings and other special occasions.
- Gold-Accented Desserts: Adding small gold accents to desserts like macarons and cupcakes is a subtle yet elegant way to elevate their appearance.
- Geode Cakes: Geode cakes, which feature edible crystals and gold accents, are a stunning and unique trend.
10.2. Drawing Inspiration from Art and Fashion
- Art Deco: Incorporate Art Deco-inspired designs into your edible gold creations for a glamorous and sophisticated look.
- Runway Trends: Look to runway trends for inspiration on how to incorporate gold into your designs. Metallic fabrics and gold embellishments are often featured in high-fashion collections.
- Nature: Draw inspiration from nature by creating edible gold designs that mimic the patterns and textures found in leaves, flowers, and other natural elements.
10.3. Showcasing Your Creations
- Photography: Take high-quality photos of your edible gold creations to showcase their beauty and craftsmanship.
- Social Media: Share your photos on social media platforms like Instagram and Pinterest to reach a wider audience.
- Competitions: Enter your creations in baking and cake decorating competitions to gain recognition and feedback.
FAQ: Your Burning Questions Answered
1. Can I use regular craft glitter instead of edible glitter?
No, never use regular craft glitter on food. Craft glitter is made from plastic and other non-edible materials that can be harmful if ingested. Always use edible glitter specifically labeled for food use.
2. Does edible gold have a taste?
Pure edible gold is tasteless. However, some edible gold products may have a slight flavor due to other ingredients or coatings.
3. How much does edible gold cost?
The cost of edible gold varies depending on the form and quality. Gold leaf is typically more expensive than luster dust or edible gold paint.
4. Can I make edible gold paint without alcohol?
Yes, you can use lemon extract or a clear spirit instead of alcohol. However, alcohol evaporates the fastest and provides the best results.
5. How long does edible gold last on baked goods?
Edible gold can last for several days on baked goods if stored properly. However, it may fade or smudge over time, especially in humid conditions.
6. Can I reuse edible gold?
No, it is not recommended to reuse edible gold once it has been applied to food. This can help prevent contamination and ensure the best results.
7. Is edible gold suitable for people with allergies?
Edible gold itself is not typically an allergen. However, be sure to check the label for any other ingredients that may cause an allergic reaction.
8. Can I use edible gold on savory dishes?
Yes, edible gold can be used on savory dishes to add a touch of luxury and elegance. Consider using it as a garnish for appetizers, soups, or main courses.
9. Where can I buy edible gold?
Edible gold can be purchased from specialty baking supply stores, online retailers, and some gourmet food stores.
10. How do I clean brushes used with edible gold paint?
Clean brushes used with edible gold paint with warm, soapy water or alcohol. Be sure to rinse them thoroughly and allow them to dry completely before storing.
Conclusion: Embrace the Golden Touch
Mastering how do you make the color gold with food coloring opens up a world of creative possibilities in the kitchen. From understanding different types of food coloring to mastering mixing techniques, you can now create stunning gold accents on cakes, cookies, chocolates, and more.
Remember to always prioritize safety by using edible gold products and following proper handling and storage guidelines. With a little practice and creativity, you can transform your culinary creations into glittering works of art.
Ready to explore more culinary secrets and elevate your baking skills? Visit FOODS.EDU.VN for a treasure trove of expert advice, detailed guides, and innovative recipes. Discover the art of perfect pastry, the science of delicious sauces, and the joy of creating unforgettable meals.
Let FOODS.EDU.VN be your guide to a world of culinary excellence. Join our community of passionate food lovers and take your skills to the next level. Start your journey today and unlock the endless possibilities of the culinary world!
Address: 1946 Campus Dr, Hyde Park, NY 12538, United States
Whatsapp: +1 845-452-9600
Website: foods.edu.vn