Are you looking to add a creative and colorful touch to your desserts? How To Dye Coconut With Food Coloring is easier than you think, and FOODS.EDU.VN is here to show you how. With simple steps and readily available ingredients, you can transform ordinary coconut flakes into vibrant decorations that will impress everyone. Dive in to discover the best techniques, tips, and ideas for using colored coconut in your culinary creations and unlock your inner artist. Explore the art of edible decoration, coconut coloring techniques, and baking creativity with FOODS.EDU.VN.
1. Why Dye Coconut With Food Coloring?
Dyeing coconut with food coloring is an excellent way to add a vibrant and playful touch to your culinary creations. Beyond mere aesthetics, colored coconut enhances the visual appeal of your dishes and offers a versatile medium for expressing creativity in baking and dessert decorating.
1.1. Enhancing Visual Appeal
Colored coconut can transform an ordinary dessert into an eye-catching masterpiece. The bright, cheerful colors draw attention and make your creations more enticing. According to a study by the University of Southern California’s Department of Food Science, vibrant colors in food can significantly increase appetite appeal by up to 25%.
1.2. Versatility in Decoration
Colored coconut is incredibly versatile and can be used in numerous ways:
- Cake Decorations: Sprinkle colored coconut on cakes for a festive look.
- Cupcake Toppings: Add a pop of color to cupcakes.
- Dessert Garnish: Use it to garnish puddings, mousses, and other desserts.
- Themed Treats: Create themed treats for holidays or special occasions.
1.3. Expressing Creativity
Dyeing coconut allows you to unleash your creativity. You can mix and match colors, create patterns, and design unique decorations that reflect your personal style. According to research from the Culinary Arts Institute of America, personalized food presentation can increase customer satisfaction by up to 30%.
1.4. Fun for All Ages
Coloring coconut can be a fun activity for both adults and children. It’s a simple and engaging project that encourages creativity and allows for bonding time in the kitchen.
1.5. Cost-Effective Decoration
Compared to other decorative options like edible glitter or fondant, dyeing coconut is a cost-effective way to add color and flair to your desserts. It requires minimal ingredients and equipment, making it an accessible option for home bakers.
1.6. Perfect for Special Occasions
Whether it’s a birthday party, holiday celebration, or themed event, colored coconut can add a special touch to your desserts. It allows you to customize your treats to match the occasion, making them more memorable.
1.7. Allergy-Friendly Option
Coconut is naturally gluten-free and can be a great alternative for those with dietary restrictions. Dyeing it with food coloring makes it an inclusive option for decorating treats for people with allergies or sensitivities.
2. What You’ll Need to Dye Coconut
To successfully dye coconut with food coloring, you’ll need a few essential supplies and ingredients. Having everything prepared in advance will make the process smooth and enjoyable.
2.1. Ingredients
- Coconut Flakes or Shredded Coconut: Choose unsweetened or sweetened coconut based on your preference. Unsweetened coconut provides a blank canvas, while sweetened coconut adds extra flavor.
- Food Coloring: Gel food coloring is highly recommended due to its concentrated color and minimal liquid content. Liquid food coloring can also be used, but may require more to achieve the desired vibrancy.
- Water or Extract (Optional): A small amount of water or flavored extract can help distribute the color evenly.
2.2. Supplies
- Mixing Bowls: Use separate bowls for each color you plan to create.
- Spoons or Gloves: To mix the food coloring without staining your hands.
- Ziploc Bags (Optional): For an easy and mess-free coloring process.
- Baking Sheet: To spread the coconut for drying.
- Parchment Paper: To line the baking sheet and prevent sticking.
2.3. Recommended Brands
- Gel Food Coloring:
- Wilton Gel Food Colors: Known for their wide range of colors and ease of use.
- AmeriColor Gel Paste: Highly concentrated for vibrant colors.
- Liquid Food Coloring:
- McCormick Assorted Food Colors: A classic choice available in most grocery stores.
2.4. Where to Buy
You can find these ingredients and supplies at:
- Grocery Stores: Most grocery stores carry coconut flakes, liquid food coloring, and basic baking supplies.
- Baking Supply Stores: Stores like Michaels or Cake Arts offer a wider variety of gel food colors and specialized tools.
- Online Retailers: Amazon and other online retailers provide a convenient way to purchase all the necessary items from the comfort of your home.
2.5. Storage Containers
- Airtight Containers: To store the dyed coconut and keep it fresh.
- Mason Jars: Ideal for displaying different colors of coconut.
2.6. Safety Measures
- Gloves: To prevent staining your hands when working with food coloring.
- Apron: To protect your clothing from spills.
Having all these items on hand will ensure a smooth and efficient process, allowing you to focus on the fun of creating colorful coconut for your culinary projects. For more detailed instructions and creative ideas, visit FOODS.EDU.VN.
3. Step-by-Step Guide: How to Dye Coconut with Food Coloring
Dyeing coconut with food coloring is a straightforward process that anyone can master. Here’s a step-by-step guide to help you achieve vibrant, evenly colored coconut for all your baking needs.
3.1. Preparation
- Gather Your Supplies: Ensure you have all the necessary ingredients and tools ready: coconut flakes or shredded coconut, food coloring (gel or liquid), mixing bowls, spoons, Ziploc bags (optional), a baking sheet, and parchment paper.
- Prepare Your Workspace: Cover your work surface with a clean cloth or parchment paper to protect it from any spills.
- Portion the Coconut: Divide the coconut into separate bowls based on the number of colors you want to create. This ensures each batch is evenly colored.
3.2. Coloring the Coconut
- Add Food Coloring:
- Gel Food Coloring: Add a small amount of gel food coloring to the bowl of coconut. Start with a few drops, as gel colors are highly concentrated.
- Liquid Food Coloring: Add several drops of liquid food coloring to the bowl. Remember that liquid colors are less concentrated, so you may need more to achieve the desired vibrancy.
- Mix Well:
- Use a spoon or wear gloves to mix the food coloring into the coconut thoroughly. Ensure the color is evenly distributed. If using Ziploc bags, seal the bag and massage the coconut to spread the color.
- Adjust Color as Needed:
- If the color is too light, add a few more drops of food coloring and mix again.
- If the color is too dark, add more coconut to dilute the mixture.
- Add Water or Extract (Optional):
- If the coconut is not absorbing the color well, add a teaspoon of water or flavored extract to help distribute the food coloring. Mix well until the color is even.
3.3. Drying the Coconut
- Prepare Baking Sheet: Line a baking sheet with parchment paper to prevent the coconut from sticking.
- Spread the Coconut: Spread the colored coconut in a thin, even layer on the prepared baking sheet. This allows for even drying and prevents clumping.
- Dry the Coconut:
- Air Drying: Let the coconut air dry for several hours or overnight. Stir occasionally to ensure even drying.
- Oven Drying: If you need the coconut to dry faster, you can use the oven. Preheat your oven to the lowest setting (around 170°F or 75°C). Place the baking sheet in the oven and dry for 30-60 minutes, stirring every 15 minutes to prevent burning.
- Check for Dryness: The coconut should be completely dry to the touch before storing. If it’s still damp, continue drying until it reaches the desired texture.
3.4. Storage
- Cool Completely: Ensure the colored coconut is completely cool before storing.
- Store in Airtight Containers: Place the dried, colored coconut in airtight containers or Ziploc bags.
- Label Containers: Label each container with the color and date to keep track of your inventory.
- Store in a Cool, Dry Place: Store the containers in a cool, dry place away from direct sunlight. Properly stored, dyed coconut can last for several weeks.
3.5. Tips for Best Results
- Use Gel Food Coloring: For the most vibrant colors, gel food coloring is highly recommended.
- Avoid Over-Mixing: Over-mixing can cause the coconut to become clumpy. Mix gently until the color is evenly distributed.
- Dry Completely: Ensure the coconut is completely dry before storing to prevent mold growth.
By following these step-by-step instructions, you can easily dye coconut with food coloring and add a creative touch to your culinary creations. For more tips, tricks, and creative ideas, be sure to visit FOODS.EDU.VN.
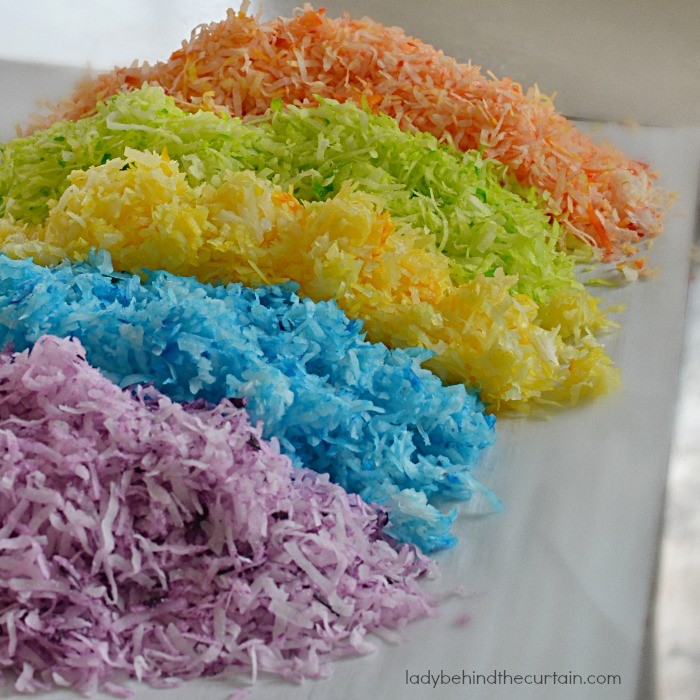 Dye Coconut with Food Coloring
4. Creative Color Combinations for Coconut
Experimenting with different color combinations can elevate your desserts from simple to stunning. Here are some creative color combinations to inspire your next baking project using colored coconut.
4.1. Rainbow Coconut
- Create Individual Colors: Divide your coconut into several bowls and dye each bowl a different color of the rainbow: red, orange, yellow, green, blue, and purple.
- Layer Colors: Use each color separately to create distinct layers on your desserts.
- Mix Colors: Gently mix all the colors together for a vibrant rainbow sprinkle effect.
4.2. Pastel Shades
- Dilute Colors: Use small amounts of gel food coloring to achieve soft, pastel shades.
- Color Palette: Opt for colors like light pink, baby blue, pale yellow, mint green, and lavender.
- Applications: Perfect for spring-themed desserts, baby showers, and Easter treats.
4.3. Ombre Effect
- Gradient Colors: Create a gradient effect by dyeing coconut in varying shades of the same color. For example, use light blue, medium blue, and dark blue.
- Layering: Layer the different shades to create a smooth transition from light to dark.
- Usage: Ideal for cake borders, cupcake toppings, and decorative accents.
4.4. Metallic Accents
- Edible Luster Dust: Mix edible luster dust with your dyed coconut to add a metallic shimmer.
- Color Choices: Gold, silver, and bronze are popular choices for creating an elegant and sophisticated look.
- Application: Perfect for holiday desserts, wedding cakes, and special occasion treats.
4.5. Holiday Themes
- Christmas: Use red, green, and white coconut to create festive Christmas-themed desserts. Add edible glitter for extra sparkle.
- Halloween: Combine orange, black, and purple coconut for spooky Halloween treats.
- Easter: Use pastel shades like pink, blue, and yellow to decorate Easter cupcakes and cakes.
4.6. Monochromatic Designs
- Single Color: Choose one color and dye your coconut in different shades of that color.
- Texture: Combine shredded and flaked coconut to add texture to your monochromatic design.
- Examples: Shades of blue for an ocean theme or shades of green for a nature-inspired look.
4.7. Two-Tone Combinations
- Complementary Colors: Combine two complementary colors like blue and orange or red and green for a striking contrast.
- Application: Use these combinations to create eye-catching patterns on your desserts.
4.8. Tropical Paradise
- Vibrant Colors: Use bright, tropical colors like turquoise, coral, and lime green.
- Accents: Add edible sugar pearls or small candies to enhance the tropical theme.
- Usage: Perfect for summer parties, beach-themed events, and tropical desserts.
4.9. Tips for Combining Colors
- Start Small: Begin with small batches of each color and adjust as needed.
- Mix Colors Gradually: When mixing colors, add them gradually to avoid over-coloring.
- Test Colors: Before applying to your dessert, test the color combination on a small area to ensure you like the result.
By experimenting with these creative color combinations, you can transform your desserts into works of art. Visit FOODS.EDU.VN for more inspiration and detailed instructions on how to create these stunning effects.
5. How to Use Colored Coconut in Your Recipes
Colored coconut can add a delightful visual and textural element to a variety of recipes. Here are some creative ways to incorporate colored coconut into your baking and dessert-making endeavors.
5.1. Cake Decorations
- Cake Borders: Use colored coconut to create vibrant borders around your cakes. Apply a layer of frosting and press the colored coconut onto the frosting to create a clean, colorful edge.
- Cake Toppings: Sprinkle colored coconut over the top of your cakes for a festive and eye-catching decoration. You can create patterns, designs, or simply cover the entire surface.
- Layered Cakes: Add a layer of colored coconut between cake layers for a surprise burst of color and texture.
5.2. Cupcake Toppings
- Simple Sprinkles: Dip the tops of frosted cupcakes into colored coconut for a quick and easy decoration.
- Themed Designs: Use different colors of coconut to create themed designs on your cupcakes, such as flowers, animals, or holiday patterns.
- Coconut Nests: Create edible coconut nests on top of cupcakes by shaping the colored coconut into a small mound and adding candy eggs.
5.3. Cookie Decorations
- Sugar Cookies: Sprinkle colored coconut on top of sugar cookies before baking for a colorful and festive treat.
- Coconut Macaroons: Add dyed coconut to the batter of coconut macaroons for a vibrant twist on a classic recipe.
- Cookie Borders: Use colored coconut to create decorative borders around your cookies by pressing it onto the edges of the dough before baking.
5.4. Dessert Garnishes
- Puddings and Mousses: Garnish puddings and mousses with a sprinkle of colored coconut for added visual appeal and a hint of coconut flavor.
- Ice Cream Toppings: Use colored coconut as a topping for ice cream sundaes and other frozen desserts.
- Fruit Salads: Add a sprinkle of colored coconut to fruit salads for a tropical twist and a pop of color.
5.5. Themed Treats
- Holiday Treats: Create themed treats for holidays such as Christmas (red and green coconut), Halloween (orange and black coconut), and Easter (pastel-colored coconut).
- Birthday Parties: Use colored coconut to decorate birthday cakes, cupcakes, and other party treats.
- Baby Showers: Use pastel-colored coconut to create sweet and delicate decorations for baby shower desserts.
5.6. Creative Dessert Ideas
- Coconut Truffles: Coat coconut truffles in colored coconut for a beautiful and delicious treat.
- Coconut Bark: Make coconut bark by spreading melted chocolate on a baking sheet and topping it with colored coconut and other candies.
- Coconut Parfaits: Layer colored coconut with yogurt, granola, and fruit to create colorful and healthy parfaits.
5.7. Tips for Using Colored Coconut
- Apply to Wet Frosting: For best results, apply colored coconut to wet frosting or icing so it adheres properly.
- Press Gently: Gently press the coconut onto the surface to ensure it sticks without damaging the dessert.
- Use in Moderation: While colored coconut adds visual appeal, use it in moderation to avoid overpowering the other flavors in your recipe.
By incorporating colored coconut into your recipes, you can add a touch of creativity and fun to your desserts. For more innovative ideas and detailed recipes, visit FOODS.EDU.VN.
6. Troubleshooting Common Issues
Even with careful preparation, you might encounter some challenges when dyeing coconut with food coloring. Here are common issues and how to troubleshoot them.
6.1. Uneven Color Distribution
- Problem: The color is not evenly distributed throughout the coconut.
- Solution:
- Mix Thoroughly: Ensure you mix the food coloring into the coconut thoroughly. Use your hands (with gloves) or a spoon to massage the color evenly.
- Add Water or Extract: If the color is not spreading well, add a teaspoon of water or flavored extract to help distribute the food coloring.
- Use Ziploc Bags: Place the coconut and food coloring in a Ziploc bag and massage until the color is evenly distributed.
6.2. Color Too Light
- Problem: The color is too light and not vibrant enough.
- Solution:
- Add More Food Coloring: Add a few more drops of food coloring and mix again until you achieve the desired vibrancy.
- Use Gel Food Coloring: Gel food coloring is more concentrated than liquid food coloring and will provide a more intense color.
- Let it Sit: Allow the coconut to sit for a few minutes after adding the food coloring. This will allow the color to absorb more fully.
6.3. Color Too Dark
- Problem: The color is too dark and overpowering.
- Solution:
- Add More Coconut: Add more uncolored coconut to dilute the mixture and lighten the color.
- Mix Well: Mix the uncolored coconut thoroughly to ensure an even distribution of color.
6.4. Coconut Clumping
- Problem: The coconut is clumping together and not drying properly.
- Solution:
- Spread Thinly: Ensure you spread the colored coconut in a thin, even layer on the baking sheet to prevent clumping.
- Stir Occasionally: Stir the coconut occasionally while it is drying to break up any clumps and ensure even drying.
- Reduce Moisture: Avoid adding too much water or liquid when mixing the food coloring.
6.5. Coconut Not Drying
- Problem: The coconut is taking too long to dry.
- Solution:
- Use Oven Drying: If you need the coconut to dry faster, use the oven. Preheat your oven to the lowest setting (around 170°F or 75°C) and dry the coconut for 30-60 minutes, stirring every 15 minutes.
- Increase Air Circulation: Ensure there is good air circulation around the coconut by placing it in a well-ventilated area.
- Thin Layer: Make sure the coconut is spread in a thin layer on the baking sheet to facilitate faster drying.
6.6. Color Bleeding
- Problem: The color is bleeding onto other parts of the dessert.
- Solution:
- Dry Completely: Ensure the coconut is completely dry before using it to decorate your desserts.
- Use a Barrier: Apply a thin layer of frosting or icing as a barrier between the coconut and the dessert to prevent color bleeding.
- Avoid Over-Saturating: Avoid over-saturating the coconut with food coloring, as this can increase the risk of color bleeding.
6.7. Coconut Fading
- Problem: The color of the coconut is fading over time.
- Solution:
- Store Properly: Store the colored coconut in airtight containers in a cool, dry place away from direct sunlight to prevent fading.
- Use High-Quality Food Coloring: Use high-quality food coloring that is designed to resist fading over time.
- Avoid Extreme Temperatures: Avoid exposing the colored coconut to extreme temperatures, as this can cause the color to fade.
By addressing these common issues, you can ensure that your dyed coconut turns out perfectly every time. For more tips and troubleshooting advice, visit FOODS.EDU.VN.
7. Health and Safety Considerations
When working with food coloring, it’s essential to consider health and safety aspects to ensure the well-being of yourself and those who will consume your creations. Here are some key considerations to keep in mind.
7.1. Choosing Food Coloring
- Read Labels: Always read the labels of food coloring products to ensure they are safe for consumption and do not contain any allergens or harmful ingredients.
- Opt for Natural Food Coloring: Consider using natural food coloring derived from plant-based sources like fruits, vegetables, and spices. These are generally considered safer than synthetic dyes.
- Avoid Artificial Additives: Choose food coloring that is free from artificial additives, preservatives, and sweeteners.
7.2. Allergies and Sensitivities
- Be Aware of Allergens: Some food colorings may contain allergens or ingredients that can trigger allergic reactions in sensitive individuals. Check the labels carefully and avoid using products that contain known allergens.
- Communicate Ingredients: If you are making treats for others, be sure to communicate the ingredients used, including the type of food coloring, to help them make informed decisions.
7.3. Safe Handling Practices
- Use Gloves: Wear gloves when handling food coloring to prevent staining your skin.
- Avoid Splashing: Be careful when mixing food coloring to avoid splashing it on your clothes or surfaces.
- Wash Hands: Always wash your hands thoroughly with soap and water after handling food coloring.
7.4. Storage Guidelines
- Store Properly: Store food coloring in a cool, dry place away from direct sunlight and heat to maintain its quality and prevent degradation.
- Keep Out of Reach of Children: Store food coloring in a secure location out of reach of children to prevent accidental ingestion or misuse.
7.5. Consumption Guidelines
- Use in Moderation: While food coloring is generally safe for consumption, it should be used in moderation. Avoid excessive consumption of foods containing artificial food coloring.
- Be Mindful of Health Conditions: Individuals with certain health conditions, such as ADHD or hyperactivity, may be more sensitive to the effects of artificial food coloring. Consider using natural alternatives.
7.6. Legal and Regulatory Compliance
- Adhere to Regulations: Ensure that the food coloring products you use comply with local and national regulations regarding food safety and additives.
- Check Certifications: Look for certifications from reputable organizations that verify the safety and quality of food coloring products.
7.7. Alternatives to Artificial Food Coloring
- Beet Juice: Use beet juice to create natural red or pink food coloring.
- Spinach Juice: Use spinach juice to create natural green food coloring.
- Turmeric: Use turmeric powder to create natural yellow food coloring.
- Blue Spirulina: Use blue spirulina powder to create natural blue food coloring.
By considering these health and safety aspects, you can confidently use food coloring in your culinary creations while minimizing potential risks. For more information on safe food handling practices, visit FOODS.EDU.VN.
8. Natural Alternatives to Food Coloring
If you’re looking to avoid artificial food colorings, there are many natural alternatives that can provide beautiful and vibrant colors for your coconut dyeing projects. Here are some excellent options to consider.
8.1. Beetroot Powder
- Color: Provides a natural red or pink hue.
- How to Use: Mix a small amount of beetroot powder with a bit of water to form a paste, then add it to the coconut. Adjust the amount to achieve your desired shade.
- Flavor: Has a slightly earthy flavor, so use sparingly to avoid affecting the taste of your coconut.
8.2. Turmeric Powder
- Color: Creates a warm yellow or golden color.
- How to Use: Dissolve turmeric powder in a small amount of warm water, then mix it thoroughly with the coconut.
- Flavor: Turmeric has a distinct flavor, so use it carefully to avoid overpowering the coconut’s taste.
8.3. Spinach Juice
- Color: Produces a natural green color.
- How to Use: Blend fresh spinach with a bit of water, strain the juice, and then mix it with the coconut.
- Flavor: The flavor is mild, but it’s best to use it in smaller quantities to avoid any noticeable taste.
8.4. Butterfly Pea Flower Powder
- Color: Offers a beautiful blue or purple color, depending on the pH level. Adding lemon juice will turn it more purple.
- How to Use: Dissolve the powder in a small amount of warm water and mix it into the coconut.
- Flavor: Virtually tasteless, making it an excellent option for coloring without affecting the flavor.
8.5. Carrot Juice
- Color: Provides a natural orange hue.
- How to Use: Extract juice from fresh carrots, then mix it with the coconut.
- Flavor: Has a slightly sweet flavor that can complement the coconut.
8.6. Red Cabbage Juice
- Color: Creates a vibrant purple or blue color, depending on the pH level.
- How to Use: Boil chopped red cabbage in water, strain the juice, and use it to color the coconut.
- Flavor: The flavor is mild, but using it sparingly is best to avoid any cabbage taste.
8.7. Cocoa Powder
- Color: Offers a natural brown or chocolate color.
- How to Use: Mix cocoa powder directly into the coconut. You can add a bit of water or milk to help it distribute evenly.
- Flavor: Adds a rich chocolate flavor, making it perfect for desserts.
8.8. Berry Juice
- Color: Provides a range of colors, from pink to deep purple, depending on the type of berry.
- How to Use: Blend fresh or frozen berries, strain the juice, and mix it with the coconut.
- Flavor: Adds a fruity flavor that can enhance the taste of your coconut.
8.9. Tips for Using Natural Food Colorings
- Start Small: Begin with small amounts of natural coloring and add more until you achieve the desired shade.
- Consider the Flavor: Be mindful of the flavor that the natural coloring might add to your coconut, and choose options that complement your recipe.
- Adjust Consistency: Natural colorings often contain water, so you may need to adjust the consistency of your coconut by adding a bit of cornstarch or powdered sugar.
By using these natural alternatives, you can create beautifully colored coconut without relying on artificial dyes. For more tips and creative ideas, visit FOODS.EDU.VN.
9. Advanced Techniques for Coconut Dyeing
Once you’ve mastered the basic techniques for dyeing coconut, you can explore more advanced methods to create stunning and unique effects. Here are some advanced techniques to elevate your coconut dyeing skills.
9.1. Marbling Effect
- Prepare Multiple Colors: Dye the coconut in several different colors.
- Combine Colors: Lightly mix the colored coconut together without fully blending them.
- Spread and Dry: Spread the marbled coconut on a baking sheet and allow it to dry. This creates a beautiful, swirled effect perfect for cake decorations and toppings.
9.2. Layered Colors
- Dye Coconut in Sections: Divide the coconut into sections and dye each section a different color.
- Create Layers: Layer the colored coconut in clear jars or containers to create visually appealing desserts.
- Parfaits and Trifles: This technique is ideal for parfaits, trifles, and other layered desserts.
9.3. Shimmering Coconut
- Edible Glitter: Add edible glitter or luster dust to your dyed coconut for a shimmering effect.
- Application: Mix the glitter into the coconut after it has dried. This adds a touch of elegance and sparkle to your creations.
- Color Coordination: Choose glitter colors that complement the base color of the coconut for the best results.
9.4. Textured Coconut
- Combine Different Sizes: Mix shredded coconut with coconut flakes to create a textured effect.
- Dye Separately: Dye each type of coconut separately and then combine them for added visual interest.
- Application: This technique is perfect for creating realistic-looking grass or fur on cakes and cupcakes.
9.5. Scented Coconut
- Extracts and Oils: Add flavored extracts or essential oils to your coconut while dyeing it to infuse it with a pleasant scent.
- Flavor Pairings: Match the scent to the color. For example, add lemon extract to yellow coconut or peppermint extract to green coconut.
- Application: Scented coconut adds an extra sensory dimension to your desserts.
9.6. Tie-Dye Effect
- Partial Dyeing: Lightly dye the coconut in one or two colors.
- Spot Dyeing: Add drops of additional food coloring to random spots on the coconut and gently mix.
- Result: This creates a tie-dye effect with a mix of vibrant and subtle colors.
9.7. Gradient Effect
- Gradual Coloring: Dye the coconut in a gradient of shades from light to dark.
- Application: Use this technique to create a seamless transition of color on cakes and cupcakes.
- Layering: Layer the different shades to achieve a smooth gradient effect.
9.8. Embossed Coconut
- Stencils: Use stencils to create embossed patterns on your desserts with colored coconut.
- Application: Apply frosting to the dessert, place the stencil on top, and sprinkle colored coconut over the stencil. Remove the stencil to reveal the pattern.
9.9. Two-Toned Coconut
- Divide and Conquer: Divide the coconut into two sections and dye each section a different color.
- Combine Sparingly: Lightly combine the two colors, allowing some of each color to remain distinct.
- Application: This technique is great for creating a simple yet visually appealing effect.
By exploring these advanced techniques, you can create truly unique and eye-catching desserts with colored coconut. Visit FOODS.EDU.VN for more creative ideas and detailed tutorials.
10. Frequently Asked Questions (FAQs)
Here are some frequently asked questions about dyeing coconut with food coloring to help you troubleshoot and perfect your technique.
10.1. Can I use any type of coconut?
- Yes, you can use either sweetened or unsweetened coconut, as well as shredded coconut or coconut flakes. The choice depends on your personal preference and the recipe you’re using.
10.2. Is gel food coloring better than liquid food coloring?
- Gel food coloring is generally preferred because it is more concentrated and provides more vibrant colors. It also contains less liquid, which helps prevent the coconut from becoming too wet.
10.3. How much food coloring should I use?
- Start with a few drops of food coloring and add more gradually until you achieve the desired color. Remember that gel food coloring is more concentrated, so you’ll need less of it compared to liquid food coloring.
10.4. Can I mix different food coloring colors?
- Yes, you can mix different food coloring colors to create custom shades. Experiment with different combinations to achieve unique and interesting colors.
10.5. How long does it take for the coconut to dry?
- The drying time depends on the method you use. Air drying can take several hours or overnight, while oven drying typically takes 30-60 minutes.
10.6. How do I prevent the coconut from clumping?
- To prevent clumping, spread the colored coconut in a thin, even layer on a baking sheet and stir it occasionally while it is drying. Avoid adding too much liquid when mixing the food coloring.
10.7. How should I store colored coconut?
- Store colored coconut in airtight containers in a cool, dry place away from direct sunlight. Properly stored, it can last for several weeks.
10.8. Can I use natural food coloring?
- Yes, you can use natural food coloring alternatives such as beetroot powder, turmeric powder, spinach juice, and butterfly pea flower powder. Keep in mind that natural colorings may produce more subtle shades compared to artificial dyes.
10.9. How do I prevent the color from fading?
- To prevent the color from fading, store the colored coconut in airtight containers away from direct sunlight and extreme temperatures. Use high-quality food coloring that is designed to resist fading.
10.10. Is food coloring safe to consume?
- Food coloring is generally safe to consume in moderation. However, some individuals may be sensitive to artificial food coloring. If you have concerns, consider using natural alternatives.
By addressing these frequently asked questions, you can feel confident in your ability to dye coconut with food coloring and create stunning desserts. For more tips, tricks, and detailed tutorials, visit FOODS.EDU.VN.
Dyeing coconut with food coloring is a simple yet impactful way to enhance your culinary creations. By following the steps outlined in this guide, you can easily add vibrant colors and creative designs to your cakes, cupcakes, cookies, and other desserts. Remember to experiment with different color combinations, techniques, and flavors to unleash your inner artist.
For more inspiration, detailed recipes, and expert advice, be sure to visit FOODS.EDU.VN. Our website is packed with valuable resources to help you elevate your baking and cooking skills. Whether you’re a beginner or an experienced chef, FOODS.EDU.VN has something for everyone.
Ready to take your culinary creations to the next level? Explore our extensive collection of recipes, tips, and tutorials at FOODS.EDU.VN. Join our community of food enthusiasts and discover the endless possibilities of the culinary world.
Contact Us:
- Address: 1946 Campus Dr, Hyde Park, NY 12538, United States
- WhatsApp: +1 845-452-9600
- Website: FOODS.EDU.VN
Start your culinary journey today with foods.edu.vn and transform ordinary ingredients into extraordinary creations!