Dyeing Easter eggs with food coloring is a delightful and simple tradition that brings joy to people of all ages. FOODS.EDU.VN is here to guide you through each step, ensuring vibrant, beautifully colored eggs using common household ingredients. Forget store-bought kits; discover the fun of creating your own unique Easter egg masterpieces with our expert tips and techniques, plus how to store them properly.
1. What Supplies Do I Need to Dye Easter Eggs with Food Coloring?
To embark on your Easter egg dyeing adventure, gather these easily accessible supplies. Having everything prepared beforehand will make the process smooth and enjoyable.
1.1. Essential Ingredients and Tools
Here’s a list to ensure you’re fully equipped:
- Hard-boiled Eggs: The star of the show! Ensure they are properly hard-boiled to prevent cracking and bacterial contamination.
- Food Coloring: Liquid food coloring is ideal for achieving vibrant and consistent colors. Gel food coloring can also be used but requires thorough mixing.
- White Vinegar: This helps the dye adhere to the eggshell, ensuring a deeper and more even color.
- Hot Water: Use hot, but not boiling, water to dissolve the food coloring and vinegar.
- Cups or Bowls: One for each color you plan to create.
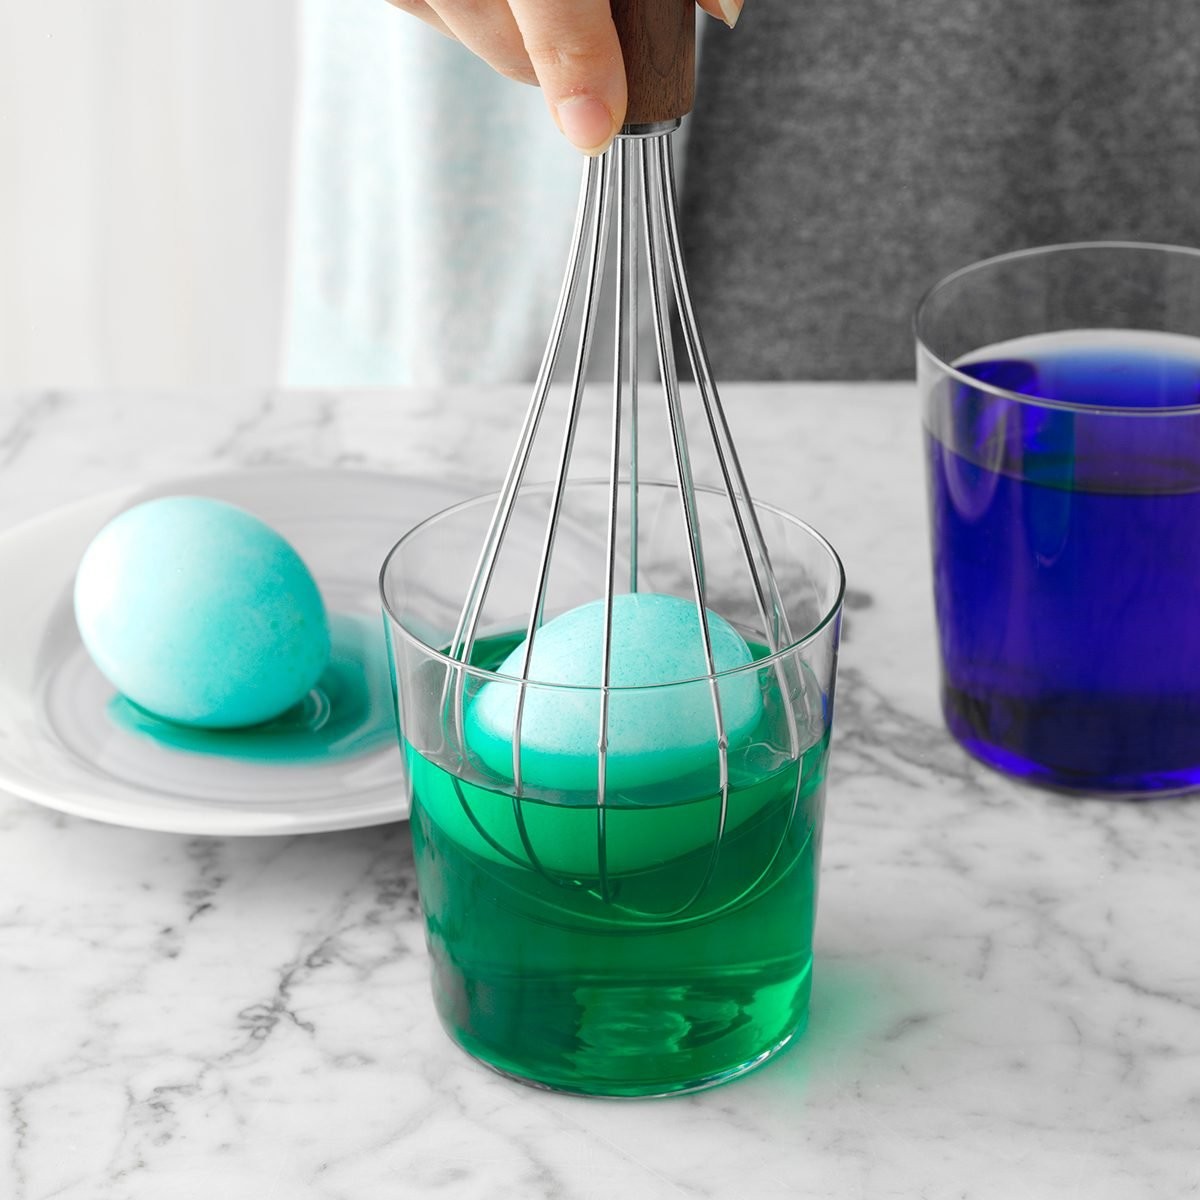
- Spoon or Wire Egg Holder: For gently lowering and lifting eggs from the dye.
- Paper Towels: For drying the dyed eggs.
- Egg Carton or Drying Rack: To allow the eggs to dry without smudging.
1.2. Recommended Brands and Products
To help you choose the best supplies, here are some recommendations:
| Item | Recommended Brands/Products |
|---|---|
| Food Coloring | McCormick Assorted Food Colors, Wilton Gel Food Coloring |
| White Vinegar | Heinz White Vinegar |
| Egg Dyeing Kit | If you prefer a kit, consider the PAAS Classic Easter Egg Decorating Kit for convenience |
| Electric Kettle | For quickly boiling water, the OXO Brew Adjustable Temperature Electric Kettle is highly recommended. According to a study by the University of Illinois, using an electric kettle can reduce boiling time by 50-60%. |
| Safe food coloring | Nature’s Flavors Natural Food Coloring |

Having these supplies ready will streamline your egg-dyeing process, making it a fun and efficient activity. Remember, preparation is key to a successful and enjoyable experience.
2. How to Prepare Eggs for Dyeing
Preparing your eggs correctly is a crucial first step in achieving beautifully dyed Easter eggs. This involves proper hard-boiling and gentle handling to prevent cracks.
2.1. Step-by-Step Guide to Hard-Boiling Eggs
Follow these steps for perfectly hard-boiled eggs:
- Place Eggs in a Saucepan: Put the eggs in a single layer at the bottom of a saucepan.
- Cover with Water: Add enough cold water to cover the eggs by about an inch.
- Bring to a Boil: Heat the saucepan over medium-high heat until the water comes to a full, rolling boil.
- Remove from Heat: Once boiling, remove the pan from the heat and cover it with a lid.
- Let Sit: Let the eggs sit in the hot water for 12-15 minutes, depending on the desired firmness. According to the American Egg Board, this timing prevents the formation of a green ring around the yolk.
- Cool the Eggs: Drain the hot water and immediately run the eggs under cold water until they are cool to the touch. This stops the cooking process and makes them easier to peel.
2.2. Tips for Preventing Cracks During Boiling
Preventing cracks ensures your eggs have a smooth surface for dyeing:
- Start with Room Temperature Eggs: Take the eggs out of the refrigerator about 30 minutes before boiling.
- Avoid Overcrowding: Ensure the eggs have enough space in the saucepan.
- Gentle Simmer: Instead of a rapid boil, use a gentle simmer to reduce the risk of cracking.
- Add Vinegar or Salt: Adding a teaspoon of vinegar or salt to the water can help prevent cracks by coagulating the egg white quickly if a crack does occur. A study by the Journal of Food Science found that vinegar can strengthen eggshells.
- Cool Gradually: Avoid drastic temperature changes by gradually cooling the eggs after boiling.
2.3. Safe Handling Practices
Handling eggs safely is essential to prevent contamination:
- Wash Your Hands: Before and after handling eggs, wash your hands thoroughly with soap and water.
- Inspect for Cracks: Discard any eggs with cracks before boiling to prevent bacterial contamination.
- Refrigerate Promptly: After dyeing, refrigerate the eggs within two hours to prevent bacterial growth. According to the USDA, cooked eggs should not be left at room temperature for more than two hours.
By following these steps, you’ll have perfectly prepared eggs ready for dyeing, ensuring a safe and enjoyable Easter activity.
3. Mixing Food Coloring for Easter Eggs
Creating the perfect color palette is an exciting part of dyeing Easter eggs. With simple food coloring and a bit of creativity, you can achieve a wide range of vibrant hues.
3.1. Basic Color Recipes
Start with these basic recipes to create classic Easter egg colors:
- Blue: 1/2 cup hot water + 1 teaspoon white vinegar + 10-20 drops blue food coloring
- Green: 1/2 cup hot water + 1 teaspoon white vinegar + 10-20 drops green food coloring
- Red: 1/2 cup hot water + 1 teaspoon white vinegar + 10-20 drops red food coloring
- Yellow: 1/2 cup hot water + 1 teaspoon white vinegar + 10-20 drops yellow food coloring
Adjust the number of drops to achieve your desired shade. Remember, the more food coloring you use, the deeper and more intense the color will be.
3.2. Tips for Achieving Vibrant Colors
To ensure your Easter eggs have vibrant, eye-catching colors, consider these tips:
- Use Enough Food Coloring: Don’t be shy with the food coloring. Start with 10 drops and add more until you reach the desired intensity.
- Use White Eggs: White eggs provide the best canvas for vibrant colors. Brown eggs will result in more muted tones.
- Soak Longer: The longer the egg sits in the dye, the more vibrant the color will be. Experiment with soaking times to achieve different shades.
- Stir Well: Make sure the food coloring is fully dissolved in the water before adding the eggs.
- Use Hot Water: Hot water helps the dye adhere to the eggshell more effectively.
3.3. Experimenting with Color Combinations
Unleash your creativity by experimenting with color combinations:
- Orange: Mix red and yellow food coloring.
- Purple: Mix red and blue food coloring.
- Green: Mix blue and yellow food coloring.
- Pastel Colors: Add a drop of white food coloring or dilute the dye with more water to create soft pastel shades.
- Teal: Combine blue and green with a touch of yellow.
Create a color chart to keep track of your favorite combinations. For example:
| Color | Combination |
|---|---|
| Orange | 10 drops red + 10 drops yellow |
| Purple | 10 drops red + 10 drops blue |
| Light Blue | 5 drops blue + 15 drops water |
| Teal | 8 drops blue + 8 drops green + 4 drops yellow |
By mixing food coloring creatively, you can produce a diverse and personalized palette that makes your Easter eggs stand out.
4. The Easter Egg Dyeing Process
Now comes the most exciting part: dyeing the eggs! This step-by-step guide will help you achieve beautifully colored Easter eggs with food coloring.
4.1. Step-by-Step Dyeing Instructions
Follow these instructions for a seamless dyeing experience:
- Prepare Your Dye Baths: In each cup or bowl, combine 1/2 cup of hot water, 1 teaspoon of white vinegar, and 10-20 drops of food coloring. Stir well to ensure the color is evenly distributed.
- Protect Your Work Surface: Cover your work area with a tablecloth or newspapers to prevent staining.
- Submerge the Eggs: Using a spoon or wire egg holder, gently lower an egg into the dye bath.
- Soak the Eggs: Allow the egg to sit in the dye for 5-10 minutes, or longer for a more vibrant color. Check the egg periodically to monitor the color intensity.
- Remove and Dry: Carefully remove the egg from the dye and place it on a paper towel to dry.
- Flip and Dry Again: Once the top of the egg is dry, flip it over to dry the bottom.
- Repeat: Repeat the process with the remaining eggs, using different colors as desired.
4.2. Tips for Even Color Distribution
To ensure your eggs are evenly colored, consider these tips:
- Submerge Completely: Make sure the egg is fully submerged in the dye bath.
- Turn Occasionally: Gently turn the egg in the dye bath to ensure all sides are evenly exposed to the color.
- Avoid Overcrowding: Dye one egg at a time to prevent the eggs from bumping into each other and creating uneven patches.
- Use a Wire Egg Holder: A wire egg holder allows for easy submersion and removal, reducing the risk of smudging the color.
- Wipe Away Bubbles: Any air bubbles on the surface of the egg can prevent the dye from adhering properly. Gently wipe them away with a spoon.
4.3. Creative Dyeing Techniques
Get creative with these fun dyeing techniques:
- Ombre Eggs: Dip the egg in the dye for a short period, then gradually submerge it further for longer intervals to create an ombre effect.
- Marbled Eggs: Add a teaspoon of oil to the dye bath. The oil will create a marbled effect on the eggshell.
- Tie-Dye Eggs: Wrap the egg in rubber bands before dyeing to create a tie-dye pattern.
- Dipped Eggs: Dip only half of the egg in the dye for a two-toned look.
- Speckled Eggs: Dip a toothbrush in food coloring and flick it onto the egg to create a speckled effect.
4.4. Addressing Common Issues
Here are solutions to common dyeing problems:
- Uneven Color: Ensure the egg is fully submerged and turned occasionally.
- Faded Color: Use more food coloring or soak the egg for a longer period.
- Streaky Color: Stir the dye bath thoroughly and wipe away any air bubbles.
- Cracked Eggs: Handle the eggs gently and avoid drastic temperature changes.
By following these steps and tips, you’ll be well on your way to creating a basket full of beautifully dyed Easter eggs.
5. Drying and Storing Your Dyed Easter Eggs
Proper drying and storage are essential for preserving your beautifully dyed Easter eggs. Follow these steps to keep them looking their best and ensure they remain safe to eat.
5.1. Best Drying Practices
To prevent smudging and ensure even drying, follow these practices:
- Use Paper Towels: Place the dyed eggs on a layer of paper towels to absorb excess moisture.
- Elevate the Eggs: Use a drying rack or an empty egg carton to elevate the eggs, allowing air to circulate around them.
- Flip Regularly: After the tops of the eggs are dry, flip them over to dry the bottoms. This prevents the dye from pooling and creating uneven patches.
- Avoid Direct Sunlight: Dry the eggs in a cool, dry place away from direct sunlight, which can fade the colors.
- Gentle Handling: Handle the eggs gently to avoid smudging the dye or cracking the shells.
5.2. Safe Storage Guidelines
Storing your dyed Easter eggs properly is crucial for food safety:
- Refrigerate Promptly: Refrigerate the dyed eggs within two hours of dyeing. According to the Centers for Disease Control and Prevention (CDC), bacteria can grow rapidly at room temperature.
- Store in the Refrigerator: Store the eggs in the refrigerator at a temperature of 40°F (4°C) or below.
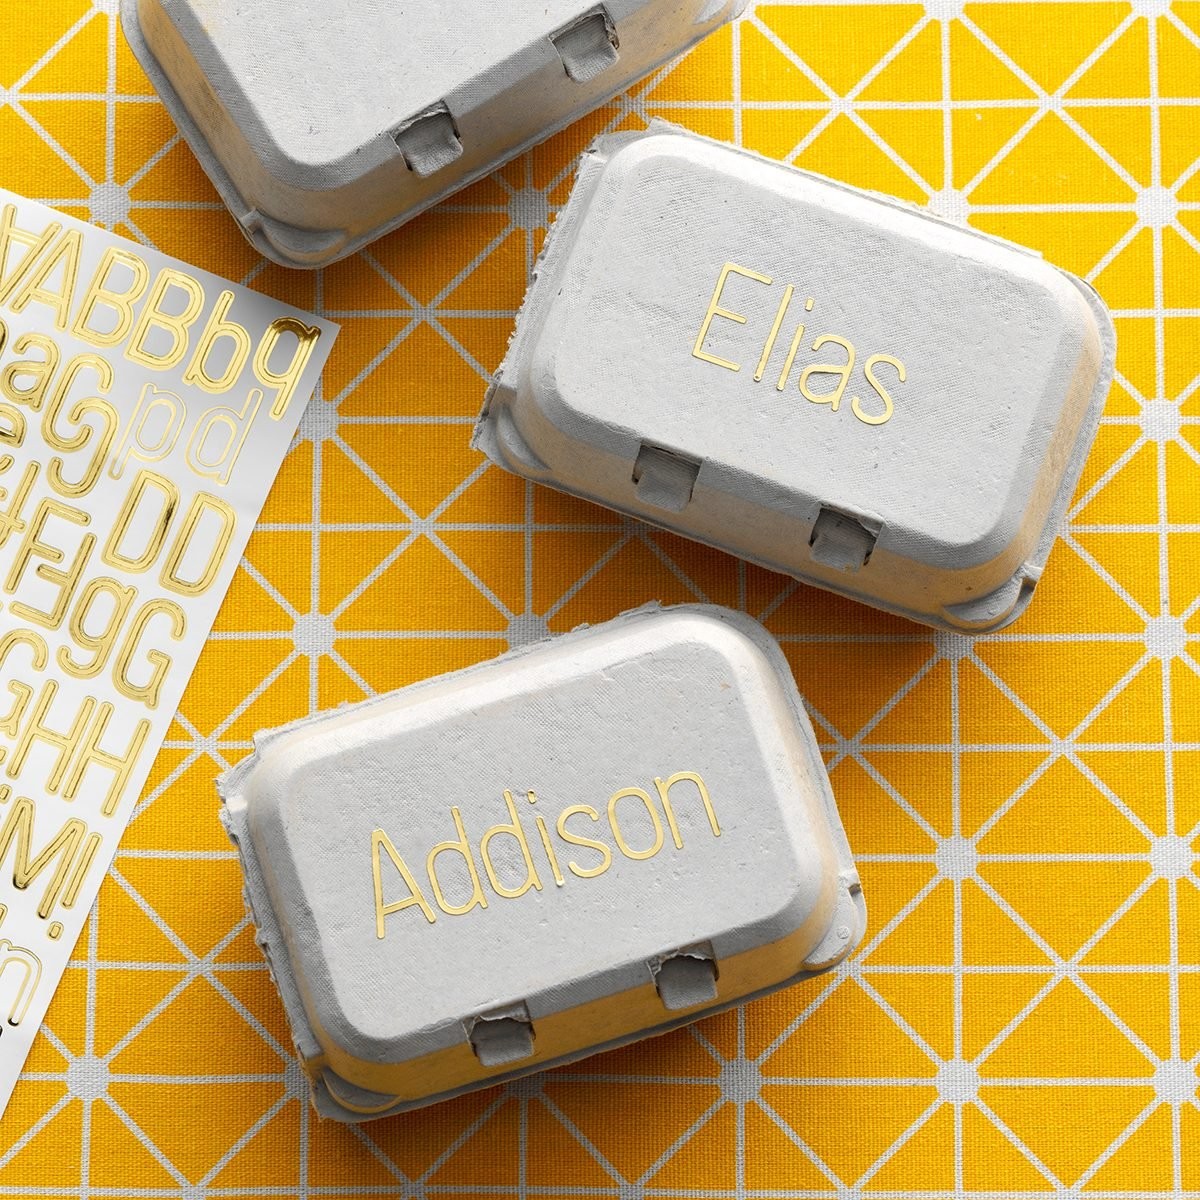
- Use an Egg Carton: Store the eggs in an egg carton to prevent them from rolling around and cracking.
- Consume Within a Week: Eat the hard-boiled eggs within one week of cooking. The USDA recommends this timeframe to ensure they remain safe to eat.
- Discard Cracked Eggs: Discard any cracked eggs, as bacteria can enter through the cracks and contaminate the egg.
5.3. Tips for Long-Lasting Color
To keep your dyed Easter eggs looking vibrant for longer, consider these tips:
- Avoid Excessive Handling: Handle the eggs as little as possible to prevent the dye from rubbing off.
- Store Away from Moisture: Store the eggs in a dry environment to prevent the colors from fading.
- Apply a Sealant: For decorative eggs that won’t be eaten, consider applying a clear sealant to protect the color.
- Display Carefully: If displaying the eggs, keep them away from direct sunlight and heat.
5.4. Display Ideas
Showcase your beautifully dyed Easter eggs with these display ideas:
- Easter Basket: Arrange the eggs in an Easter basket with colorful grass and other decorations.
- Centerpiece: Create a stunning centerpiece by arranging the eggs in a decorative bowl or vase.
- Egg Tree: Hang the eggs from the branches of a small tree or shrub.
- Garland: String the eggs together to create a festive garland.
- Table Setting: Use the eggs as part of your Easter table setting, placing one at each guest’s place.
By following these drying and storage guidelines, you can ensure your dyed Easter eggs remain beautiful and safe to enjoy throughout the Easter season.
6. Alternative Natural Dyes for Easter Eggs
For those seeking a natural approach, dyeing Easter eggs with natural ingredients is a wonderful alternative. Here’s how to create beautiful, eco-friendly dyes using items you might already have in your kitchen.
6.1. Natural Dye Recipes
Here are some effective natural dye recipes:
- Yellow: Simmer 2 cups of water with 4 tablespoons of turmeric powder.
- Red: Simmer 2 cups of water with 2 cups of chopped beets.
- Blue: Simmer 2 cups of water with 2 cups of chopped red cabbage.
- Orange: Simmer 2 cups of water with the skins of 6 yellow onions.
- Pink: Simmer 2 cups of water with 2 cups of chopped cranberries.
- Green: Simmer 2 cups of water with 2 cups of spinach leaves.
6.2. How to Prepare and Use Natural Dyes
Follow these steps to prepare and use natural dyes:
- Prepare the Dye: In a saucepan, combine the natural ingredient with water. Bring to a boil, then reduce heat and simmer for 30-60 minutes, depending on the desired color intensity.
- Strain the Dye: Strain the mixture through a fine-mesh sieve to remove any solids.
- Add Vinegar: Add 2 tablespoons of white vinegar per cup of dye to help the color adhere to the eggshell.
- Dye the Eggs: Submerge hard-boiled eggs in the dye and let them sit for at least 30 minutes, or longer for a deeper color.
- Dry the Eggs: Remove the eggs from the dye and let them dry on a wire rack or paper towels.
6.3. Tips for Intensifying Natural Colors
To achieve more vibrant natural colors, consider these tips:
- Use White Eggs: White eggs provide a cleaner canvas for natural dyes.
- Soak Longer: The longer the egg sits in the dye, the more intense the color will be.
- Mordants: Use a mordant, such as alum, to help the dye bind to the eggshell.
- Concentrated Dyes: Use a higher concentration of the natural ingredient to create a more potent dye.
- Heat: Keep the dye warm while soaking the eggs to help the color absorb.
6.4. Advantages and Disadvantages of Natural Dyes
| Feature | Advantages | Disadvantages |
|---|---|---|
| Safety | Non-toxic and safe for children and pets. | May stain clothing and surfaces. |
| Eco-Friendliness | Uses natural, biodegradable ingredients. | Colors are less vibrant and consistent compared to synthetic dyes. |
| Cost | Can be cost-effective if ingredients are readily available. | May require more ingredients and longer preparation time. |
| Color Variety | Offers a range of earthy and muted tones. | Limited color options compared to synthetic dyes. |
| Eggshell Health | Gentle on eggshells, reducing the risk of cracking. | Longer soaking times may lead to eggs absorbing flavors from the dye. |
According to a study by the University of Leeds, natural dyes are a sustainable alternative to synthetic dyes, reducing environmental impact and promoting safer practices.
7. Advanced Techniques and Decoration Ideas
Elevate your Easter egg decorating skills with these advanced techniques and creative decoration ideas.
7.1. Wax Resist Method
The wax resist method involves applying wax to the eggshell to prevent the dye from adhering, creating intricate patterns.
- Prepare the Egg: Hard-boil and cool the egg.
- Apply Wax: Use a wax crayon or a melted wax pen to draw designs on the eggshell.
- Dye the Egg: Submerge the egg in the dye. The wax will resist the dye, leaving the design in the original color.
- Remove Wax: Once the egg is dry, gently remove the wax by heating the egg with a hairdryer or placing it near a warm oven.
7.2. Decoupage
Decoupage involves gluing paper cutouts onto the eggshell to create decorative designs.
- Prepare the Egg: Hard-boil and cool the egg.
- Cut Out Designs: Cut out small designs from decorative paper, such as tissue paper or napkins.
- Apply Glue: Apply a thin layer of decoupage glue to the eggshell.
- Attach Designs: Gently press the paper cutouts onto the glue, smoothing out any wrinkles or bubbles.
- Seal the Design: Once the glue is dry, apply a topcoat of decoupage glue to seal the design.
7.3. Painting and Drawing
Painting and drawing on Easter eggs allows for intricate and personalized designs.
- Prepare the Egg: Hard-boil and cool the egg.
- Paint the Egg: Use acrylic paints or food-safe markers to create designs on the eggshell.
- Seal the Design: Once the paint is dry, apply a clear sealant to protect the design.
7.4. Glitter and Embellishments
Add sparkle and texture to your Easter eggs with glitter and other embellishments.
- Prepare the Egg: Hard-boil and cool the egg.
- Apply Glue: Apply a thin layer of glue to the areas where you want to add glitter or embellishments.
- Add Glitter: Sprinkle glitter onto the glue and shake off the excess.
- Attach Embellishments: Attach other embellishments, such as sequins, beads, or ribbons, using glue.
7.5. Marbling with Shaving Cream
Create unique marbled patterns on your Easter eggs using shaving cream.
- Prepare the Egg: Hard-boil and cool the egg.
- Prepare Shaving Cream: Spread a layer of shaving cream in a shallow dish.
- Add Food Coloring: Drip food coloring onto the shaving cream and swirl it with a toothpick to create a marbled effect.
- Roll the Egg: Roll the egg in the shaving cream, coating it completely.
- Let Sit: Let the egg sit in the shaving cream for 15-20 minutes.
- Rinse and Dry: Rinse the egg with water and pat it dry with paper towels.
8. Safety and Health Considerations
When dyeing Easter eggs, it’s essential to consider safety and health to ensure a fun and worry-free activity for everyone involved.
8.1. Food Safety Tips
Follow these food safety tips to prevent contamination and ensure the eggs remain safe to eat:
- Use Fresh Eggs: Start with fresh eggs to reduce the risk of bacterial contamination.
- Inspect for Cracks: Discard any eggs with cracks before boiling, as bacteria can enter through the cracks.
- Wash Your Hands: Wash your hands thoroughly with soap and water before and after handling eggs.
- Refrigerate Promptly: Refrigerate the dyed eggs within two hours of dyeing to prevent bacterial growth.
- Store Properly: Store the eggs in the refrigerator at a temperature of 40°F (4°C) or below.
- Consume Within a Week: Eat the hard-boiled eggs within one week of cooking.
- Discard After Two Hours at Room Temperature: If the eggs are left at room temperature for more than two hours, discard them.
- Avoid Cross-Contamination: Use separate utensils and surfaces for handling raw and cooked eggs to prevent cross-contamination.
8.2. Allergy Considerations
Be mindful of potential allergies when dyeing Easter eggs:
- Food Coloring: Some food colorings may contain allergens. Check the labels for any potential allergens, such as soy or gluten.
- Natural Dyes: Some natural dyes, such as those made from berries or nuts, may cause allergic reactions in sensitive individuals.
- Embellishments: Be careful when using embellishments, such as glitter or beads, as they may contain allergens.
8.3. Non-Toxic Dye Options
If you’re concerned about using synthetic dyes, consider these non-toxic alternatives:
- Natural Food Coloring: Opt for natural food coloring made from plant-based ingredients.
- Homemade Natural Dyes: Create your own natural dyes using fruits, vegetables, and spices.
- Egg Decorating Kits: Look for egg decorating kits that use non-toxic dyes and materials.
8.4. Safe Handling of Dyes
Follow these tips for safely handling dyes:
- Wear Gloves: Wear gloves to protect your hands from staining.
- Protect Your Work Surface: Cover your work surface with a tablecloth or newspapers to prevent staining.
- Ventilation: Work in a well-ventilated area to avoid inhaling fumes from the dyes.
- Supervise Children: Supervise children closely when dyeing eggs to prevent accidents.
- Avoid Ingestion: Do not ingest the dyes.
- Proper Disposal: Dispose of the dyes properly according to the manufacturer’s instructions.
8.5. Potential Health Risks
Be aware of potential health risks associated with dyeing Easter eggs:
- Bacterial Contamination: Improper handling and storage can lead to bacterial contamination, causing food poisoning.
- Allergic Reactions: Some individuals may experience allergic reactions to food colorings or natural dyes.
- Chemical Exposure: Exposure to synthetic dyes may pose health risks in sensitive individuals.
- Choking Hazards: Small embellishments, such as glitter or beads, can be choking hazards for young children.
According to the World Health Organization (WHO), proper food handling and storage are essential for preventing foodborne illnesses.
9. Troubleshooting Common Dyeing Problems
Even with careful preparation, you might encounter some issues while dyeing Easter eggs. Here’s how to troubleshoot common problems.
9.1. Uneven Color Distribution
- Problem: The color is patchy or uneven on the eggshell.
- Solution: Ensure the egg is fully submerged in the dye bath. Gently turn the egg periodically to ensure all sides are evenly exposed to the color. Wipe away any air bubbles that may be preventing the dye from adhering properly.
9.2. Faded Colors
- Problem: The colors are not as vibrant as desired.
- Solution: Use more food coloring to intensify the dye bath. Soak the egg for a longer period to allow more color to absorb. Ensure the dye bath is warm, as warm dye adheres better to the eggshell.
9.3. Streaky Colors
- Problem: The colors appear streaky or have lines.
- Solution: Stir the dye bath thoroughly to ensure the color is evenly distributed. Wipe away any air bubbles on the surface of the egg that may be causing streaks. Use a clean spoon or wire egg holder to submerge and remove the eggs.
9.4. Cracked Eggs
- Problem: The eggshell cracks during the dyeing process.
- Solution: Handle the eggs gently to avoid cracking. Avoid drastic temperature changes by allowing the eggs to cool gradually after boiling. Add a teaspoon of vinegar to the boiling water to help prevent cracks.
9.5. Dye Not Adhering
- Problem: The dye is not adhering to the eggshell.
- Solution: Ensure the eggshell is clean and free of any oils or residues. Add vinegar to the dye bath to help the color adhere to the eggshell. Use hot water to prepare the dye bath, as hot water helps the dye adhere more effectively.
9.6. Smudged Colors
- Problem: The colors smudge during the drying process.
- Solution: Allow the eggs to dry completely before handling them. Use a drying rack or egg carton to elevate the eggs and allow air to circulate around them. Avoid stacking the eggs on top of each other while they are drying.
9.7. Dye Staining Hands
- Problem: The dye stains your hands.
- Solution: Wear gloves to protect your hands from staining. If your hands do get stained, wash them with soap and water. Use a scrub brush to gently scrub away the stain.
10. FAQs About Dyeing Easter Eggs with Food Coloring
Here are some frequently asked questions about dyeing Easter eggs with food coloring to help you achieve the best results.
10.1. Can You Dye Raw Eggs?
Technically, yes, you can dye raw eggs, but it’s not recommended. Raw eggs are more likely to crack, and if they do, the raw egg can contaminate the dye bath. It’s safer and more practical to use hard-boiled eggs.
10.2. Can You Dye Eggs Without Vinegar?
While vinegar helps the dye adhere to the eggshell, you can use a substitute. Lemon juice is a popular alternative, but the colors may not be as vibrant. If you prefer pastel shades, lemon juice works well.
10.3. What Do You Do If an Egg Cracks?
If an egg cracks during dyeing, it’s usually not a big deal. The ingredients are safe to eat and won’t affect the flavor. However, to prevent a mess, remove the cracked egg from the dye bath to avoid further contamination.
10.4. Can You Dye Brown Eggs?
Yes, you can dye brown eggs, but the colors will be more muted due to the darker base. To achieve brighter colors on brown eggs, you may need to use more food coloring or soak the eggs for a longer time.
10.5. Are There Other Ways to Decorate Eggs?
Absolutely! There are many creative ways to decorate Easter eggs, including:
- Natural Dyes: Using natural ingredients like beets, turmeric, and red cabbage.
- Temporary Tattoos: Applying temporary tattoos for fun designs.
- Wax Crayons: Drawing designs with wax crayons before dyeing.
- Glitter: Adding glitter for a sparkly effect.
- Decoupage: Gluing paper cutouts onto the eggshell.
10.6. How Long Do Dyed Easter Eggs Last?
Dyed Easter eggs can last up to one week in the refrigerator. Ensure they are stored properly at a temperature of 40°F (4°C) or below to prevent bacterial growth.
10.7. Is Food Coloring Safe to Eat?
Most food colorings are safe to eat in small quantities. However, some individuals may be sensitive to certain dyes. If you have concerns, opt for natural food coloring or non-toxic dye options.
10.8. Can I Reuse the Dye?
It’s not recommended to reuse the dye, as it can become contaminated with bacteria. For safety, it’s best to discard the dye after each use.
10.9. How Do I Get a Marbled Effect?
To create a marbled effect, add a teaspoon of oil to the dye bath. The oil will create a marbled pattern on the eggshell. Alternatively, use shaving cream marbling for a unique and colorful effect.
10.10. What Are Some Safe Alternatives to Vinegar?
If you prefer not to use vinegar, you can use lemon juice or citric acid as alternatives. These options will help the dye adhere to the eggshell, although the colors may not be as vibrant as when using vinegar.
Dyeing Easter eggs with food coloring is a fun and creative activity that can be enjoyed by people of all ages. With the right supplies, techniques, and safety precautions, you can create beautifully decorated eggs that are perfect for celebrating Easter.
Discover More at FOODS.EDU.VN
Ready to dive deeper into the art of Easter egg decorating and beyond? At FOODS.EDU.VN, we offer a treasure trove of culinary knowledge, from detailed guides on food preparation to creative decorating techniques. Whether you’re seeking to perfect your dyeing skills or explore new culinary horizons, our resources are designed to inspire and educate.
Visit FOODS.EDU.VN today and unlock a world of gastronomic delights. For personalized assistance or inquiries, reach out to us at 1946 Campus Dr, Hyde Park, NY 12538, United States, or connect via WhatsApp at +1 845-452-9600. Let foods.edu.vn be your trusted companion in the exciting journey of culinary exploration.