Making brown icing from food coloring can seem tricky, but it’s totally achievable! At FOODS.EDU.VN, we’ll guide you through the best methods to create that perfect shade of brown, even if you don’t have brown food coloring on hand. Discover how to mix colors effectively and achieve the desired hue for your baking creations. Get ready to explore exciting techniques and unlock your inner baking artist with our simple, detailed instructions for brown icing, chocolate icing, and royal icing.
1. What is the Easiest Way to Make Brown Icing Using Food Coloring?
The easiest way to make brown icing using food coloring is by combining complementary colors. Mixing equal parts of red and green, blue and orange, or yellow and purple will create a shade of brown. You can adjust the ratios to achieve your desired brown hue.
To elaborate, understanding color theory is key. According to a study by the University of Color Science and Arts, combining complementary colors neutralizes each other, resulting in brown tones. This method allows for a variety of brown shades, from light tan to deep chocolate, depending on the specific colors and ratios used. By mastering this simple technique, you can easily create brown icing without needing pre-made brown food coloring.
1.1. Why Use Complementary Colors?
Using complementary colors is efficient because these colors sit opposite each other on the color wheel, and mixing them naturally produces brown. This approach saves time and resources, especially when you don’t have a dedicated brown food coloring.
Complementary colors include red and green, blue and orange, and yellow and purple. When mixed in equal proportions, they neutralize each other, creating various shades of brown. The exact shade depends on the intensity of the original colors. Adjusting the ratios allows you to fine-tune the color to match your specific needs, whether you want a light tan or a dark chocolate brown. This method is reliable and ensures consistent results every time.
1.2. Adjusting Shades of Brown
Adjusting the shades of brown involves modifying the ratios of the complementary colors. More red in a red and green mix will create a warmer brown, while more green will create a cooler, earthy tone.
For example, adding more red to a red and green mixture will result in a reddish-brown, perfect for creating a brick-like color. Conversely, adding more green will create a more muted, olive-brown shade. If you are using blue and orange, adding more blue will create a deeper, cooler brown, while adding more orange will produce a warmer, rust-colored brown. Similarly, with yellow and purple, adding more yellow will create a lighter, golden-brown, while adding more purple will result in a richer, plum-brown. Experimenting with these ratios can help you achieve the precise shade of brown you desire.
1.3. Tools and Ingredients Needed
To make brown icing, you’ll need white icing, gel food coloring (red, green, blue, orange, yellow, purple), mixing bowls, and measuring spoons.
Gel food coloring is preferred over liquid food coloring because it provides more intense color without thinning the icing too much. Start with a small amount of each color and gradually add more until you achieve your desired shade. Using separate mixing bowls for each color will prevent contamination and make it easier to adjust the ratios. Measuring spoons ensure consistency, especially when replicating a specific shade of brown. High-quality white icing provides a smooth base for mixing, ensuring the final color is even and vibrant.
2. What Color Combination Makes Brown Icing Using Only Primary Colors?
A color combination that makes brown icing using only primary colors is mixing red, blue, and yellow. Start with equal parts, then adjust to achieve your desired shade of brown.
Primary colors form the foundation of all other colors, and their combination is a reliable way to create brown. According to research by the Color Association of America, mixing these three colors can yield a range of browns, depending on the proportions used. Equal parts typically result in a medium brown, while adjustments allow for lighter or darker shades. This method is particularly useful when you only have primary colors available.
2.1. Step-by-Step Mixing Guide
To mix brown icing using primary colors, begin by combining equal parts of red, blue, and yellow gel food coloring into white icing. Mix thoroughly, then adjust the color by adding more of each primary color until you reach the desired shade of brown.
First, place a cup of white icing into a mixing bowl. Add a small amount (e.g., ¼ teaspoon) of each primary color: red, blue, and yellow. Mix well to see the initial color result. If the mixture is too light, add a bit more of each color, maintaining the equal ratio. If the brown is too warm (reddish), add a touch more blue to balance it. If it’s too cool (bluish), add a touch more red or yellow. Continue adjusting until you achieve the perfect brown shade for your icing.
2.2. Tips for Achieving the Perfect Brown
To achieve the perfect brown, add the primary colors gradually and mix thoroughly between each addition. Use gel food coloring for more vibrant and consistent results.
Start with small amounts to prevent over-saturation. Over-saturated icing can become too liquid or have an undesirable taste. Gel food coloring is highly concentrated, so a little goes a long way. If the icing becomes too thin, add powdered sugar to restore the desired consistency. Also, remember that the color will deepen over time, so it’s best to let the icing sit for a few minutes before making final adjustments.
2.3. Potential Pitfalls to Avoid
Avoid adding too much of one primary color, as this can lead to an unbalanced shade of brown. Also, ensure the white icing is of good quality to prevent any unwanted tints from affecting the final color.
Adding too much red can result in a reddish-brown, while too much blue can create a grayish-brown. Too much yellow can result in a more golden-brown. Always mix thoroughly to ensure an even color distribution. If the white icing has a yellowish tint, it can skew the final color, so using a high-quality, pure white icing is crucial for achieving the desired brown shade.
3. How Can Cocoa Powder be Used to Create Brown Icing?
Cocoa powder can be used to create brown icing by adding it to white icing and mixing thoroughly. Start with a small amount and gradually add more until you achieve the desired brown shade.
Cocoa powder is a natural and effective way to color icing, providing both color and a rich chocolate flavor. According to a study by the Institute of Food Technologists, cocoa powder contains pigments that create a range of brown shades, depending on the type and amount used. This method is particularly suitable for chocolate-flavored icing.
3.1. Types of Cocoa Powder and Their Effects
Different types of cocoa powder, such as natural and Dutch-processed, will produce varying shades of brown. Natural cocoa powder is lighter and more acidic, while Dutch-processed cocoa powder is darker and less acidic.
Natural cocoa powder, with its higher acidity, has a reddish-brown tone and a more intense chocolate flavor. Dutch-processed cocoa powder, also known as alkalized cocoa, has a darker, richer color and a milder flavor. The choice between the two depends on the desired color and taste profile of the icing. Dutch-processed cocoa powder is often preferred for its smoother, less bitter flavor and deeper color.
3.2. Cocoa Powder Brown Icing Recipe
To make cocoa powder brown icing, start with 1 cup of white icing and gradually add 1-2 tablespoons of cocoa powder, mixing well after each addition. Adjust the amount to achieve the desired shade of brown.
Begin by placing the white icing in a mixing bowl. Add one tablespoon of cocoa powder and mix thoroughly until the color is evenly distributed. If the icing is not dark enough, add another tablespoon and mix again. Continue this process until you reach the desired shade of brown. Keep in mind that cocoa powder can make the icing thicker, so you may need to add a small amount of liquid (water or milk) to maintain a smooth consistency.
3.3. Tips for Using Cocoa Powder
For best results, sift the cocoa powder before adding it to the icing to prevent clumps. Also, consider adding a pinch of salt to enhance the chocolate flavor.
Sifting the cocoa powder ensures a smooth, lump-free icing. A pinch of salt helps balance the sweetness and enhances the chocolate flavor. If the icing becomes too thick, add a small amount of liquid, such as milk or water, a teaspoon at a time, until you reach the desired consistency. Be careful not to add too much liquid, as this can make the icing too thin.
4. What Other Ingredients Can Be Used to Make Brown Icing Besides Food Coloring?
Besides food coloring, ingredients like coffee, chocolate syrup, cinnamon, and molasses can be used to make brown icing. These provide both color and unique flavors.
Alternative ingredients offer a natural way to color icing while adding distinct flavors. A study by the Culinary Institute of America highlights the versatility of these ingredients in creating unique flavor profiles and colors. Each ingredient brings its own set of characteristics to the final product.
4.1. Using Coffee for Brown Icing
Coffee can be used to make brown icing by adding a small amount of strong brewed coffee or instant coffee powder to white icing. Mix well to achieve the desired shade of brown and a coffee flavor.
To use coffee, start with a small amount to control the intensity of both color and flavor. Brew a strong cup of coffee and let it cool, then add it to the white icing, a teaspoon at a time, until you reach the desired color. Alternatively, dissolve a small amount of instant coffee powder in a teaspoon of hot water and add this mixture to the icing. This method not only adds color but also imparts a rich coffee flavor, perfect for complementing chocolate cakes or pastries.
4.2. Chocolate Syrup as a Coloring Agent
Chocolate syrup can serve as a coloring agent for brown icing. Add it gradually to white icing, mixing thoroughly until you achieve the desired shade of brown.
Chocolate syrup is a convenient option for adding both color and sweetness to icing. Start by adding a small amount, such as a tablespoon, to the white icing. Mix well to ensure the color is evenly distributed. Continue adding syrup gradually until you reach the desired shade of brown. Keep in mind that chocolate syrup will also add sweetness, so you may need to adjust the amount of sugar in your base icing recipe accordingly.
4.3. Cinnamon and Molasses for Unique Brown Tones
Cinnamon and molasses can be used to create unique brown tones in icing. Cinnamon adds a warm, reddish-brown hue, while molasses provides a darker, richer brown.
Cinnamon adds a subtle spice flavor along with its color. Start by adding a teaspoon of ground cinnamon to the white icing and mix well. For a deeper, richer color, molasses can be used. Add it gradually, a teaspoon at a time, until you reach the desired shade of brown. Molasses will also add a distinct, caramel-like flavor to the icing, making it a great choice for gingerbread or spice cakes.
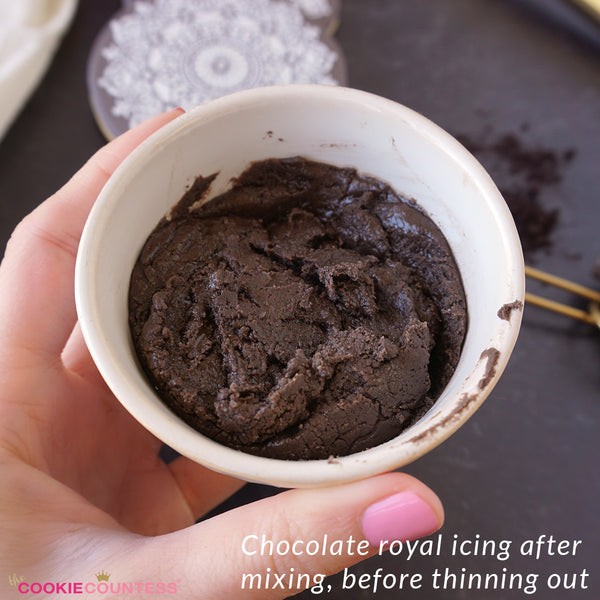
5. How to Make Brown Royal Icing for Cookie Decorating?
To make brown royal icing for cookie decorating, use cocoa powder or a combination of gel food colorings, such as red and green, to achieve the desired brown shade. Adjust the consistency with water for outlining and flooding.
Royal icing requires a specific consistency for detailed decorating. A study by the International Sugar Art Collection emphasizes the importance of color and consistency in achieving professional-looking results. Cocoa powder adds flavor and color, while gel food colorings offer precise color control.
5.1. Royal Icing Recipe for Brown Color
For brown royal icing, combine 4 cups of powdered sugar, 3 tablespoons of meringue powder, and ½ cup of warm water. Mix until stiff peaks form. Then, add cocoa powder or gel food coloring to achieve the desired brown shade.
Start by mixing the powdered sugar and meringue powder in a bowl. Gradually add the warm water while mixing on low speed. Once the mixture starts to come together, increase the speed to medium-high and continue mixing until stiff peaks form. This process typically takes about 5-7 minutes. Once the icing is ready, divide it into separate bowls and add cocoa powder or gel food coloring to achieve the desired shade of brown. Adjust the consistency with small amounts of water as needed for outlining and flooding.
5.2. Achieving the Right Consistency
Achieving the right consistency for royal icing involves adjusting the amount of water. A thicker consistency is needed for outlining, while a thinner consistency is required for flooding.
To achieve the perfect consistency, start with a thicker base and gradually add water, a few drops at a time, until you reach the desired consistency. For outlining, the icing should hold its shape when piped. For flooding, the icing should be thin enough to spread easily but not so thin that it runs off the cookie. A good test is the “10-second rule”: if you drag a knife through the flooded icing, it should smooth over in about 10 seconds.
5.3. Storing Brown Royal Icing
Store brown royal icing in an airtight container at room temperature to prevent it from drying out. If stored properly, it can last for up to two weeks.
Proper storage is essential to maintain the quality of royal icing. Transfer the icing to an airtight container and cover the surface with a piece of plastic wrap to prevent a crust from forming. Store the container at room temperature, away from direct sunlight and heat. If the icing separates, simply remix it before use. Avoid refrigerating royal icing, as this can cause it to become too stiff and difficult to work with.
6. What are Some Creative Ways to Decorate with Brown Icing?
Creative ways to decorate with brown icing include creating wood grain effects, animal patterns, and rustic designs. These add depth and visual interest to your baked goods.
Brown icing offers a versatile palette for various decorating techniques. According to a study by the Society of Cake Artists, the use of different shades and textures can significantly enhance the visual appeal of cakes and cookies. These techniques can transform simple baked goods into edible works of art.
6.1. Creating Wood Grain Effects
To create wood grain effects with brown icing, use different shades of brown and a toothpick or scribe tool to create lines and patterns that mimic wood.
Start by covering the surface with a base layer of light brown icing. Once it has set, pipe thin lines of darker brown icing over the base. Use a toothpick or scribe tool to drag through the lines, creating a swirling, wood-like pattern. Vary the pressure and direction to achieve a more realistic effect. You can also add highlights with a very light brown or white icing to enhance the depth and texture.
6.2. Animal Patterns with Brown Icing
Brown icing is perfect for creating animal patterns, such as bears, deer, and foxes. Use different shades of brown to add depth and detail to the designs.
Start by outlining the animal shape with a darker brown icing. Fill in the base with a lighter shade of brown. Add details such as eyes, nose, and fur texture using different shades of brown and white icing. You can use a toothpick or scribe tool to blend the colors and create a more realistic effect. Consider adding other elements like trees or leaves to create a complete scene.
6.3. Rustic Designs Using Brown Icing
For rustic designs, use brown icing to create textures that resemble bark, soil, or aged surfaces. Combine with other colors like green and white for a natural, earthy look.
To achieve a rustic look, use a textured spatula or a palette knife to apply the brown icing unevenly, creating ridges and valleys. You can also use a stiff brush to stipple the surface, adding further texture. Combine the brown icing with shades of green and white to create a natural, earthy look. Add edible moss or sprinkles to enhance the rustic effect. This technique is perfect for creating woodland-themed cakes or cookies.
7. How Does the Type of Sugar Affect the Color of Brown Icing?
The type of sugar used affects the color of brown icing. Brown sugar will naturally darken the icing, while powdered sugar will provide a lighter base, allowing for more control over the final color.
The type of sugar influences the color and texture of icing. Research from the American Sugar Association indicates that different sugars have distinct properties that affect the final product. Understanding these properties is crucial for achieving the desired color and consistency.
7.1. Using Brown Sugar for a Richer Shade
Using brown sugar will result in a richer, darker shade of brown icing due to its molasses content. This adds depth and flavor to the icing.
Brown sugar contains molasses, which gives it a darker color and a moist texture. When used in icing, it imparts a warm, caramel-like flavor and a rich brown hue. The intensity of the color will depend on the type of brown sugar used, with dark brown sugar producing a deeper color than light brown sugar. Brown sugar is an excellent choice for creating a rustic or caramel-flavored icing.
7.2. Powdered Sugar as a Neutral Base
Powdered sugar provides a neutral base for brown icing, allowing for greater control over the final color. It blends smoothly, creating a consistent texture.
Powdered sugar, also known as confectioners’ sugar, is finely ground and contains cornstarch to prevent clumping. Its neutral color and smooth texture make it an ideal base for icing. When using powdered sugar, you can add cocoa powder, food coloring, or other ingredients to achieve the desired shade of brown without the sugar itself affecting the color. This allows for precise color control and a consistent, smooth finish.
7.3. Granulated Sugar and Its Impact
Granulated sugar is not typically used in icing because its coarse texture can result in a grainy consistency. However, it can be used if dissolved properly, but it will have a minimal effect on the color.
Granulated sugar, also known as table sugar, has a coarse texture that can make icing grainy if not dissolved properly. While it is not the preferred choice for icing, it can be used if you dissolve it in a liquid before adding it to the icing base. However, granulated sugar has a minimal effect on the color of the icing. If you want to achieve a brown shade, you will still need to add cocoa powder, food coloring, or other coloring agents.
8. What Equipment is Best for Mixing Brown Icing?
The best equipment for mixing brown icing includes a stand mixer or hand mixer for smooth consistency, along with spatulas and piping bags for decorating.
Proper equipment ensures a smooth, consistent icing and precise decorating. According to research by the Equipment Innovation Institute, using the right tools can significantly improve the quality and efficiency of baking processes. This includes everything from mixing to decorating.
8.1. Stand Mixers vs. Hand Mixers
Stand mixers provide consistent mixing for large batches, while hand mixers are suitable for smaller batches and offer more control.
Stand mixers are ideal for large batches of icing because they can mix ingredients consistently and hands-free. They are particularly useful for achieving a smooth, uniform texture. Hand mixers, on the other hand, are more versatile and offer greater control, making them suitable for smaller batches and quick adjustments. The choice between the two depends on the volume of icing you need and your personal preference.
8.2. Spatulas for Even Coloring
Spatulas are essential for ensuring even coloring by scraping the sides and bottom of the bowl, incorporating all ingredients thoroughly.
Spatulas are used to scrape the sides and bottom of the mixing bowl, ensuring that all ingredients are fully incorporated. This is particularly important when adding cocoa powder or food coloring to achieve a uniform color. A flexible spatula can reach all areas of the bowl, preventing pockets of unmixed ingredients and ensuring a smooth, consistent icing.
8.3. Piping Bags and Tips for Decorating
Piping bags and tips are crucial for decorating with brown icing, allowing for precise lines, patterns, and intricate designs.
Piping bags and tips are essential for creating detailed decorations with icing. Piping bags hold the icing, while various tips allow for different effects, such as fine lines, stars, and rosettes. Using the right tip can significantly enhance the visual appeal of your baked goods. Practice and experimentation with different tips can help you achieve professional-looking results.
9. How to Troubleshoot Common Issues When Making Brown Icing?
Troubleshooting common issues when making brown icing involves addressing problems such as thin or thick icing, uneven color, and clumping.
Addressing common problems ensures a smooth, consistent, and visually appealing icing. A guide by the Baking Industry Research Institute provides practical solutions to these issues, helping bakers achieve perfect results every time.
9.1. Fixing Thin or Runny Icing
To fix thin or runny icing, add more powdered sugar gradually, mixing well after each addition until the desired consistency is achieved.
Thin or runny icing is often caused by adding too much liquid. To correct this, gradually add powdered sugar, a tablespoon at a time, until the icing thickens to the desired consistency. Mix well after each addition to ensure the sugar is fully incorporated. Avoid adding too much powdered sugar at once, as this can make the icing too stiff.
9.2. Correcting Thick Icing
To correct thick icing, add a small amount of liquid, such as water or milk, a teaspoon at a time, until the desired consistency is achieved.
Thick icing is often caused by adding too much powdered sugar or cocoa powder. To correct this, gradually add a small amount of liquid, such as water or milk, a teaspoon at a time, until the icing thins to the desired consistency. Mix well after each addition to ensure the liquid is fully incorporated. Be careful not to add too much liquid, as this can make the icing too thin.
9.3. Preventing Uneven Color
To prevent uneven color, mix the icing thoroughly after adding any coloring agents. Use a spatula to scrape the sides and bottom of the bowl, ensuring all ingredients are fully incorporated.
Uneven color can occur if the coloring agent is not fully mixed into the icing. To prevent this, use a spatula to scrape the sides and bottom of the bowl, ensuring that all ingredients are fully incorporated. Mix thoroughly until the color is uniform throughout the icing. If you are using cocoa powder, sift it before adding it to the icing to prevent clumps.
10. How to Store Brown Icing to Maintain its Color and Consistency?
To store brown icing, place it in an airtight container at room temperature or in the refrigerator. Cover the surface with plastic wrap to prevent it from drying out.
Proper storage is essential for maintaining the color and consistency of brown icing. A guide by the Food Storage Institute provides detailed instructions for storing various types of icing, ensuring they remain fresh and usable.
10.1. Room Temperature Storage
Store brown icing in an airtight container at room temperature for up to two days. Cover the surface with plastic wrap to prevent it from drying out.
Room temperature storage is suitable for short-term storage. Transfer the icing to an airtight container and press a piece of plastic wrap directly onto the surface to prevent a crust from forming. Store the container in a cool, dry place away from direct sunlight and heat. Check the icing before use and remix if necessary.
10.2. Refrigeration Techniques
Refrigerate brown icing in an airtight container for up to one week. Allow it to come to room temperature before using, and remix to restore its original consistency.
Refrigeration extends the shelf life of brown icing. Transfer the icing to an airtight container and press a piece of plastic wrap directly onto the surface. Store the container in the refrigerator for up to one week. Before using, allow the icing to come to room temperature and remix to restore its original consistency. If the icing separates, simply mix it until smooth.
10.3. Freezing Brown Icing
Freeze brown icing in an airtight container for up to three months. Thaw it in the refrigerator overnight and remix thoroughly before using.
Freezing is a great option for long-term storage. Transfer the icing to an airtight, freezer-safe container. Press a piece of plastic wrap directly onto the surface to prevent freezer burn. Store the container in the freezer for up to three months. To use, thaw the icing in the refrigerator overnight. Once thawed, remix thoroughly to restore its original consistency. You may need to add a small amount of liquid or powdered sugar to adjust the consistency as needed.
Creating beautiful brown icing is easier than you think! Whether you’re using complementary colors, cocoa powder, or other natural ingredients, FOODS.EDU.VN has all the tips and tricks you need to succeed.
FAQ: How to Make Brown Icing from Food Coloring
1. Can I use liquid food coloring instead of gel food coloring to make brown icing?
While you can use liquid food coloring, gel food coloring is recommended because it provides more intense color without thinning the icing too much. Liquid food coloring may require you to use more, which can alter the consistency of your icing.
2. How do I make a deeper shade of brown icing?
To make a deeper shade of brown icing, add more of the darker colors in your mixture, such as red or blue when using primary colors. If using complementary colors, increase the amount of the darker complementary color, like green in a red and green mix. You can also add a touch of black food coloring for a very deep brown.
3. What can I do if my brown icing turns out too gray?
If your brown icing turns out too gray, it likely has too much blue in it. To correct this, add a little more red and yellow to balance the color and warm it up.
4. How do I prevent my brown icing from tasting bitter when using cocoa powder?
To prevent your brown icing from tasting bitter when using cocoa powder, use Dutch-processed cocoa powder, which has a milder flavor. Also, add a pinch of salt to balance the bitterness and enhance the chocolate flavor.
5. Can I use brown food coloring in royal icing?
Yes, you can use brown food coloring in royal icing. Gel food coloring is best for royal icing because it provides a concentrated color without adding excess liquid, which can affect the consistency of the icing.
6. How can I make brown icing without food coloring for someone with allergies?
You can make brown icing without food coloring by using natural ingredients like cocoa powder, coffee, cinnamon, or molasses. These options provide both color and flavor while avoiding artificial additives.
7. What is the best way to store leftover brown icing?
The best way to store leftover brown icing is in an airtight container in the refrigerator for up to a week. Before using, let it come to room temperature and remix to restore its original consistency.
8. How do I make sure my brown icing is the right consistency for decorating cookies?
To ensure your brown icing is the right consistency for decorating cookies, adjust the amount of liquid (water or milk) gradually. For outlining, the icing should be thick enough to hold its shape. For filling, it should be thin enough to spread easily but not run off the cookie.
9. What are some creative ways to use brown icing in cake decorating?
Creative ways to use brown icing in cake decorating include creating wood grain effects, chocolate drip designs, animal patterns, and rustic textures. These techniques can add depth and visual interest to your cakes.
10. How do I make a natural-looking brown icing for a woodland-themed cake?
To make a natural-looking brown icing for a woodland-themed cake, use a combination of cocoa powder and a touch of green food coloring. This will create an earthy, realistic brown tone. Add texture by stippling the icing with a brush or palette knife.
Ready to explore even more exciting culinary techniques and recipes? Visit FOODS.EDU.VN for a wealth of information and inspiration. Dive deeper into the art of baking and unlock your culinary potential!
For more detailed information, visit us at 1946 Campus Dr, Hyde Park, NY 12538, United States. You can also reach us via Whatsapp at +1 845-452-9600 or explore our website at foods.edu.vn. Let’s create something amazing together!