Jerky making is an art, and at FOODS.EDU.VN, we’re excited to guide you through mastering it. Knowing How To Make Jerky In A Food Dehydrator is a fantastic way to create a healthy, delicious, and protein-packed snack right in your own kitchen. This ultimate guide covers everything from selecting the best cuts of meat to perfectly dehydrating your jerky, ensuring a mouthwatering experience every time. Ready to elevate your snack game? Let’s dive into the world of jerky-making with some helpful tips and tricks!
1. Understanding the Basics of Jerky Making
Jerky isn’t just dried meat; it’s a culinary delight steeped in history and tradition. Originating as a method of preserving meat, jerky has evolved into a beloved snack enjoyed worldwide. At its core, making jerky involves removing moisture from lean meat, preventing spoilage and concentrating flavor. The key is to strike a balance between drying the meat sufficiently to inhibit bacterial growth and retaining enough moisture to maintain a palatable texture. This is where the precision of a food dehydrator comes into play.
1.1. The Appeal of Homemade Jerky
Why bother making your own jerky when you can simply buy it at the store? The answer lies in the unparalleled control you have over ingredients and quality.
- Healthier Ingredients: Commercial jerky often contains preservatives, artificial flavors, and excessive sodium. When you make it yourself, you control every ingredient, ensuring a healthier snack.
- Customized Flavors: The possibilities are endless. From sweet and smoky to spicy and savory, you can tailor the marinade to your exact taste preferences.
- Cost-Effective: Purchasing high-quality jerky can be expensive. Making your own can be more economical, especially if you buy meat in bulk.
- Satisfaction: There’s a unique satisfaction in creating something delicious from scratch. Plus, it’s a fun and rewarding culinary project!
- Avoidance of Additives: Many store-bought jerky products contain additives like MSG, nitrates, and artificial colors. Homemade jerky allows you to avoid these unwanted ingredients.
1.2. Why Use a Food Dehydrator?
While jerky can be made in an oven or smoker, a food dehydrator offers several advantages:
- Consistent Temperature: Dehydrators maintain a steady, low temperature, crucial for safely drying meat without cooking it.
- Even Airflow: The design of most dehydrators ensures uniform airflow, drying the jerky evenly and preventing moisture pockets that can lead to spoilage.
- Energy Efficiency: Dehydrators consume less energy than ovens, making them a more economical choice for long drying times.
- Ease of Use: With simple controls and timers, dehydrators are incredibly user-friendly, even for beginners.
- Versatility: Beyond jerky, dehydrators can be used to dry fruits, vegetables, herbs, and more, making them a valuable addition to any kitchen.
1.3. Essential Equipment for Making Jerky
Before you begin, gather these essential tools and equipment:
- Food Dehydrator: Choose a dehydrator with adjustable temperature settings and consistent airflow.
- Sharp Knife: A good quality knife is essential for slicing meat evenly.
- Cutting Board: Use a clean cutting board dedicated to meat preparation.
- Mixing Bowls: For preparing the marinade.
- Measuring Cups and Spoons: Accurate measurements are crucial for a well-balanced marinade.
- Ziplock Bags or Containers: For marinating the meat.
- Paper Towels: For patting the meat dry before dehydrating.
- Meat Thermometer: To ensure the jerky reaches a safe internal temperature.
- Vacuum Sealer (Optional): For long-term storage.
2. Selecting the Right Cut of Meat
The foundation of great jerky is high-quality, lean meat. The best cuts are those with minimal fat, as fat can spoil during the dehydration process and shorten the jerky’s shelf life.
2.1. Recommended Meat Cuts
- Eye of Round Roast: This is a top choice due to its leanness and uniform shape, making it easy to slice.
- Top Round Roast: Another lean option that’s widely available and relatively inexpensive.
- Bottom Round Roast: Similar to top round but can be a bit tougher, so marinating is key.
- Flank Steak: Known for its rich flavor and tenderness, flank steak makes excellent jerky. Slice it thinly against the grain for the best results.
- Sirloin Tip Roast: A budget-friendly option that’s lean and flavorful.
- Ground Meat (Lean): For those who prefer a different texture, lean ground meat (90% lean or higher) can be used with a jerky gun to create jerky strips.
- Beef Tenderloin: While more expensive, beef tenderloin results in incredibly tender jerky.
2.2. Understanding Meat Grades
The grade of meat you choose can also impact the final product. USDA grades indicate the quality and tenderness of the meat.
- Prime: The highest grade, with abundant marbling (intramuscular fat). While flavorful, prime cuts may not be ideal for jerky due to the fat content.
- Choice: A good balance of flavor and leanness. Choice cuts are often a great option for jerky.
- Select: The leanest grade, with less marbling. Select cuts can be used for jerky, but marinating is essential to add flavor and moisture.
2.3. Where to Buy Meat
- Butchers: Local butchers can provide high-quality cuts and offer advice on the best options for jerky.
- Supermarkets: Supermarkets offer a wide variety of meat, but quality can vary. Look for lean cuts with minimal fat.
- Warehouse Stores: Stores like Sam’s Club and Costco often have good prices on meat, especially when buying in bulk. Be sure to check the quality and leanness of the cuts.
- Online Retailers: Some online retailers specialize in high-quality meats, offering convenience and a wide selection.
Free Sam’s Club Membership
Big box stores tend to have the best prices when it comes to meat for beef jerky. These include the main two, Sam’s Club and Costco. If you like purchasing local, great! Local butchers have great cuts of meat, they just tend to be more expensive. However, you are supporting local businesses.
3. Preparing the Meat
Proper preparation is crucial for safe and delicious jerky. This involves trimming, slicing, and, optionally, tenderizing the meat.
3.1. Trimming the Fat
Using a sharp knife, carefully trim away all visible fat from the meat. Fat has a higher risk of spoilage during the dehydration process.
3.2. Slicing Techniques
Slicing the meat correctly is essential for achieving the desired texture.
- Thickness: Aim for slices that are about 1/8 to 1/4 inch thick. Thinner slices will dry more quickly and result in a crispier jerky, while thicker slices will take longer and be chewier.
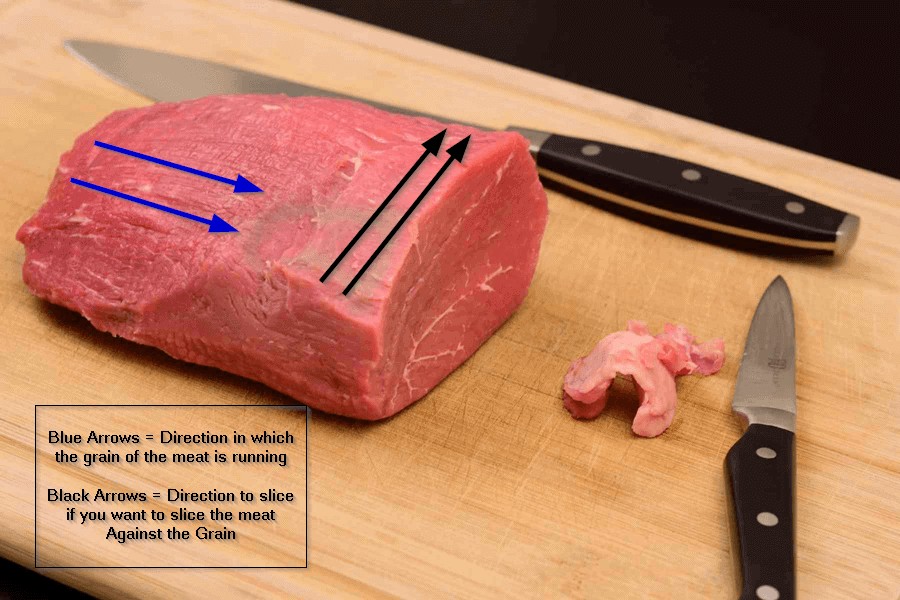
- Grain Direction: Slice against the grain for a more tender jerky, or with the grain for a chewier texture. To identify the grain, look for the parallel lines of muscle fibers running through the meat.
- Partial Freezing: Partially freezing the meat for 1-2 hours before slicing can make it easier to achieve uniform slices. The meat should be firm but not completely frozen.
- Jerky Slicers: Consider using a jerky slicer for consistent results, especially if you make jerky frequently.
3.3. Tenderizing (Optional)
If you’re using a tougher cut of meat, you can tenderize it before marinating.
- Mechanical Tenderizing: Use a meat mallet or tenderizing tool to break down the muscle fibers.
- Marinades: Certain ingredients in marinades, such as vinegar, lemon juice, or pineapple juice, can also help tenderize the meat.
4. Crafting the Perfect Marinade
The marinade is where you infuse your jerky with flavor. A well-balanced marinade should include salt, acid, and various seasonings.
4.1. Key Marinade Ingredients
- Salt: Salt not only adds flavor but also helps to preserve the meat by drawing out moisture and inhibiting bacterial growth.
- Acid: Acidic ingredients like vinegar, lemon juice, or Worcestershire sauce help to tenderize the meat and enhance the flavor.
- Flavorings: This is where you can get creative. Common flavorings include soy sauce, brown sugar, garlic powder, onion powder, black pepper, red pepper flakes, liquid smoke, and various herbs and spices.
- Sugar: Sugar adds sweetness and helps to balance the savory flavors. Brown sugar, honey, or maple syrup can be used.
- Umami: Ingredients like soy sauce, Worcestershire sauce, and mushroom powder add a savory, umami-rich flavor.
4.2. Marinade Recipes
Here are a few marinade recipes to get you started:
Classic Beef Jerky Marinade
- 1/2 cup soy sauce
- 1/4 cup Worcestershire sauce
- 2 tablespoons brown sugar
- 1 tablespoon garlic powder
- 1 teaspoon black pepper
- 1/2 teaspoon red pepper flakes (optional)
Sweet and Spicy Jerky Marinade
- 1/2 cup soy sauce
- 1/4 cup honey
- 2 tablespoons apple cider vinegar
- 1 tablespoon sriracha
- 1 teaspoon ginger powder
- 1/2 teaspoon cayenne pepper
Teriyaki Jerky Marinade
- 1/2 cup soy sauce
- 1/4 cup mirin (sweet rice wine)
- 2 tablespoons brown sugar
- 1 tablespoon ginger, grated
- 2 cloves garlic, minced
- 1/2 teaspoon sesame oil
Smoked Paprika Marinade
- ½ cup soy sauce
- ¼ cup Worcestershire sauce
- 2 tablespoons smoked paprika
- 1 tablespoon brown sugar
- 1 teaspoon garlic powder
- 1 teaspoon onion powder
- ½ teaspoon black pepper
- ½ teaspoon cayenne pepper (optional)
Maple Dijon Marinade
- ½ cup maple syrup
- ¼ cup Dijon mustard
- ¼ cup apple cider vinegar
- 1 tablespoon Worcestershire sauce
- 1 teaspoon black pepper
- ½ teaspoon garlic powder
4.3. Marinating Process
- Combine Ingredients: In a bowl or ziplock bag, mix all marinade ingredients thoroughly.
- Add Meat: Add the sliced meat to the marinade, ensuring all pieces are evenly coated.
- Marinate: Seal the bag or container and refrigerate for at least 6 hours, or preferably 12-24 hours. The longer the meat marinates, the more flavorful it will be.
- Turn Occasionally: If using a container, turn the meat occasionally to ensure even marination. For ziplock bags, simply flip the bag over.
4.4. Tips for Enhancing Marinade Flavor
- Fresh Herbs and Spices: Using fresh herbs and spices can add a burst of flavor to your marinade.
- Citrus Zest: Adding citrus zest (lemon, lime, or orange) can brighten the flavor profile.
- Infused Oils: Consider using infused oils, such as garlic-infused or chili-infused oil, for added depth.
- Experiment: Don’t be afraid to experiment with different combinations of flavors to create your signature marinade.
5. Dehydrating the Jerky
Now comes the crucial step: dehydrating the marinated meat. This process removes moisture, preserves the meat, and creates the characteristic jerky texture.
5.1. Preparing the Dehydrator
- Clean Trays: Ensure the dehydrator trays are clean and dry.
- Arrange Meat: Lay the marinated meat strips on the trays, making sure they are not touching or overlapping. This allows for even airflow and consistent drying.
5.2. Dehydrating Time and Temperature
- Temperature: Set your dehydrator to 160°F (71°C). This temperature is high enough to kill any potential bacteria while still allowing the meat to dry properly.
- Time: Dehydrating time can vary depending on the thickness of the meat, the humidity in your environment, and the efficiency of your dehydrator. Generally, it takes between 4 to 8 hours.
- USDA Guidelines: According to USDA guidelines, heating meat to 160°F (71°C) is crucial for food safety. To ensure the meat reaches this temperature, you can preheat the jerky in an oven at 275°F (135°C) for 10 minutes before dehydrating.
- Rotating Trays: Rotate the trays every few hours to ensure even drying.
5.3. Monitoring the Dehydration Process
- Check Regularly: Start checking the jerky after 4 hours.
- Bend Test: The jerky is done when it bends and cracks but doesn’t break in half. It should also have a slightly leathery texture.
- Internal Temperature: Use a meat thermometer to ensure the internal temperature reaches 160°F (71°C).
5.4. Maximizing Dehydrator Efficiency
- Even Distribution: Ensure meat strips are evenly spaced on the trays to promote uniform drying.
- Air Circulation: Don’t overcrowd the dehydrator. Proper air circulation is key to efficient drying.
- Consistent Temperature: Maintain a consistent temperature throughout the dehydration process. Avoid opening the dehydrator frequently, as this can cause temperature fluctuations.
6. Determining Jerky’s Doneness
Knowing when your jerky is perfectly dried is crucial for both taste and safety.
6.1. Visual Cues
- Color: The jerky should have a deep, rich color.
- Texture: The surface should be dry to the touch, without any visible moisture.
6.2. The Bend Test
The bend test is the most reliable way to determine doneness.
- Cool a Piece: Remove a piece of jerky from the dehydrator and let it cool for a few minutes.
- Bend: Bend the piece of jerky. It should bend and crack but not break in half. If it breaks, it’s over-dried. If it’s too pliable, it needs more time in the dehydrator.
- White Fibers: Look for white fibers within the meat when bent. These indicate that the meat has been properly dried.
6.3. Troubleshooting Common Issues
- Jerky is Too Dry: If the jerky is too dry and brittle, reduce the dehydration time in future batches. You can also try marinating for a shorter period.
- Jerky is Too Moist: If the jerky is too moist, increase the dehydration time. Ensure the meat strips are not overlapping on the trays, and consider increasing the temperature slightly.
- Uneven Drying: If some pieces are drying faster than others, rotate the trays more frequently. Make sure the meat strips are sliced evenly.
7. Cooling and Storing Jerky
Proper cooling and storage are essential for maintaining the quality and safety of your homemade jerky.
7.1. Cooling Process
- Remove from Dehydrator: Once the jerky is done, remove it from the dehydrator and let it cool completely on a wire rack. This allows any remaining moisture to evaporate.
- Cooling Time: Allow the jerky to cool for at least 1-2 hours before storing.
7.2. Storage Options
- Ziplock Bags: For short-term storage (1-2 weeks), store the cooled jerky in ziplock bags. Remove as much air as possible from the bag before sealing.
- Airtight Containers: Airtight containers can also be used for short-term storage.
- Vacuum Sealing: For long-term storage (1-2 months), vacuum sealing is the best option. Vacuum sealing removes all air from the bag, preventing oxidation and spoilage.
- Refrigeration: Storing jerky in the refrigerator can extend its shelf life, especially in humid environments.
- Freezing: For even longer storage (up to 6 months), you can freeze the jerky. Make sure it is properly sealed to prevent freezer burn.
7.3. Tips for Maximizing Shelf Life
- Dry Thoroughly: Ensure the jerky is thoroughly dried before storing to prevent mold growth.
- Cool Completely: Always cool the jerky completely before storing to prevent condensation inside the storage container.
- Proper Sealing: Use airtight containers or vacuum seal bags to minimize exposure to air and moisture.
- Check Regularly: Check the stored jerky periodically for any signs of spoilage, such as mold or an off odor.
8. Safety Considerations
Food safety is paramount when making jerky. Follow these guidelines to prevent foodborne illness.
8.1. Safe Handling Practices
- Wash Hands: Wash your hands thoroughly with soap and water before and after handling raw meat.
- Clean Surfaces: Clean and sanitize all surfaces and utensils that come into contact with raw meat.
- Separate Cutting Boards: Use separate cutting boards for raw meat and other foods to prevent cross-contamination.
- Avoid Cross-Contamination: Keep raw meat separate from cooked or ready-to-eat foods.
8.2. USDA Guidelines
- Heating: According to USDA guidelines, heating meat to 160°F (71°C) is crucial for killing bacteria.
- Dehydration Temperature: Maintain a dehydrator temperature of 160°F (71°C) or higher to ensure food safety.
- Safe Storage: Store jerky properly to prevent spoilage.
8.3. Recognizing Signs of Spoilage
- Mold: Discard any jerky that shows signs of mold growth.
- Off Odor: If the jerky has an unusual or unpleasant odor, it may be spoiled.
- Slimy Texture: A slimy texture can indicate bacterial growth.
- Discoloration: Discoloration can also be a sign of spoilage.
9. Troubleshooting Common Problems
Even with careful preparation, you may encounter some challenges when making jerky. Here are some common issues and how to address them.
9.1. Jerky is Too Tough
- Slicing: Ensure you are slicing against the grain.
- Tenderizing: Consider tenderizing the meat before marinating.
- Marinating: Marinate for a longer period to help break down the muscle fibers.
9.2. Jerky is Too Salty
- Marinade: Reduce the amount of salt or soy sauce in the marinade.
- Soaking: Soak the meat in water for 30 minutes before dehydrating to remove excess salt.
9.3. Jerky is Too Bland
- Marinade: Increase the amount of flavoring ingredients in the marinade.
- Marinating: Marinate for a longer period to allow the flavors to penetrate the meat.
- Seasoning: Add a dry rub of spices to the meat before dehydrating.
9.4. Jerky is Not Drying Evenly
- Slicing: Ensure the meat strips are sliced evenly.
- Arrangement: Arrange the meat strips on the dehydrator trays so they are not touching or overlapping.
- Rotation: Rotate the trays regularly to ensure even drying.
9.5. Additional Tips and Tricks
- Use Curing Salts: Adding curing salts, such as sodium nitrite, can help to preserve the color and flavor of the jerky and inhibit bacterial growth. Follow the manufacturer’s instructions carefully when using curing salts.
- Experiment with Flavors: Don’t be afraid to experiment with different flavor combinations to create your signature jerky recipe.
- Record Your Results: Keep a record of your recipes and techniques so you can replicate your successes and avoid your failures.
10. Exploring Flavor Variations
One of the most exciting aspects of making jerky is the ability to experiment with different flavors. Here are some ideas to inspire you.
10.1. Global Flavors
- Korean BBQ: Use a marinade with soy sauce, sesame oil, garlic, ginger, and gochujang (Korean chili paste).
- Thai Peanut: Combine soy sauce, peanut butter, lime juice, honey, and red pepper flakes.
- Italian Herb: Use a marinade with olive oil, balsamic vinegar, garlic, oregano, basil, and thyme.
- Mexican Fiesta: Combine lime juice, chili powder, cumin, paprika, garlic powder, and cayenne pepper.
- Moroccan Spice: Use a marinade with olive oil, lemon juice, garlic, ginger, cumin, coriander, turmeric, and cinnamon.
10.2. Sweet and Savory Combinations
- Maple Bacon: Combine maple syrup, soy sauce, liquid smoke, garlic powder, and bacon bits.
- Honey Garlic: Use a marinade with honey, soy sauce, garlic, ginger, and sesame oil.
- Cranberry Chipotle: Combine cranberry sauce, chipotle peppers in adobo sauce, lime juice, and brown sugar.
10.3. Spicy Creations
- Habanero Heat: Use a marinade with habanero peppers, lime juice, garlic, and cumin.
- Jalapeño Lime: Combine jalapeño peppers, lime juice, garlic, cilantro, and cumin.
- Sriracha: Use sriracha sauce, soy sauce, honey, and garlic.
10.4. Incorporating Unique Ingredients
- Coffee: Add brewed coffee or instant coffee granules to your marinade for a rich, smoky flavor.
- Tea: Infuse your marinade with strong brewed tea, such as black tea or smoked tea, for added depth.
- Fruit Purees: Add fruit purees, such as apple or pear, to your marinade for sweetness and moisture.
- Vegetable Juices: Use vegetable juices, such as tomato or carrot, to add nutrients and flavor to your jerky.
11. Jerky for Special Diets
Jerky can be adapted to suit various dietary needs and preferences.
11.1. Gluten-Free Jerky
- Soy Sauce: Use tamari, a gluten-free soy sauce alternative.
- Worcestershire Sauce: Check the label to ensure it is gluten-free. Some brands contain malt vinegar, which is derived from barley.
- Marinade: Ensure all other marinade ingredients are gluten-free.
11.2. Low-Sodium Jerky
- Salt: Reduce the amount of salt in the marinade.
- Soy Sauce: Use low-sodium soy sauce or tamari.
- Flavorings: Increase the amount of other flavorings, such as garlic, herbs, and spices, to compensate for the reduced salt.
11.3. Sugar-Free Jerky
- Sweeteners: Use sugar-free sweeteners, such as stevia or erythritol, in place of sugar.
- Marinade: Ensure all other marinade ingredients are sugar-free.
- Flavorings: Emphasize savory and spicy flavors to create a delicious sugar-free jerky.
11.4. Vegetarian/Vegan Jerky
While traditional jerky is made from meat, there are vegetarian and vegan alternatives.
- Mushroom Jerky: Use large, meaty mushrooms, such as portobello or shiitake, to create a savory and satisfying jerky.
- Soy Curl Jerky: Soy curls are a versatile and protein-rich ingredient that can be marinated and dehydrated to create a vegan jerky.
- Tofu Jerky: Firm or extra-firm tofu can be pressed to remove excess water, marinated, and dehydrated to create a chewy and flavorful vegan jerky.
- Jackfruit Jerky: Young, green jackfruit can be shredded, marinated, and dehydrated to create a unique and delicious vegan jerky.
12. Advanced Techniques
For those looking to take their jerky-making skills to the next level, here are some advanced techniques to explore.
12.1. Cold Smoking
Cold smoking involves exposing the meat to smoke at a low temperature (below 85°F or 29°C) for an extended period. This adds a deep, smoky flavor without cooking the meat.
- Equipment: You’ll need a cold smoker attachment for your dehydrator or a separate cold smoking setup.
- Process: Follow the manufacturer’s instructions for cold smoking. Monitor the temperature closely to ensure it remains low enough to prevent cooking the meat.
- Safety: Cold smoking can increase the risk of bacterial growth, so it’s important to follow safe handling practices and ensure the meat reaches a safe internal temperature during dehydration.
12.2. Sous Vide Pre-Cooking
Sous vide involves cooking the meat in a water bath at a precise temperature for an extended period. This can help to tenderize the meat and ensure it reaches a safe internal temperature before dehydration.
- Equipment: You’ll need a sous vide immersion circulator and a vacuum sealer.
- Process: Vacuum seal the marinated meat and cook it in a water bath at 160°F (71°C) for 1-2 hours. Then, remove the meat from the bag, pat it dry, and dehydrate as usual.
- Benefits: Sous vide pre-cooking can result in a more tender and evenly cooked jerky.
12.3. Fermentation
Fermentation involves using beneficial bacteria to add flavor and preserve the meat. This is a more advanced technique that requires careful attention to detail to ensure food safety.
- Equipment: You’ll need a fermentation chamber or a cool, dark place with a consistent temperature.
- Process: Follow a trusted recipe for fermented jerky. Monitor the pH and temperature closely to ensure the meat ferments properly and remains safe to eat.
- Safety: Fermentation can increase the risk of bacterial growth, so it’s important to follow safe handling practices and monitor the process closely.
12.4. Working with Different Meats
- Venison: Venison is a lean and flavorful meat that makes excellent jerky. Marinate it for a longer period to help tenderize it.
- Turkey: Turkey jerky is a healthy and delicious alternative to beef. Use lean ground turkey or turkey breast.
- Salmon: Salmon jerky is a unique and flavorful snack. Use skinless salmon fillets and marinate them in a teriyaki or smoked paprika marinade.
- Duck: Duck jerky is a rich and decadent treat. Use duck breast and marinate it in a sweet and savory marinade.
13. Jerky Recipes from Around the World
Explore the diverse world of jerky-making with these international recipes.
13.1. Biltong (South Africa)
Biltong is a type of air-dried, cured meat that is popular in South Africa. It is typically made from beef, but other meats can also be used.
- Ingredients: Beef, vinegar, salt, coriander, black pepper, and other spices.
- Process: The meat is marinated in vinegar and spices, then air-dried for several days until it is firm and dry.
13.2. Kilishi (Nigeria)
Kilishi is a type of dried meat that is popular in Nigeria. It is made from thinly sliced beef that is marinated in a peanut-based sauce and then sun-dried.
- Ingredients: Beef, peanuts, water, onions, chili powder, salt, and other spices.
- Process: The meat is marinated in a peanut sauce, then sun-dried until it is crispy and dry.
13.3. Carne Seca (Mexico)
Carne seca is a type of dried beef that is popular in Mexico. It is typically made from lean beef that is marinated in a mixture of lime juice, salt, and spices, then sun-dried.
- Ingredients: Beef, lime juice, salt, chili powder, cumin, and other spices.
- Process: The meat is marinated in a lime juice mixture, then sun-dried until it is firm and dry.
13.4. Pemmican (Native America)
Pemmican is a traditional Native American food that is made from dried, pulverized meat, fat, and berries. It is a nutrient-rich and shelf-stable food that was often used for long journeys.
- Ingredients: Dried meat, rendered fat, dried berries, and sometimes nuts or seeds.
- Process: The meat is dried and pulverized, then mixed with melted fat and dried berries. The mixture is formed into cakes or bars and allowed to cool and harden.
14. Jerky as a Business Venture
If you’re passionate about jerky, you might consider turning your hobby into a business. Here are some tips for starting a jerky business.
14.1. Developing a Business Plan
- Market Research: Research the market to identify your target audience and potential competitors.
- Product Development: Develop unique and high-quality jerky recipes that set you apart from the competition.
- Branding: Create a strong brand identity that reflects the quality and uniqueness of your jerky.
- Pricing: Determine a pricing strategy that is competitive and profitable.
- Marketing: Develop a marketing plan to reach your target audience.
14.2. Legal and Regulatory Requirements
- Food Safety Regulations: Comply with all applicable food safety regulations, including those related to meat processing and labeling.
- Licensing: Obtain any necessary licenses and permits to operate a food business.
- Insurance: Obtain liability insurance to protect your business from potential lawsuits.
14.3. Production and Packaging
- Equipment: Invest in high-quality equipment for meat processing, marinating, dehydrating, and packaging.
- Packaging: Use attractive and durable packaging that protects the jerky and extends its shelf life.
- Labeling: Comply with all labeling requirements, including ingredient lists, nutritional information, and safe handling instructions.
14.4. Sales and Distribution
- Online Sales: Sell your jerky online through your own website or through third-party platforms like Etsy or Amazon.
- Retail Sales: Partner with local retailers, such as grocery stores, convenience stores, and specialty food stores, to sell your jerky.
- Farmers Markets: Sell your jerky at farmers markets and other local events.
- Wholesale: Sell your jerky wholesale to distributors and retailers.
15. Frequently Asked Questions (FAQ)
Q1: What is the best cut of meat for making jerky?
The eye of round roast is generally considered the best due to its leanness and uniform shape. Other good options include top round, bottom round, flank steak, and sirloin tip.
Q2: How long should I marinate the meat?
Marinate for at least 6 hours, but preferably 12-24 hours, for maximum flavor.
Q3: What temperature should I set my dehydrator to?
Set your dehydrator to 160°F (71°C) to ensure food safety.
Q4: How long does it take to dehydrate jerky?
Dehydrating time can vary, but it generally takes between 4 to 8 hours.
Q5: How do I know when the jerky is done?
The jerky is done when it bends and cracks but doesn’t break in half.
Q6: How should I store jerky?
For short-term storage, use ziplock bags or airtight containers. For long-term storage, vacuum sealing is best.
Q7: Is it safe to make jerky at home?
Yes, as long as you follow safe handling practices and ensure the meat reaches a safe internal temperature.
Q8: Can I use an oven instead of a dehydrator?
Yes, you can use an oven set to the lowest possible temperature (ideally below 200°F or 93°C). Prop the door open slightly to allow moisture to escape.
Q9: Can I make jerky from ground meat?
Yes, use lean ground meat (90% lean or higher) and a jerky gun to create jerky strips.
Q10: How long does homemade jerky last?
Homemade jerky typically lasts for 1-2 weeks in ziplock bags or airtight containers, and 1-2 months when vacuum sealed.
Conclusion: Your Jerky Adventure Awaits
Knowing how to make jerky in a food dehydrator is a rewarding skill that allows you to create delicious, healthy snacks tailored to your taste. By following this comprehensive guide, you’ll be well-equipped to experiment with different meats, marinades, and techniques to create your signature jerky recipes. Remember to prioritize food safety and have fun exploring the endless possibilities of homemade jerky.
Ready to dive deeper into the world of culinary arts? At FOODS.EDU.VN, we offer a wealth of knowledge and resources to help you master a variety of cooking techniques and recipes. Visit our website to explore more articles, tutorials, and expert tips. Whether you’re a beginner or an experienced chef, FOODS.EDU.VN is your go-to destination for all things food-related.
Want to learn more about creating culinary masterpieces? Visit FOODS.EDU.VN today!
Address: 1946 Campus Dr, Hyde Park, NY 12538, United States
WhatsApp: +1 845-452-9600
Website: foods.edu.vn