Making mini food is a delightful hobby, and FOODS.EDU.VN is here to guide you through every step. From miniature pastries to tiny savory dishes, crafting these adorable creations is easier than you think. This guide provides expert tips, detailed instructions, and creative ideas to help you master the art of making mini food.
1. What Is Mini Food And Why Is It So Appealing?
Mini food refers to scaled-down versions of real food items, often crafted from polymer clay, resin, or other materials. These miniature creations are incredibly appealing due to their charming aesthetic, intricate details, and the satisfaction of creating something so small and realistic.
The appeal of mini food lies in several factors:
- Aesthetic Charm: The small size and detailed craftsmanship make them visually appealing.
- Creative Outlet: Mini food creation provides a fantastic outlet for creativity and artistic expression.
- Therapeutic Hobby: The process of making mini food can be relaxing and therapeutic.
- Collectibility: Many people enjoy collecting mini food items, creating entire miniature worlds.
- Versatility: Mini food can be used in dollhouses, dioramas, jewelry, and various other crafts.
2. What Are The Essential Materials For Making Mini Food?
To embark on your mini food-making journey, you’ll need a few essential materials. These include polymer clay, liquid clay, pastels, tools, and baking equipment.
Here’s a detailed list of materials:
| Material | Description | Usage |
|---|---|---|
| Polymer Clay | A type of modeling clay that hardens when baked; available in various colors. | Forming the base of the mini food items. |
| Liquid Clay | A liquid form of polymer clay used for glazing and adding details. | Creating icings, sauces, and other liquid-like elements. |
| Pastels | Soft chalk pastels that can be scraped into powder for coloring the clay. | Adding realistic color and shading to the mini food. |
| Craft Sand | Fine sand used to mimic sugar or other granular substances. | Adding texture and realism to certain items like cookies or pastries. |
| Acrylic Paints | Used for detailed painting and adding highlights. | Detailing and enhancing the appearance of the mini food. |
| Glaze | A clear coating that adds shine and protects the clay. | Giving a glossy finish to the mini food items. |
| Resin | A clear, glossy material that can be used to create realistic liquids and fillings. | Simulating liquids, jams, and other transparent elements. |
| Molds | Silicone molds in various shapes and sizes for creating consistent forms. | Creating repetitive shapes and details easily. |
| Findings | Jump rings, eye pins, and other metal components for jewelry-making. | Turning mini food into jewelry or charms. |
| Mini Containers | Small jars, plates, and other containers to display the mini food. | Displaying and showcasing the finished mini food items. |
| Baking Sheet | Used to bake the polymer clay in the oven. | Baking polymer clay to harden it. |
3. What Tools Do I Need To Create Detailed Mini Foods?
Having the right tools can make a significant difference in the quality and ease of creating mini food. Here’s a list of essential tools:
| Tool | Description | Usage |
|---|---|---|
| Rolling Pin | A small rolling pin for flattening the clay evenly. | Rolling out polymer clay to the desired thickness. |
| Clay Cutters | Miniature cookie cutters in various shapes and sizes. | Cutting out precise shapes for cookies, pastries, and other items. |
| X-Acto Knife | A sharp knife for cutting and shaping the clay. | Making fine cuts, adding details, and trimming excess clay. |
| Pointy Tool | A tool with a fine tip for sculpting and adding details. | Adding textures, creating small holes, and applying icing. |
| Paint Brushes | Small brushes for applying pastels, paints, and liquid clay. | Adding color, shading, and details to the mini food items. |
| Dotting Tools | Tools with rounded tips for creating dots and other patterns. | Adding decorative details, such as dots on cakes or frosting. |
| Toothpicks | Useful for mixing, applying small amounts of clay, and creating textures. | Mixing colors, applying small details, and creating textures on the mini food items. |
| Tweezers | For picking up and placing small items. | Handling and placing tiny details, such as sprinkles or decorations. |
| Sandpaper | For smoothing rough edges. | Smoothing out imperfections and rough edges on the baked clay. |
| Work Surface | A smooth, non-stick surface to work on. | Providing a clean and even surface for rolling, cutting, and shaping the clay. |
| Oven Thermometer | Ensures accurate baking temperature. | Monitoring the oven temperature to prevent burning or under-baking the clay. |
| Tile or Glass Piece | To bake polymer clay on, preventing sticking. | Baking the mini food items on a smooth surface to prevent them from sticking and to ensure even baking. |
4. How To Make Miniature Sugar Cookies Using Polymer Clay?
Creating miniature sugar cookies with polymer clay is a fun and rewarding project. Here’s a step-by-step guide:
Materials:
- Light yellow polymer clay
- Clear liquid polymer
- Brown and colored pastels
- Craft sand (optional)
Tools:
- Rolling pin
- Mini cookie cutters
- X-Acto knife
- Pointy tool
- Small paint brush
- Plastic wrap
- Parchment paper
- Baking sheet or ceramic tile
Instructions:
-
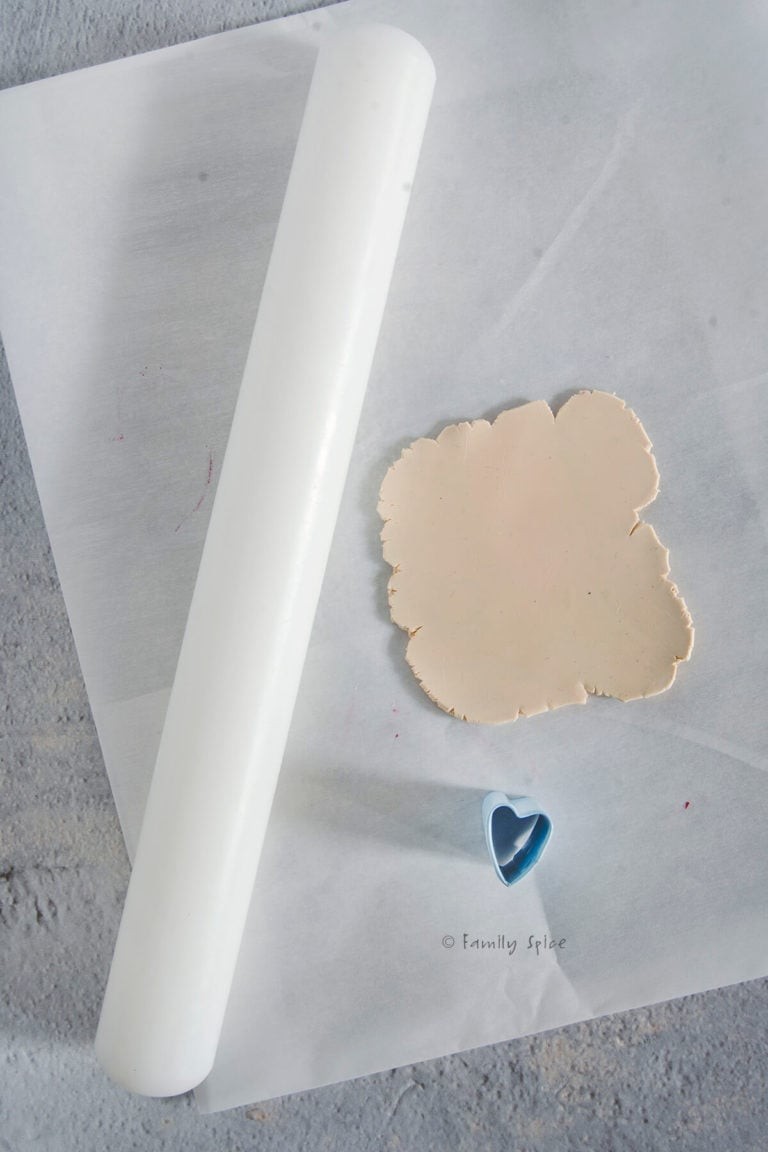
Soften and Roll the Clay:
- Begin by softening the light yellow polymer clay. This makes it easier to work with and roll out evenly.
- Use a rolling pin to roll the clay to your desired thickness. Aim for about ⅛-1/16 inch thick for realistic-looking cookies.
-
Cut Out the Cookie Shapes:
- Place a sheet of plastic wrap over the clay. This prevents the cutters from sticking and helps to remove the shapes cleanly.
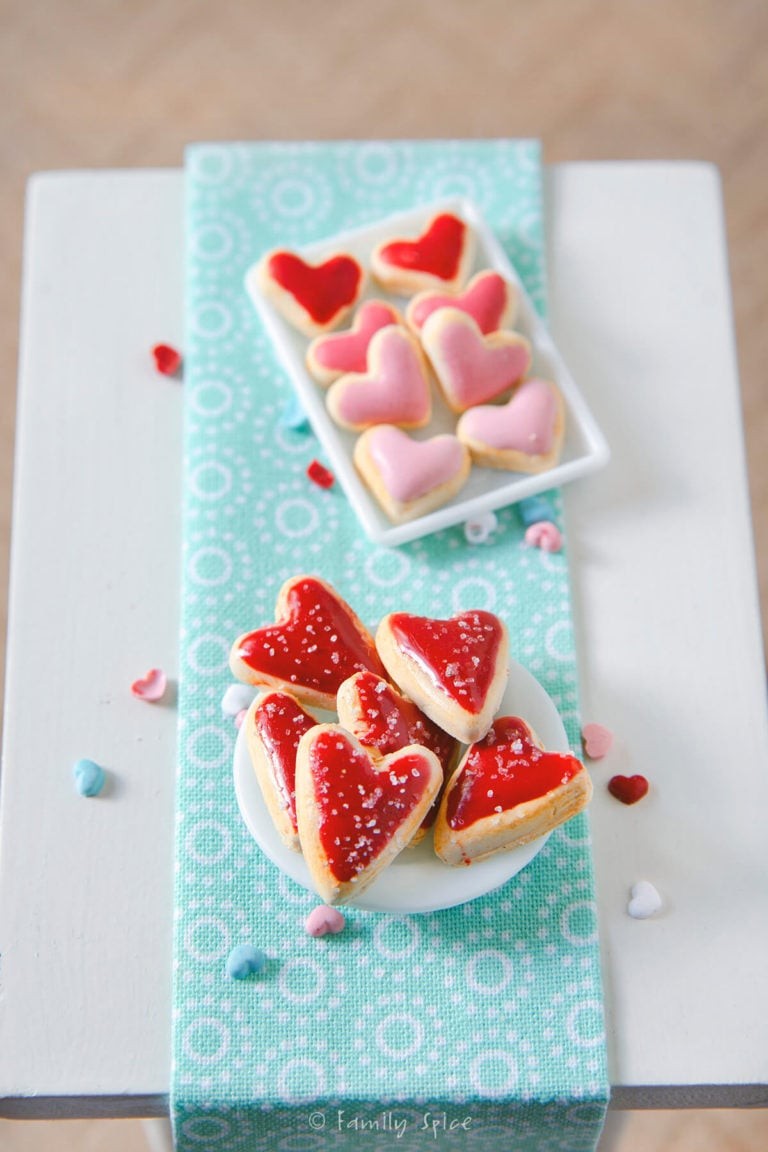
- Use mini cookie cutters to cut out the cookie shapes. Heart shapes are perfect for Valentine’s Day or any special occasion.
- Gently pull up the plastic wrap to remove the cutter from the clay, ensuring the shape remains intact.
-
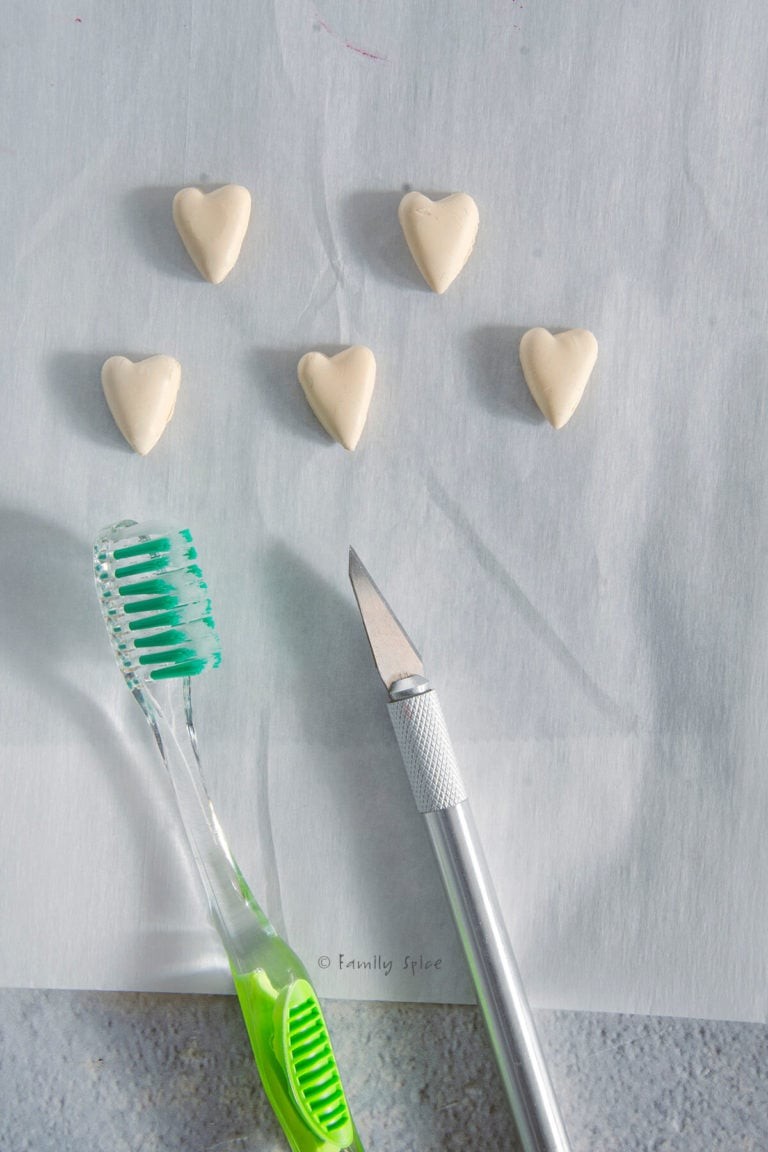
Add Texture (Optional):
- For a more realistic look, add texture to the edges of the cookies.
- Use a pointy tool or the tip of your X-Acto knife to scratch out and poke small holes around the edges.
- Alternatively, use an old toothbrush along the edges for a subtle texture.
-
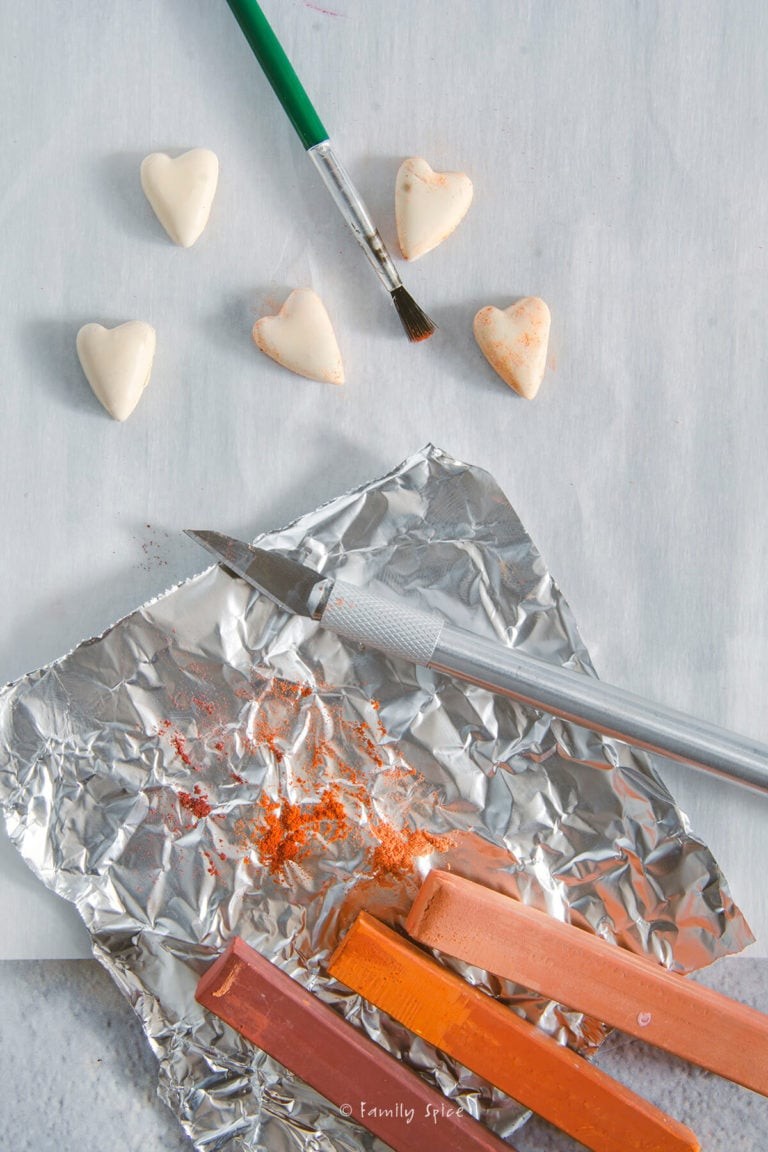
Add Browned Edges:
- Use a piece of parchment or foil to scratch out various shades of brown pastels.
- Using a small paint brush, gently brush the edges of the cookies with the brown pastel shavings to mimic the browned spots on real sugar cookies.
-
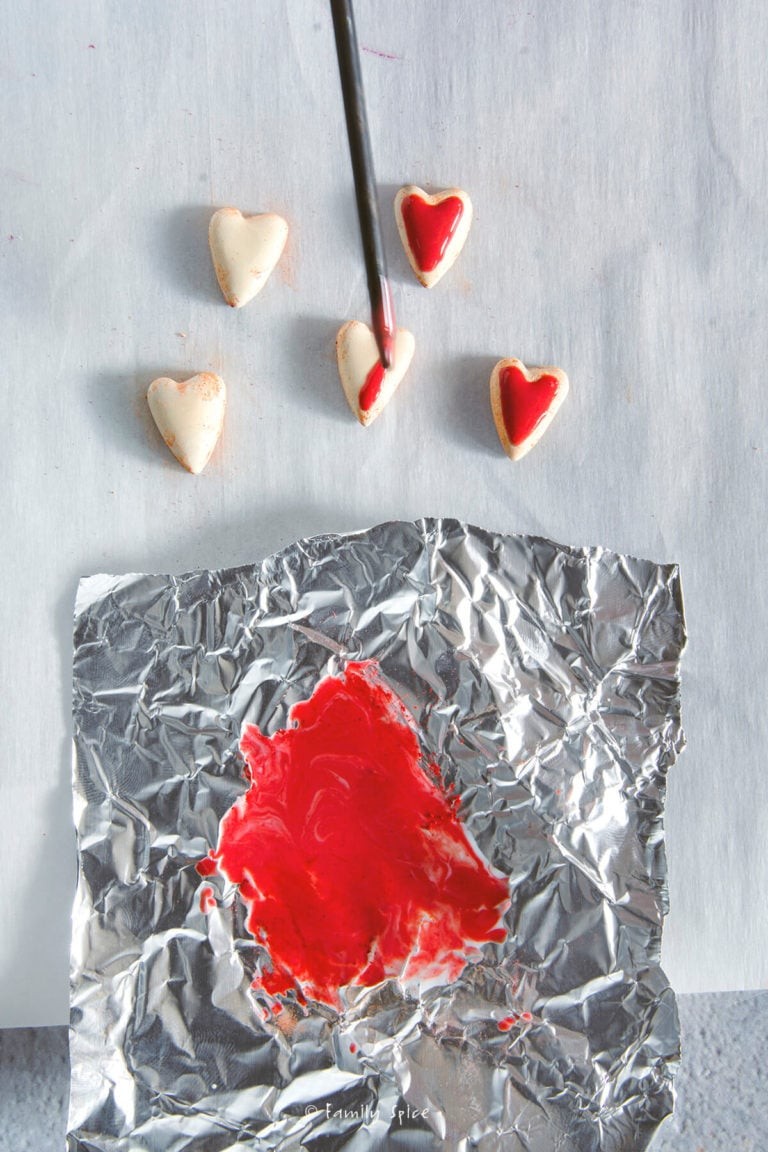
Prepare the Icing:
- On a piece of parchment or foil, scratch out the colored pastels you want for your icing.
- Add clear liquid polymer to the pastel shavings and mix until you achieve the desired color and consistency.
-
Ice the Cookies:
- Using your pointy tool, carefully ice the cookies with the colored liquid polymer.
- Apply small bits of icing at a time to ensure a clean and precise application. Work slowly to avoid making a mess.
-
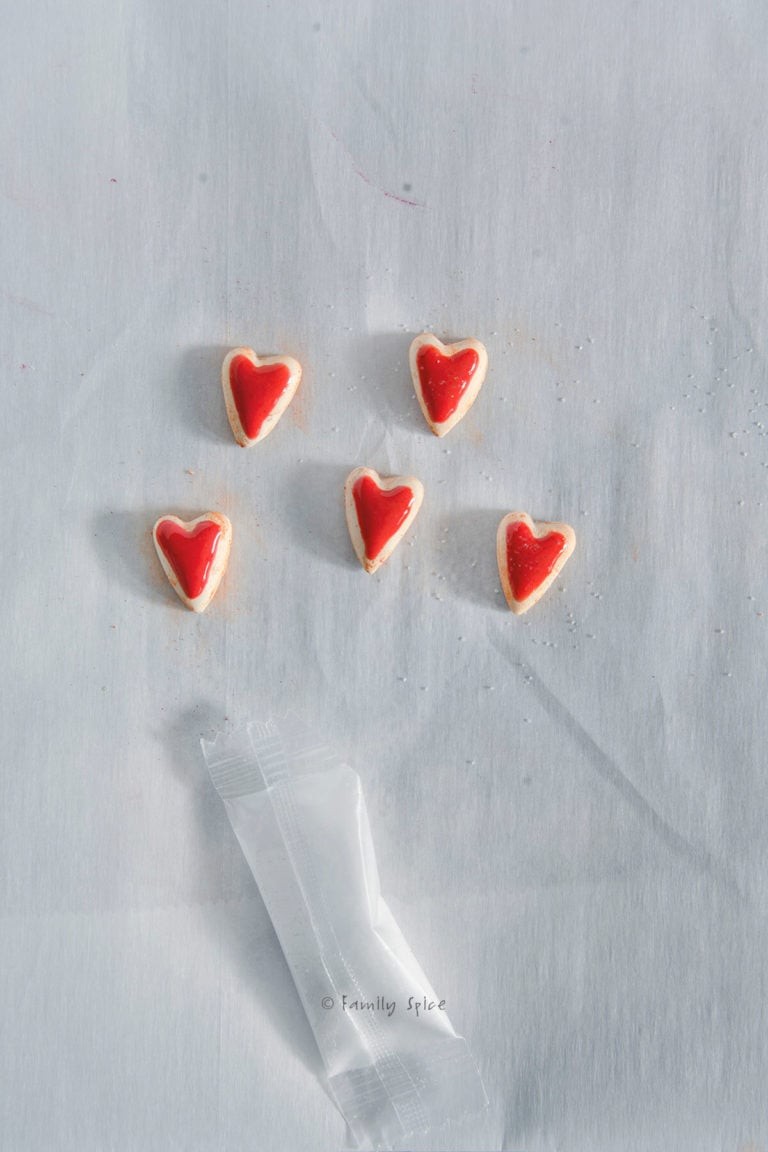
Add Sprinkles (Optional):
- If desired, sprinkle bits of craft sand onto the iced cookies to mimic sugar sprinkles.
- If desired, sprinkle bits of craft sand onto the iced cookies to mimic sugar sprinkles.
-
Bake the Cookies:
- Place the polymer clay cookies on a parchment paper-lined baking sheet or a ceramic tile or piece of glass.
- Bake according to the polymer clay package’s directions. Typically, this is around 275°F (135°C) for about 15-20 minutes, but always refer to the specific instructions for your clay.
5. What Are Some Tips And Tricks For Working With Polymer Clay?
Working with polymer clay can be a breeze with the right techniques. Here are some valuable tips and tricks:
| Tip | Description | Benefit |
|---|---|---|
| Condition the Clay | Always condition the clay by kneading it until it’s soft and pliable. | Prevents cracking and makes it easier to work with. |
| Use Plastic Wrap | Use plastic wrap when cutting out shapes to prevent sticking. | Ensures clean cuts and easy removal of shapes. |
| Work on a Clean Surface | Work on a clean, non-stick surface to avoid contamination and sticking. | Keeps the clay clean and prevents unwanted textures. |
| Use Baby Wipes | Keep baby wipes on hand for cleaning tools and removing fingerprints. | Maintains clean and professional-looking results. |
| Bake at the Right Temperature | Bake the clay at the temperature recommended on the package to prevent burning or under-baking. | Ensures the clay hardens properly without becoming brittle or soft. |
| Cool Slowly | Allow the baked clay to cool slowly to prevent cracking. | Helps maintain the integrity of the finished piece. |
| Use Liquid Clay for Details | Use liquid clay for adding fine details and textures. | Allows for precise and intricate designs. |
| Store Clay Properly | Store unused clay in airtight containers to prevent it from drying out. | Extends the shelf life of the clay and keeps it ready for use. |
| Experiment with Colors | Mix different colors of clay to create custom shades. | Expands your creative options and allows for unique color palettes. |
| Practice Regularly | The more you practice, the better you’ll become at working with polymer clay. | Improves your skills and allows you to develop your own techniques. |
| Use Molds for Consistency | Silicone molds help in creating consistent shapes and details. | Ensures uniformity and saves time when making multiple identical pieces. |
| Avoid Overworking the Clay | Overworking the clay can make it crumbly. Work in short sessions and keep the clay moisturized. | Maintains the clay’s smooth texture and prevents it from becoming difficult to handle. |
6. How Can I Achieve Realistic Textures And Colors In My Mini Food?
Achieving realistic textures and colors is crucial for making your mini food look authentic. Here are some techniques to help you:
| Technique | Description | How to Achieve It |
|---|---|---|
| Adding Texture | Creating realistic surfaces like bread crusts or fruit skins. | Use tools like toothbrushes, textured mats, or crumpled foil to press patterns into the clay. Experiment with different materials to achieve various textures. |
| Shading and Highlighting | Using pastels or acrylic paints to add depth and dimension. | Apply brown pastels to the edges of baked goods for a browned effect. Use white or light-colored acrylics to highlight certain areas and create a sense of light and shadow. |
| Color Mixing | Creating custom colors by blending different shades of polymer clay. | Mix small amounts of different colored clays until you achieve the desired shade. Keep a color chart handy for reference. |
| Using Liquid Clay | Applying liquid clay to create realistic icings, sauces, and glazes. | Mix liquid clay with pastels or acrylic paints to create colored icings. Apply a thin layer of clear liquid clay for a glossy glaze. |
| Adding Granular Details | Using craft sand, crushed spices, or other small particles to mimic ingredients like sugar, salt, or herbs. | Sprinkle craft sand on iced cookies to simulate sugar. Use finely crushed herbs to add a realistic touch to savory dishes. |
| Creating Translucence | Simulating the transparency of certain foods like jelly or gummy candies. | Mix translucent polymer clay with colored clay to create a see-through effect. Experiment with different ratios to achieve the desired level of translucence. |
| Applying Realistic Finishes | Using varnishes or sealants to protect and enhance the appearance of the mini food. | Apply a thin layer of varnish to protect the clay from dust and scratches. Choose a matte or glossy finish depending on the desired look. |
7. What Are Some Creative Ideas For Mini Food Projects?
The possibilities for mini food projects are endless! Here are a few creative ideas to get you started:
- Miniature Cakes and Pastries: Create tiny versions of your favorite desserts like red velvet cake, macarons, and cupcakes.
- Miniature Fruits and Vegetables: Craft realistic fruits and vegetables like strawberries, bananas, and carrots.
- Miniature Fast Food: Make miniature burgers, fries, and pizzas.
- Miniature Sushi: Craft tiny sushi rolls and sashimi.
- Miniature Holiday Treats: Create miniature gingerbread cookies, candy canes, and other festive treats.
- Miniature Beverages: Make tiny cups of coffee, tea, and juice.
- Miniature Breakfast Items: Craft miniature pancakes, eggs, and bacon.
- Miniature Ethnic Foods: Create miniature tacos, dumplings, and spring rolls.
- Miniature Candy: Make miniature lollipops, gummy bears, and chocolates.
- Miniature Table Settings: Craft entire miniature table settings with plates, utensils, and food.
8. How To Display And Use Your Miniature Food Creations?
Once you’ve created your mini food masterpieces, it’s time to display and use them! Here are some ideas:
| Usage | Description | Tips |
|---|---|---|
| Dollhouse Displays | Use mini food to decorate dollhouses and create realistic scenes. | Arrange the food on miniature tables, in tiny kitchens, or on dollhouse shelves. |
| Dioramas | Create miniature dioramas featuring your mini food creations. | Use the food to create scenes like a bakery, a restaurant, or a picnic. |
| Jewelry Making | Turn mini food into wearable art by attaching them to necklaces, earrings, and bracelets. | Use eye pins and jump rings to attach the food to jewelry findings. Apply a protective coating to prevent damage. |
| Decorative Magnets | Attach magnets to the back of mini food items to create cute and functional magnets. | Use strong adhesive to secure the magnets. These are great for decorating refrigerators or magnetic boards. |
| Cake Toppers | Use mini food as unique and charming cake toppers for special occasions. | Ensure the food is clean and safe to place on the cake. Consider using a non-toxic sealant. |
| Miniature Food Photography | Create stunning food photography by staging your mini food in creative settings. | Use natural lighting and interesting backgrounds. Experiment with different angles and compositions. |
| Gifts | Give mini food creations as unique and personalized gifts to friends and family. | Package the food in small, decorative boxes or jars. Include a handwritten note with care instructions. |
| Educational Tools | Use mini food as educational tools for teaching children about different foods and cultures. | Create sets of mini food representing different food groups or cuisines. Use them for sorting and identification activities. |
| Home Décor | Incorporate mini food into your home décor by displaying them on shelves, in shadow boxes, or under glass domes. | Create themed displays for different seasons or holidays. Use small easels to showcase individual pieces. |
9. How Do I Store Polymer Clay Properly?
Proper storage is essential for maintaining the quality of your polymer clay. Here’s how to store it correctly:
- Airtight Containers: Store unused clay in airtight containers to prevent it from drying out. Plastic containers or resealable bags work well.
- Cool, Dark Place: Keep the clay in a cool, dark place away from direct sunlight and heat.
- Separate Colors: Store different colors of clay separately to prevent them from blending.
- Label Containers: Label each container with the color and type of clay for easy identification.
- Avoid Contact with Other Materials: Keep the clay away from materials that can react with it, such as certain plastics or solvents.
- Check Regularly: Periodically check the clay for any signs of drying or hardening. If it feels dry, try kneading it with a few drops of clay softener.
- Organize Storage: Organize your clay storage by color or type for easy access and inventory.
10. What Are Some Common Mistakes To Avoid When Making Mini Food?
Avoiding common mistakes can save you time and frustration. Here are some pitfalls to watch out for:
- Not Conditioning the Clay: Failing to condition the clay properly can lead to cracks and imperfections. Always knead the clay until it’s soft and pliable.
- Baking at the Wrong Temperature: Baking at the wrong temperature can result in burnt or under-baked clay. Always use an oven thermometer to ensure accurate temperature.
- Using Dirty Tools: Using dirty tools can transfer unwanted colors or textures to your clay. Clean your tools regularly with baby wipes or rubbing alcohol.
- Overworking the Clay: Overworking the clay can make it crumbly and difficult to handle. Work in short sessions and keep the clay moisturized.
- Not Adding Enough Detail: Neglecting to add enough detail can make your mini food look unrealistic. Take the time to add textures, shading, and highlights.
- Using the Wrong Glaze: Using the wrong type of glaze can ruin your finished piece. Choose a glaze specifically designed for polymer clay.
- Rushing the Process: Rushing the process can lead to mistakes and a lower quality result. Take your time and enjoy the process.
- Not Protecting Your Work Surface: Working directly on a porous surface can cause the clay to stick. Always use a non-stick work surface like a ceramic tile or glass mat.
- Storing Clay Incorrectly: Storing clay improperly can cause it to dry out or become contaminated. Always store your clay in airtight containers in a cool, dark place.
- Ignoring Instructions: Ignoring the instructions on the clay packaging can lead to unpredictable results. Always read and follow the manufacturer’s instructions.
FAQ About Making Mini Food
Here are some frequently asked questions about making mini food:
1. What is the best type of clay for making mini food?
Polymer clay is generally considered the best type of clay for making mini food due to its durability, versatility, and wide range of colors. Brands like Sculpey and Fimo are popular choices.
2. How do I prevent fingerprints on my mini food creations?
To prevent fingerprints, wear gloves or use a soft brush to smooth the surface of the clay. You can also use baby wipes to gently remove any fingerprints.
3. Can I use real food items in my mini food creations?
While you can use real food items for inspiration, it’s not recommended to incorporate them directly into your mini food creations due to concerns about preservation and hygiene.
4. How do I create realistic frosting for my mini cakes?
Mix liquid clay with colored pastels or acrylic paints to create realistic frosting. Use a pointy tool or a small piping bag to apply the frosting to your mini cakes.
5. How do I add shine to my mini food creations?
Apply a thin layer of clear liquid clay or a polymer clay-safe varnish to add shine to your mini food creations.
6. How do I make my mini food creations durable?
Bake the polymer clay at the temperature and time recommended on the package to ensure it hardens properly. You can also apply a sealant to protect the finished piece.
7. How do I fix cracks in my polymer clay creations?
Use a small amount of liquid clay to fill in any cracks. Smooth the surface with a brush or your finger before baking.
8. Can I paint polymer clay after baking?
Yes, you can paint polymer clay after baking using acrylic paints. Allow the paint to dry completely and then apply a sealant to protect it.
9. How do I create miniature labels for my mini food creations?
Design miniature labels using a computer program or by hand. Print them on adhesive paper and carefully cut them out. Apply the labels to your mini food packaging or displays.
10. Where can I find inspiration for my mini food creations?
You can find inspiration in real food items, cookbooks, online tutorials, and social media platforms like Pinterest and Instagram.
Making mini food is a fun and rewarding hobby that allows you to express your creativity and create adorable, realistic replicas of your favorite foods. With the right materials, tools, and techniques, you can master the art of mini food making and create stunning displays, jewelry, or gifts. So, gather your supplies, unleash your imagination, and start crafting your own miniature culinary delights!
Ready to dive deeper into the world of mini food? FOODS.EDU.VN offers a wealth of resources, from detailed tutorials to expert tips, to help you perfect your craft. Visit foods.edu.vn today and unlock a world of culinary creativity! Contact us at 1946 Campus Dr, Hyde Park, NY 12538, United States, or reach out via WhatsApp at +1 845-452-9600. Let’s create something amazing together!