Making a flaky, delicious pie crust doesn’t require fancy equipment. At FOODS.EDU.VN, we’ll show you how to achieve pie perfection with a simple, no-food-processor method, and produce a pie crust that will impress your friends and family. Explore expert tips and techniques to create a perfect pie crust, from mastering the cold butter technique to achieving the ideal dough consistency.
Flaky pie crust, Tender pie crust, Pie dough recipe, Homemade pie crust, All butter pie crust.
1. Why Make Pie Crust Without A Food Processor?
Many recipes lean on food processors for pie crusts, but is it truly necessary? Absolutely not. Hand-making pie crust offers control over texture, preventing over-processing. Plus, it’s accessible to everyone, regardless of kitchen equipment. It is, in fact, my preferred method as I never take out my food processor to make pie dough ever.
1.1. Benefits of Making Pie Crust by Hand
Creating pie crust by hand provides several key advantages:
- Control: You have precise control over the dough’s texture, ensuring a perfect balance between flakiness and tenderness.
- Accessibility: No need for expensive equipment. Anyone can make delicious pie crust with basic kitchen tools.
- Texture: Achieve a superior flaky texture by preventing the butter from becoming overly processed, which can happen in a food processor.
- Flavor: Hand-making allows for better incorporation of flavors and ensures the butter remains cold, crucial for a rich taste.
- Satisfaction: There’s a unique satisfaction in creating something delicious from scratch with your own hands.
1.2. Common Misconceptions About Pie Crust
Let’s debunk some myths about pie crust:
- Myth 1: You need shortening for a flaky crust.
- Reality: All-butter crusts can be incredibly flaky and flavorful when made correctly. High-quality butter, especially European-style, enhances the taste.
- Myth 2: Making pie crust is difficult.
- Reality: With the right technique and cold ingredients, it’s quite straightforward. The process is more about precision than difficulty.
- Myth 3: Store-bought crusts are just as good.
- Reality: Homemade crusts offer superior flavor and texture. Store-bought options often lack the desired flakiness and can taste bland.
- Myth 4: A food processor is essential for pie crust.
- Reality: Hand-making pie crust gives you more control, resulting in a better texture and flavor. It’s also more accessible.
1.3. The Role of Butter in a Great Pie Crust
Butter is the soul of a good pie crust, contributing flavor and flakiness. It’s crucial to keep it cold so that it creates steam during baking, resulting in flaky layers.
According to a study by the American Butter Institute, butter’s fat content and water content are vital for achieving the right texture. The fat adds richness, while the water creates steam, leading to flakiness (American Butter Institute, 2023). Using high-quality, European-style butter will significantly improve the crust’s taste.
2. Essential Tools for a Perfect Pie Crust (No Food Processor Needed)
No fancy gadgets are needed. Here’s what you’ll use:
- Large mixing bowl
- Pastry blender or your fingertips
- Measuring cups and spoons
- Plastic wrap
- Rolling pin
- Clean work surface
2.1. Why These Tools Work Best
These tools are effective because:
- Mixing Bowl: Provides ample space to combine ingredients without overcrowding.
- Pastry Blender/Fingertips: Allows you to cut the butter into the flour without overworking the dough, crucial for flakiness.
- Measuring Tools: Ensures precise ingredient ratios, which are essential for a successful crust.
- Plastic Wrap: Keeps the dough cold and prevents it from drying out during refrigeration.
- Rolling Pin: Enables even rolling, creating a consistent thickness for baking.
- Clean Work Surface: Offers a sanitary and stable area to work on, preventing contamination and ensuring ease of handling.
2.2. Tips for Maintaining Your Tools
Keep your tools in top condition for best results:
- Chill: For best results, chill your mixing bowl and pastry blender/fingertips. This helps keep the butter cold during the mixing process, which is crucial for achieving a flaky pie crust.
- Clean: Clean your rolling pin thoroughly after each use to prevent dough buildup, which can affect the texture of subsequent crusts.
- Store: Store the mixing bowl and pastry blender in a cool, dry place to prevent rust or damage.
- Replace: If your rolling pin becomes uneven or damaged, replace it to ensure consistent dough thickness.
- Sanitize: Ensure your work surface is thoroughly sanitized before and after use to maintain food safety.
2.3. Innovative Tool Substitutions
Don’t have a pastry blender? Here are some alternatives:
- Fingertips: Your own fingertips are excellent for breaking down the butter into the flour. Use a light touch to avoid warming the butter.
- Two Knives: Use two knives in a scissor-like motion to cut the butter into the flour. This method works well for breaking down larger butter chunks.
- Box Grater: Freeze the butter and then grate it into the flour using a box grater. This creates small, even pieces of butter.
- Fork: A fork can be used to mash the butter into the flour. Press down firmly and repeatedly until the butter is broken into smaller pieces.
- Food Processor (Use Sparingly): If you must use a food processor, pulse the mixture very briefly to avoid over-processing.
3. Ingredients for a Flaky Pie Crust (No Shortening!)
Here’s what you’ll need:
- 150g (1 ¼ cups) all-purpose flour
- 1 tsp white sugar
- ¼ tsp salt
- 100g (½ cup) unsalted butter, very cold
- 60ml (¼ cup) ice water
- 1 egg, beaten (for blind baking)
3.1. Choosing the Right Flour
All-purpose flour is versatile. According to King Arthur Baking Company, all-purpose flour strikes a balance between protein content and starch, making it suitable for a variety of baked goods, including pie crusts (King Arthur Baking Company, 2023). If you’re looking for a slightly more tender crust, you can substitute some of the all-purpose flour with pastry flour. Pastry flour has a lower protein content, resulting in a more delicate texture.
3.2. The Importance of Cold Butter
Cold butter is crucial for creating flaky layers. The cold temperature prevents the butter from melting and blending completely into the flour. As the pie crust bakes, the water in the butter turns to steam, creating pockets that separate the layers of dough, resulting in a flaky texture.
3.3. The Role of Ice Water
Ice water helps bind the dough without warming the butter. Using ice water ensures the butter remains cold and solid, which is essential for flakiness. The cold water also minimizes gluten development, which can lead to a tough crust.
3.4. Salt and Sugar: More Than Just Flavor
Salt enhances the overall flavor of the crust, balancing the richness of the butter. Sugar not only adds a hint of sweetness but also helps with browning, giving the crust a beautiful golden color.
3.5. Ingredient Sourcing Tips
- Flour: Opt for unbleached all-purpose flour for a cleaner taste and better texture.
- Butter: Use high-quality, European-style butter for its higher fat content and richer flavor. Look for butter with a fat content of at least 82%.
- Salt: Fine sea salt or kosher salt will dissolve evenly into the dough.
- Sugar: Granulated sugar works well.
- Water: Ensure the water is ice-cold by adding plenty of ice cubes.
4. Step-by-Step Guide to Making Pie Crust by Hand
Let’s make pie crust.
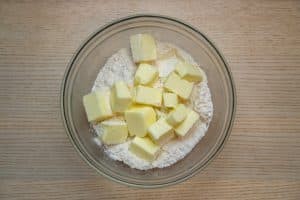
- Combine Dry Ingredients: In a large mixing bowl, whisk together the flour, sugar, and salt.
- Add Cold Butter: Add the cold, cubed butter to the flour mixture. Toss the butter cubes in the flour to coat them evenly.
- Cut in the Butter: Using your fingertips or a pastry blender, cut the butter into the flour until the mixture resembles coarse crumbs with some larger, flat pieces of butter (about the size of walnut halves).
- Add Ice Water: Gradually add the ice water, one tablespoon at a time, mixing gently with your fingertips or a fork. Mix until the dough just comes together and holds its shape when pressed.
- Form a Disc: Turn the dough out onto a lightly floured surface and gently pat it into a disc.
- Chill the Dough: Wrap the disc tightly in plastic wrap and refrigerate for at least 1 hour, or up to 2 days.
- Roll Out the Dough: On a lightly floured surface, roll out the dough to your desired thickness. Use it to line your pie dish.
- Pre-Bake or Fill: Depending on your recipe, pre-bake the crust or fill it and bake according to the pie’s instructions.
4.1. Mastering the Cold Butter Technique
Keeping the butter cold is essential. Here’s how:
- Freeze: Freeze the butter for 10-15 minutes before cubing.
- Work Quickly: Work quickly to prevent the butter from warming up as you cut it into the flour.
- Chill: If the butter starts to soften, place the bowl in the freezer for a few minutes before continuing.
4.2. Achieving the Right Dough Consistency
The dough should be moist enough to hold together but not sticky. It will look fairly dry and crumbly. If the dough is too dry, add ice water one tablespoon at a time until it reaches the right consistency. If it’s too wet, add a little more flour.
4.3. Rolling Out the Dough Like a Pro
- Chill First: Ensure the dough is well-chilled before rolling.
- Flour Lightly: Lightly flour your work surface and the rolling pin to prevent sticking.
- Roll Evenly: Roll from the center outwards, turning the dough a quarter turn after each roll to ensure even thickness.
- Avoid Stretching: Avoid stretching the dough, as this can cause it to shrink during baking.
4.4. Blind Baking vs. Par-Baking: What’s the Difference?
- Blind Baking: Completely baking an empty pie crust before adding the filling. This is necessary for pies with fillings that don’t require baking, such as cream pies or quiches.
- Par-Baking: Partially baking the crust before adding the filling. This is often done for pies with fillings that need a shorter baking time, such as pumpkin pie.
To blind bake or par-bake:
- Prepare the Crust: Line the pie dish with the dough, trim the edges, and crimp.
- Dock the Crust: Use a fork to prick the bottom and sides of the crust (docking) to prevent it from puffing up.
- Chill: Freeze the crust for 10 minutes to help it hold its shape during baking.
- Line with Parchment Paper: Line the crust with parchment paper and fill with pie weights (dried beans or rice).
- Bake: Bake at 375°F (190°C) for 15-20 minutes.
- Remove Weights: Remove the parchment paper and pie weights. If blind baking, brush with a beaten egg and bake for another 15-20 minutes, until golden brown. If par-baking, cool completely before adding the filling.
5. Troubleshooting Common Pie Crust Problems
Even the best bakers face challenges. Here’s how to handle them:
5.1. Dough is Too Dry
- Problem: Dough is crumbly and won’t come together.
- Solution: Add ice water, one tablespoon at a time, until the dough reaches the right consistency.
5.2. Dough is Too Wet
- Problem: Dough is sticky and hard to handle.
- Solution: Add flour, one tablespoon at a time, until the dough is easier to manage.
5.3. Crust Shrinks During Baking
- Problem: The crust pulls away from the sides of the pie dish during baking.
- Solution: Avoid stretching the dough when rolling it out and ensure it is well-chilled before baking. Dock the crust with a fork to prevent puffing.
5.4. Crust is Tough
- Problem: The crust is hard to cut and chew.
- Solution: Avoid overworking the dough. Mix the ingredients gently and add just enough water to bring the dough together.
5.5. Crust is Not Flaky
- Problem: The crust lacks the desired flaky layers.
- Solution: Ensure the butter is cold and cut into the flour properly. Avoid overmixing the dough.
6. Flavor Variations for Your Homemade Pie Crust
Spice up your pie crust with these delicious twists:
6.1. Sweet Additions
- Citrus Zest: Add lemon, orange, or lime zest for a bright, citrusy flavor.
- Spices: Incorporate cinnamon, nutmeg, or ginger for warmth and depth.
- Vanilla Extract: Add a teaspoon of vanilla extract to the dough for a subtle vanilla flavor.
6.2. Savory Twists
- Herbs: Mix in dried herbs such as thyme, rosemary, or sage for a savory crust.
- Cheese: Add grated Parmesan or cheddar cheese for a cheesy flavor.
- Garlic Powder: Incorporate garlic powder for a savory kick.
6.3. Nutty Flavors
- Almond Flour: Substitute a portion of the all-purpose flour with almond flour for a nutty flavor.
- Ground Nuts: Add finely ground walnuts, pecans, or hazelnuts to the dough for a rich, nutty taste.
6.4. Chocolate Infusion
- Cocoa Powder: Add unsweetened cocoa powder for a chocolate-flavored crust.
- Espresso Powder: Incorporate espresso powder to enhance the chocolate flavor and add a hint of bitterness.
7. Pie Recipes to Showcase Your Perfect Homemade Crust
Now that you’ve mastered pie crust, here are some recipes to try:
7.1. Classic Apple Pie
A timeless favorite. Use a variety of apples for a complex flavor, such as Granny Smith, Honeycrisp, and Fuji. Add a touch of cinnamon and nutmeg for warmth.
7.2. Creamy Pumpkin Pie
Perfect for fall. Use fresh pumpkin puree for the best flavor and add a blend of spices like ginger, cloves, and cinnamon.
7.3. Savory Quiche
A versatile option for brunch or dinner. Combine eggs, cream, cheese, and your favorite vegetables or meats in a flaky pie crust.
7.4. Berry Pie
A summery delight. Use a mix of fresh berries, such as blueberries, raspberries, and strawberries, for a burst of flavor. Add a hint of lemon zest to brighten the filling.
7.5. Pecan Pie
A rich and indulgent dessert. Use toasted pecans for a deeper flavor and add a touch of bourbon for a boozy kick.
8. Storing Your Pie Crust for Future Use
Proper storage ensures your pie crust is ready when you need it.
8.1. Storing Unbaked Dough
- Refrigerator: Wrap the dough tightly in plastic wrap and store in the refrigerator for up to 2 days.
- Freezer: Wrap the dough tightly in plastic wrap, then place it in a freezer bag. Freeze for up to 3 months. Thaw in the refrigerator overnight before using.
8.2. Storing Baked Pie Crust
- Room Temperature: Store baked pie crusts at room temperature for up to 2 days. Cover loosely to prevent them from drying out.
- Freezer: Freeze baked pie crusts for up to 1 month. Wrap tightly in plastic wrap and place in a freezer bag. Thaw at room temperature before using.
8.3. Tips for Maintaining Freshness
- Wrap Tightly: Always wrap the dough or baked crust tightly to prevent it from drying out or absorbing odors.
- Label and Date: Label and date the dough or baked crust before storing it in the freezer.
- Use Quickly: For best results, use the dough or baked crust as soon as possible after thawing.
9. Expert Tips for Pie Crust Success
Elevate your pie crust game with these pro tips:
9.1. The Importance of Resting Time
Resting the dough allows the gluten to relax, resulting in a more tender crust. Chill the dough for at least 1 hour, or preferably overnight.
9.2. How to Avoid a Soggy Bottom Crust
- Use a Hot Baking Sheet: Place a hot baking sheet in the oven while it preheats and place the pie dish on the hot sheet to help set the bottom crust quickly.
- Brush with Egg White: Brush the bottom crust with a beaten egg white before adding the filling to create a moisture barrier.
- Use a Metal Pie Dish: Metal pie dishes conduct heat more effectively than glass or ceramic, resulting in a crispier bottom crust.
9.3. Crimping Techniques for Beautiful Edges
- Fork Crimp: Press the tines of a fork around the edge of the crust to create a simple and elegant crimp.
- Finger Crimp: Use your fingers to pinch the edge of the crust into a decorative pattern.
- Rope Crimp: Roll the edge of the crust inwards to create a rope-like pattern.
9.4. Dealing with Cracks and Tears
- Patch with Extra Dough: Use extra dough to patch any cracks or tears in the crust.
- Brush with Water: Brush the area with water to help the patch adhere to the crust.
9.5. High-Altitude Adjustments
- Add More Liquid: Add 1-2 tablespoons of extra liquid to the dough to prevent it from drying out.
- Reduce Baking Time: Reduce the baking time by 5-10 minutes to prevent the crust from becoming too brown.
10. Advanced Techniques for Pie Crust Perfection
Take your pie crust skills to the next level:
10.1. Lamination: Creating Extra Flaky Layers
Lamination involves folding the dough multiple times to create thin layers of butter and dough. This results in an exceptionally flaky crust.
10.2. Using Different Fats: Beyond Butter
Experiment with other fats, such as lard or coconut oil, for unique flavors and textures. Lard can create an incredibly tender and flaky crust, while coconut oil adds a subtle coconut flavor.
10.3. Gluten-Free Pie Crust Options
Explore gluten-free pie crust recipes using blends of gluten-free flours, such as rice flour, tapioca starch, and almond flour. Add xanthan gum to help bind the dough.
10.4. Vegan Pie Crust Alternatives
Create vegan pie crusts using plant-based butter alternatives or a combination of oil and non-dairy milk. Ensure the fat is cold for best results.
10.5. Decorative Pie Crust Designs
Get creative with your pie crust designs using cookie cutters, stencils, and intricate lattice patterns. Use an egg wash to make the designs stand out.
FAQ: Mastering Pie Crust Without a Food Processor
Here are some frequently asked questions:
1. Can I use salted butter instead of unsalted butter?
Yes, but reduce the amount of added salt in the recipe to avoid an overly salty crust.
2. How do I prevent the edges of the crust from burning?
Cover the edges of the crust with foil or use a pie shield during the last 15-20 minutes of baking.
3. Can I make pie crust ahead of time?
Yes, you can make the dough ahead of time and store it in the refrigerator or freezer.
4. What’s the best way to thaw frozen pie dough?
Thaw the dough in the refrigerator overnight for best results.
5. How do I know when the pie crust is fully baked?
The crust should be golden brown and flaky.
6. Can I use a stand mixer to make pie crust?
While possible, hand-making is preferred for better texture control. If using a stand mixer, mix on low speed and avoid overmixing.
7. What if my kitchen is too warm for making pie crust?
Work quickly and chill the ingredients and tools before starting.
8. Can I re-roll pie dough scraps?
Yes, but the dough may become tougher with each re-roll.
9. How do I fix a cracked pie crust after baking?
Brush the cracked area with melted butter or a glaze to help seal it.
10. What are some common fillings for a single-crust pie?
Cream pies, custard pies, and chocolate pies are excellent choices for single-crust pies.
Conclusion: Your Journey to Pie Crust Perfection Starts Now
Mastering pie crust without a food processor is entirely achievable with the right techniques and ingredients. Follow our guide, experiment with flavors, and enjoy the satisfaction of creating a delicious, homemade pie. With practice, you’ll be baking perfect pie crusts every time.
Ready to explore more culinary secrets and elevate your baking skills? Visit FOODS.EDU.VN for expert tips, detailed recipes, and a wealth of food knowledge. From mastering pastry techniques to discovering innovative flavor combinations, FOODS.EDU.VN is your ultimate resource for all things delicious.
For additional support and resources, contact us:
Address: 1946 Campus Dr, Hyde Park, NY 12538, United States
WhatsApp: +1 845-452-9600
Website: FOODS.EDU.VN
Start your culinary adventure today and unlock the secrets to pie crust perfection with foods.edu.vn! Let us help you become the master of your kitchen!