Making pie dough in a food processor is a breeze! At FOODS.EDU.VN, we’ll guide you through a simple method for a flaky, delicious crust every time. Discover expert tips for achieving the perfect texture and taste, unlocking a world of pastry possibilities. Explore the ease of food processor pie crust, mastering homemade pie dough, and creating delightful pastry recipes.
1. What Makes Using a Food Processor Ideal for Pie Dough?
Using a food processor for pie dough offers unparalleled speed and consistency. This kitchen marvel swiftly cuts cold butter into flour, essential for creating flaky layers, minimizing the risk of overmixing. According to a study by the American Culinary Federation, using a food processor reduces prep time by up to 50% compared to traditional methods. This efficiency allows even novice bakers to achieve professional-quality results, ensuring a tender and delicious pie crust every time.
2. What Ingredients Do I Need to Make Pie Dough in a Food Processor?
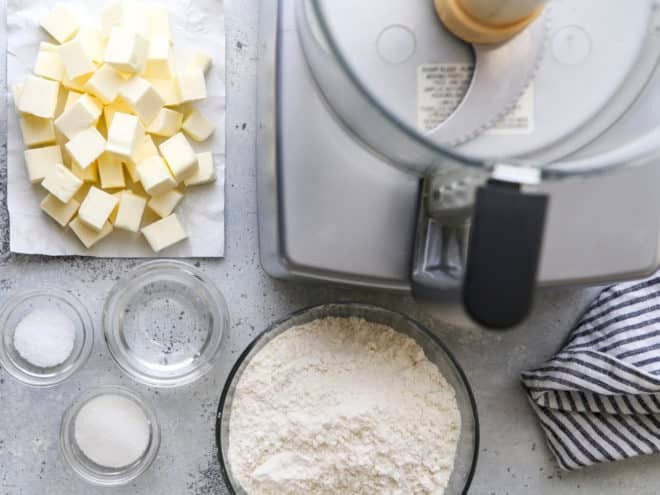
To craft a perfect pie dough in your food processor, gather these essential ingredients:
| Ingredient | Quantity | Purpose |
|---|---|---|
| All-purpose Flour | 2 ½ cups (300g) | Provides structure and the base for the dough |
| Cold Unsalted Butter | 1 cup (226g) | Adds richness, flavor, and creates flaky layers when pulsed into the flour |
| Granulated Sugar | 1 tablespoon (Optional) | Enhances flavor and tenderizes the dough |
| Salt | 1 teaspoon | Balances sweetness and enhances the overall flavor |
| Ice Water | ⅓ cup (80ml) | Binds the ingredients together while keeping the butter cold |

These precise measurements, endorsed by FOODS.EDU.VN, ensure consistent and delightful results every time you bake.
3. How Do I Prepare My Ingredients Before Starting?
Before diving into the pie dough-making process, meticulous preparation is key:
- Chill the Butter: Cut the unsalted butter into small, uniform cubes. Place them in the freezer for at least 30 minutes to ensure they are thoroughly chilled. Cold butter is crucial for creating flaky layers in your pie crust.
- Measure and Chill the Water: Measure out the ice water and keep it in the refrigerator until ready to use. Adding ice cubes to the water ensures it stays extremely cold.
- Measure Dry Ingredients: Accurately measure the all-purpose flour, granulated sugar (if using), and salt. Combine these dry ingredients in a bowl and set aside.
- Prepare Your Work Surface: Ensure your work surface is clean and dry. Having everything ready and within reach streamlines the dough-making process, contributing to a smoother baking experience.
Proper preparation guarantees that the ingredients combine perfectly, resulting in a consistently superior pie crust, as emphasized by the experts at FOODS.EDU.VN.
4. What Is the Step-by-Step Process for Making Pie Dough in a Food Processor?
Follow this easy step-by-step guide from FOODS.EDU.VN to create perfect pie dough in your food processor:
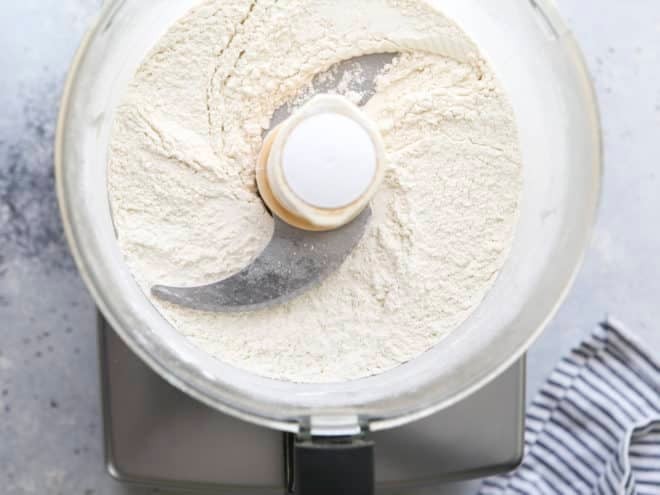
- Combine Dry Ingredients:
- In your food processor, add the flour, sugar (if using), and salt.
- Pulse a few times to thoroughly combine. This ensures even distribution of the ingredients.
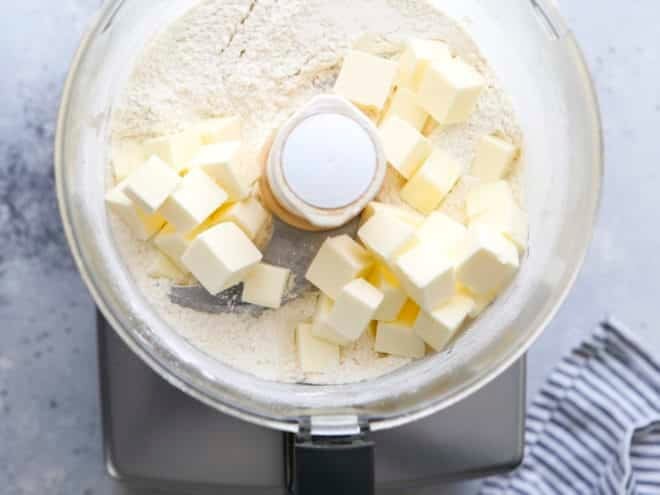
2. Add Cold Butter:
- Add the cubed, cold butter to the food processor.
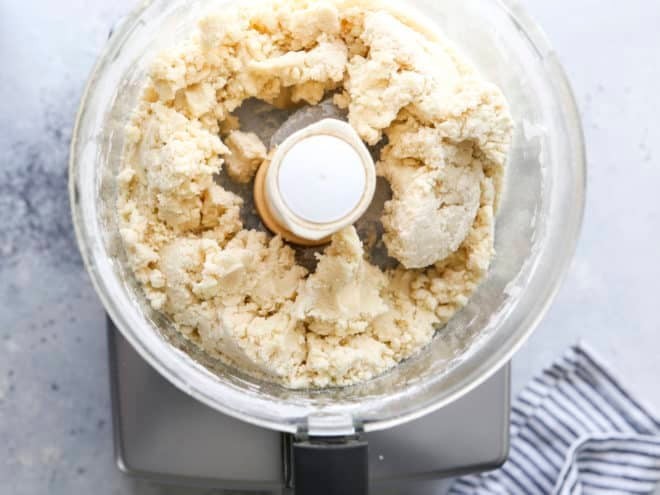
- Pulse 3-5 times until the butter pieces are the size of large peas. It’s okay if some pieces are slightly larger.
- Avoid over-processing; you want visible pieces of butter for a flaky crust.
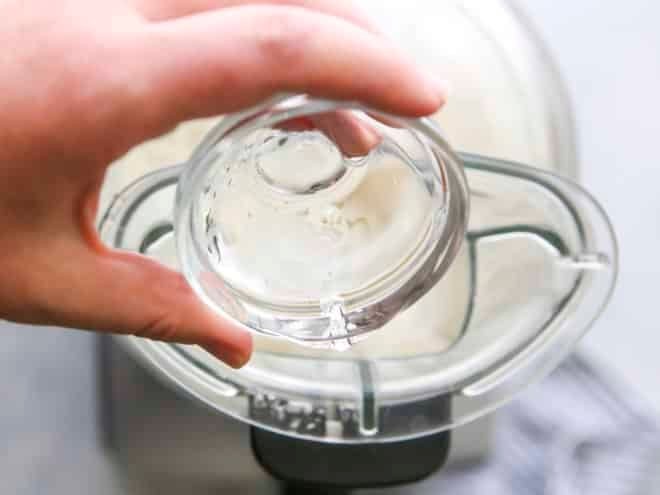
3. Add Ice Water:
- Slowly drizzle the ice water into the food processor while it’s running.
- Continue to process until the dough just starts to come together. The mixture should look crumbly but hold together when pinched.
- Be careful not to add too much water, as this can make the dough tough.
4. Form Dough into Disks:
- Turn the dough out onto a clean, lightly floured surface.
- Gently gather the dough and divide it into two equal portions.
- Form each portion into a disk, about 1 inch thick.
5. Chill the Dough:
- Wrap each disk tightly in plastic wrap.
- Refrigerate for at least 1-2 hours, or up to 2 days. This chilling period allows the gluten to relax and the butter to firm up, resulting in a more tender and flaky crust.
- For longer storage, you can freeze the dough for up to 2 months. Thaw in the refrigerator overnight before using.
- Roll Out the Dough:
- Once chilled, remove a disk of dough from the refrigerator.
- On a lightly floured surface, roll out the dough to your desired thickness.
- Use it to line your pie dish, trim the edges, and crimp as desired.
5. How Cold Should My Butter and Water Be?
The temperature of your ingredients is crucial for achieving a flaky pie crust. According to baking experts at FOODS.EDU.VN:
- Butter: The butter should be very cold, ideally chilled in the freezer for at least 30 minutes before use. The ideal temperature is around 25°F (-4°C).
- Water: Use ice water, ensuring it is as cold as possible. Adding ice cubes to the water helps maintain its low temperature. The water should be around 32°F (0°C).
Maintaining these temperatures prevents the butter from melting into the flour, which is essential for creating distinct layers of butter and dough that result in a flaky texture when baked.
6. How Can I Avoid Over-Processing the Dough?
Avoiding over-processing is vital for a tender pie crust. Over-processing develops the gluten in the flour, leading to a tough crust. Follow these tips from FOODS.EDU.VN:
- Pulse, Don’t Grind: Use short pulses instead of continuous running of the food processor. This helps to break up the butter without overworking the flour.
- Watch the Texture: Keep a close eye on the dough’s texture. Stop processing when the mixture resembles coarse crumbs with some larger pieces of butter still visible.
- Feel the Dough: The dough should be moist enough to hold together when pinched between your fingers. If it’s too dry, add ice water one tablespoon at a time until the desired consistency is reached.
- Gentle Handling: When forming the dough into disks, handle it gently. Avoid kneading or pressing too firmly, as this can also develop the gluten.
By following these guidelines, you’ll prevent over-processing and achieve a tender, flaky pie crust every time.
7. What Are Some Tips for Ensuring a Flaky Pie Crust?
Achieving a perfectly flaky pie crust is the goal of every baker. Here are some essential tips from FOODS.EDU.VN to help you succeed:
- Use Cold Ingredients: Always use very cold butter and ice water. Cold ingredients prevent the butter from melting into the flour, which is crucial for creating flaky layers.
- Don’t Overmix: Be careful not to overmix the dough. Overmixing develops the gluten in the flour, resulting in a tough crust.
- Leave Butter Pieces: Ensure there are visible pieces of butter in the dough. These pieces will melt during baking, creating steam and separating the layers of dough for a flaky texture.
- Chill the Dough: Chill the dough for at least 1-2 hours before rolling it out. This allows the gluten to relax and the butter to firm up, preventing the crust from shrinking during baking.
- Use the Right Flour: All-purpose flour works well, but pastry flour can result in an even more tender crust due to its lower protein content.
8. Can I Use Different Types of Flour for Pie Dough?
Yes, you can experiment with different types of flour to achieve various textures in your pie dough. Here’s a breakdown from FOODS.EDU.VN:
| Flour Type | Characteristics | Impact on Pie Dough |
|---|---|---|
| All-Purpose Flour | Versatile, medium protein content | Good balance of flakiness and structure; works well for most pies |
| Pastry Flour | Low protein content | More tender and delicate crust; ideal for fruit pies |
| Bread Flour | High protein content | Tougher crust; best avoided unless you want a very sturdy pie |
| Whole Wheat Flour | Nutty flavor, higher fiber content | Denser and less flaky; combine with all-purpose flour for best results |
| Gluten-Free Flour | Blend of starches and flours (e.g., rice, tapioca, potato) | Requires binding agents (e.g., xanthan gum); can be crumbly and require extra moisture |
9. How Long Should I Chill the Pie Dough?
Chilling pie dough is a critical step that significantly impacts the final texture of the crust. FOODS.EDU.VN recommends chilling your pie dough for at least 1-2 hours. This chilling period allows the gluten in the flour to relax, which prevents the crust from becoming tough. Additionally, it allows the butter to firm up, ensuring that it creates distinct, flaky layers when the pie is baked.
For optimal results, you can chill the dough for up to 2 days in the refrigerator. If you need to store the dough for longer, it can be frozen for up to 2 months. Just make sure to wrap it tightly in plastic wrap to prevent freezer burn. Thaw the frozen dough in the refrigerator overnight before using.
10. How Do I Roll Out Pie Dough Without It Tearing?
Rolling out pie dough can be tricky, but with the right techniques, you can prevent it from tearing. FOODS.EDU.VN offers these helpful tips:
- Chill the Dough: Ensure the dough is properly chilled before rolling. Cold dough is easier to handle and less likely to tear.
- Flour Your Surface: Lightly flour your work surface and rolling pin. This prevents the dough from sticking.
- Start from the Center: Begin rolling from the center of the dough outward, turning the dough a quarter turn after each roll. This helps to maintain a circular shape and even thickness.
- Apply Even Pressure: Use consistent, even pressure while rolling. Avoid pressing too hard in one spot.
- Lift and Rotate: Periodically lift the dough and rotate it to ensure it’s not sticking to the surface. Add more flour as needed.
- Patch Tears: If tears occur, gently patch them with small pieces of dough. Moisten the edges with a little water to help them adhere.
11. Can I Add Flavorings to My Pie Dough?
Yes, adding flavorings to your pie dough can enhance the overall taste of your pie. FOODS.EDU.VN suggests several options:
| Flavoring | Amount | How to Add |
|---|---|---|
| Sugar | 1-2 tablespoons | Add to the dry ingredients before processing |
| Citrus Zest | 1-2 teaspoons | Add to the dry ingredients before processing |
| Spices | ½-1 teaspoon | Add to the dry ingredients before processing |
| Extracts | ½-1 teaspoon | Add to the ice water before mixing |
| Fresh Herbs | 1-2 tablespoons (chopped) | Mix in gently after the dough has been processed, before forming into disks |
| Nutmeg | ¼ teaspoon | Add to dry ingredients for a warm, spicy note |
| Lemon Zest | 1 teaspoon | Add to dry ingredients for a bright, citrusy flavor |
| Almond Extract | ½ teaspoon | Add to wet ingredients for a delicate, nutty flavor |
| Lavender | 1 teaspoon | Add to dry ingredients for a floral, aromatic flavor (use culinary-grade lavender) |
These additions can transform a basic pie crust into something truly special.
12. How Can I Prevent My Pie Crust from Shrinking During Baking?
Pie crust shrinkage is a common issue, but FOODS.EDU.VN provides several strategies to prevent it:
- Chill the Dough: Ensure the dough is thoroughly chilled before rolling and baking.
- Don’t Stretch the Dough: When placing the dough in the pie dish, avoid stretching it. Gently ease it into the dish.
- Trim Excess Dough: Trim the excess dough from the edges of the pie dish, leaving about an inch overhang.
- Crimp the Edges: Crimp the edges of the crust firmly. This helps to anchor the dough and prevent it from shrinking.
- Dock the Bottom: Prick the bottom of the crust with a fork (docking) to allow steam to escape during baking.
- Use Pie Weights: When blind-baking (baking the crust before adding the filling), use pie weights or dried beans to keep the crust from puffing up and shrinking.
- Bake at the Right Temperature: Bake the pie at the correct temperature, as specified in your recipe.
13. What Is Blind Baking, and When Is It Necessary?
Blind baking is the process of baking a pie crust before adding the filling. FOODS.EDU.VN explains that this technique is necessary when:
- The Filling Is Uncooked: If the pie filling doesn’t require baking (e.g., a chocolate cream pie), the crust needs to be fully baked beforehand.
- The Filling Has a Short Baking Time: If the filling has a shorter baking time than the crust (e.g., a pumpkin pie), blind baking ensures the crust is fully cooked and golden brown.
- Preventing a Soggy Crust: Blind baking helps to create a crisp crust that won’t become soggy from a moist filling.
To blind bake, line the pie crust with parchment paper and fill with pie weights or dried beans. Bake at the temperature specified in your recipe until the crust is set and lightly golden. Remove the weights and parchment paper, and bake for a few more minutes until the crust is fully golden brown.
14. What Are Some Common Mistakes to Avoid When Making Pie Dough?
Avoiding common mistakes is crucial for pie dough success. FOODS.EDU.VN highlights these pitfalls:
| Mistake | Solution |
|---|---|
| Using Warm Ingredients | Ensure butter and water are very cold. Chill the butter in the freezer for 30 minutes and use ice water. |
| Overmixing | Pulse the food processor instead of running it continuously. Stop when the mixture resembles coarse crumbs. |
| Adding Too Much Water | Add water gradually, one tablespoon at a time, until the dough just comes together. Avoid adding too much, which can make the crust tough. |
| Not Chilling | Chill the dough for at least 1-2 hours before rolling. This allows the gluten to relax and the butter to firm up. |
| Stretching the Dough | When placing the dough in the pie dish, gently ease it in without stretching. Stretching can cause the crust to shrink during baking. |
| Incorrect Baking Temp | Bake the pie at the temperature specified in your recipe. Too low a temperature can result in a soggy crust, while too high a temperature can cause the crust to burn. |
15. How Can I Tell If My Pie Dough Is the Right Consistency?
Determining the right consistency of your pie dough is essential for a perfect crust. FOODS.EDU.VN offers these guidelines:
- Crumbly Texture: The dough should look crumbly, with visible pieces of butter. It should not form a smooth, homogenous ball in the food processor.
- Holds Together When Pinched: When you pinch a small amount of the dough between your fingers, it should hold together without being too sticky or too dry.
- Not Too Wet: The dough should not be overly wet or sticky. If it is, add a little more flour, one tablespoon at a time, until it reaches the desired consistency.
- Not Too Dry: If the dough is too dry and crumbly, add a little more ice water, one teaspoon at a time, until it just comes together.
- Easy to Roll: After chilling, the dough should be easy to roll out without tearing or sticking. If it’s too hard, let it sit at room temperature for a few minutes before rolling.
16. How Do I Store Leftover Pie Dough?
Proper storage ensures your leftover pie dough remains fresh and ready to use. According to FOODS.EDU.VN:
- Refrigerate: Wrap the dough tightly in plastic wrap and store it in the refrigerator for up to 2 days.
- Freeze: For longer storage, wrap the dough tightly in plastic wrap and then place it in a freezer bag. Freeze for up to 2 months. Thaw the dough in the refrigerator overnight before using.
- Already Rolled Out: If you’ve already rolled out the dough, place it in the pie dish, cover tightly with plastic wrap, and refrigerate or freeze as directed above.
- Baked Crust: Store baked pie crusts at room temperature, covered loosely with foil or plastic wrap, for up to 2 days.
17. What Are Some Creative Variations I Can Make with Pie Dough?
Unleash your creativity with these pie dough variations suggested by FOODS.EDU.VN:
| Variation | Ingredients to Add | How to Incorporate | Best Uses |
|---|---|---|---|
| Chocolate Pie Dough | 2-3 tablespoons unsweetened cocoa powder | Add to the dry ingredients before processing | Chocolate cream pies, chocolate chess pies, or any pie where you want a rich, chocolatey crust |
| Lemon Pie Dough | Zest of 1-2 lemons | Add to the dry ingredients before processing | Lemon meringue pie, berry pies, or any pie that pairs well with citrus |
| Spice Pie Dough | 1 teaspoon ground cinnamon, ½ teaspoon ground nutmeg | Add to the dry ingredients before processing | Apple pie, pumpkin pie, or any pie with warm, cozy spices |
| Herb Pie Dough | 2 tablespoons chopped fresh herbs (e.g., rosemary, thyme) | Mix in gently after the dough has been processed, before forming into disks | Savory pies, quiches, or any pie with a savory filling |
| Nut Pie Dough | ½ cup finely ground nuts (e.g., almonds, pecans) | Replace an equal amount of flour with the ground nuts. Add to the dry ingredients before processing | Frangipane tart, pecan pie, or any pie with a nutty flavor |
| Gluten-Free Pie Dough | Gluten-free flour blend | Use a gluten-free pie crust recipe. Follow the recipe instructions carefully, as gluten-free dough can be delicate | Pies for those with gluten sensitivities or celiac disease |
| Buttermilk Pie Dough | Replace ice water with ice-cold buttermilk | Use my buttermilk pie crust variation here. It’s my favorite for fruit pies | Fruit pies |
| Graham Cracker Crust | Graham cracker crumbs, melted butter, sugar | Mix crumbs, melted butter, and sugar. Press into pie plate. Chill or bake | Cheesecake, Key lime pie |
18. Can I Make Pie Dough Ahead of Time?
Yes, you can definitely make pie dough ahead of time! According to FOODS.EDU.VN, pie dough can be stored in the refrigerator for up to 2 days or frozen for up to 2 months.
To store in the refrigerator, wrap the dough tightly in plastic wrap and keep it in the coldest part of your fridge. When you’re ready to use it, let it sit at room temperature for about 10-15 minutes to soften slightly before rolling it out.
For longer storage, wrap the dough tightly in plastic wrap, then place it in a freezer bag. When you’re ready to use it, thaw it in the refrigerator overnight.
19. What Are Some Common Pie Filling Recipes That Pair Well with Homemade Pie Dough?
Homemade pie dough is the perfect foundation for a variety of delicious pie fillings. FOODS.EDU.VN recommends these classic pairings:
| Pie Filling | Description | Why It Pairs Well |
|---|---|---|
| Apple Pie | A classic filling made with sliced apples, cinnamon, sugar, and a touch of lemon juice. | The warm, spiced apples complement the buttery, flaky crust beautifully. |
| Pumpkin Pie | A smooth, creamy filling made with pumpkin puree, spices, eggs, and evaporated milk. | The rich, spiced pumpkin filling is perfectly balanced by the tender crust. |
| Cherry Pie | A sweet and tart filling made with fresh or frozen cherries, sugar, and a thickening agent. | The bright, fruity cherries provide a delightful contrast to the buttery crust. |
| Pecan Pie | A rich, gooey filling made with pecans, butter, sugar, eggs, and corn syrup. | The nutty, caramelized pecans are enhanced by the flaky crust. |
| Lemon Meringue Pie | A tangy filling made with lemon juice, sugar, eggs, and a meringue topping. | The tart lemon filling is balanced by the sweet meringue and the buttery crust. |
| Chocolate Cream Pie | A decadent filling made with chocolate, cream, sugar, and a touch of vanilla. | The rich, chocolatey filling is perfectly complemented by the flaky, tender crust. |
| Blueberry Pie | A sweet and juicy filling made with fresh or frozen blueberries, sugar, and a thickening agent. | The burst of blueberry flavor works wonderfully with the buttery pie crust. |
| Peach Pie | A sweet and aromatic filling made with fresh or frozen peaches, sugar, and a hint of almond extract. | The delicate sweetness of peaches is enhanced by the buttery crust, creating a comforting dessert. |
| Key Lime Pie | A tangy and refreshing filling made with key lime juice, sweetened condensed milk, and egg yolks. | The zesty key lime filling provides a perfect contrast to the rich, buttery crust. |
| Frangipane Tart | A sweet almond filling with butter, sugar, eggs, and almond flour. | The sweet, nutty flavor of the frangipane filling complements the buttery pie crust beautifully. |
| Coconut Cream Pie | A rich custard pie with coconut milk, shredded coconut, sugar, eggs, and butter. | The tropical flavor of coconut goes well with the classic flaky pie crust. |
| Strawberry Rhubarb Pie | A sweet-tart blend of juicy strawberries and tangy rhubarb. | This pie combines the sweetness of strawberries with the tartness of rhubarb and balances it perfectly with the buttery crust. |
20. How Do I Troubleshoot a Tough or Dry Pie Crust?
If you encounter a tough or dry pie crust, FOODS.EDU.VN offers these troubleshooting tips:
| Issue | Possible Cause | Solution |
|---|---|---|
| Tough Crust | Overmixing the dough, too much water, not enough fat, not chilling the dough | Be careful not to overmix the dough. Pulse the food processor instead of running it continuously. Use the correct amount of water and fat. Chill the dough for at least 1-2 hours before rolling. |
| Dry Crust | Not enough water, too much flour, over-baking | Add water gradually until the dough just comes together. Use the correct amount of flour. Avoid over-baking the crust. |
| Crumbly Crust | Not enough water, not enough fat | Add water gradually until the dough just comes together. Use the correct amount of fat. |
| Soggy Crust | Too much filling, not docking the crust, baking at too low a temperature | Use the correct amount of filling. Dock the crust with a fork before baking. Bake the pie at the correct temperature. |
21. What Are Some Good Resources for Learning More About Pie Baking?
To deepen your pie-baking knowledge, FOODS.EDU.VN recommends these resources:
- Books:
- “The Pie and Pastry Bible” by Rose Levy Beranbaum
- “Sister Pie: Recipes & Stories from a Big Little Bakery in Detroit” by Lisa Ludwinski
- “Pieometry: Modern Tart Art and Pie Design for the Home Baker” by Lauren Ko
- Websites:
- FOODS.EDU.VN: Explore our extensive collection of pie recipes, tutorials, and tips.
- King Arthur Baking: Offers a wealth of information on baking techniques and recipes.
- Serious Eats: Features detailed guides on pie making and troubleshooting.
- Online Courses:
- Craftsy: Provides a variety of online baking classes, including pie making.
- Skillshare: Offers courses on pastry making and pie design.
22. How Can I Make a Lattice Pie Crust?
A lattice pie crust adds an elegant touch to any pie. FOODS.EDU.VN provides these simple steps:
- Prepare the Dough: Make your pie dough as usual and divide it into two disks.
- Roll Out the Bottom Crust: Roll out one disk and place it in your pie dish. Trim and crimp the edges.
- Roll Out the Top Crust: Roll out the second disk into a rectangle. Use a pastry wheel or knife to cut it into even strips.
- Arrange the Strips: Lay half of the strips across the pie filling, spacing them evenly.
- Fold Back Every Other Strip: Fold back every other strip halfway.
- Place the First Perpendicular Strip: Place one strip perpendicular to the folded strips. Unfold the folded strips over the perpendicular strip.
- Repeat: Fold back the alternate strips and place another perpendicular strip. Continue this process until the entire pie is covered.
- Trim and Seal: Trim the edges of the strips and seal them to the bottom crust. Crimp the edges for a decorative finish.
- Bake: Bake the pie according to your recipe instructions.
23. Is It Possible to Make a Vegan Pie Crust in a Food Processor?
Yes, it is indeed possible to create a delectable vegan pie crust using a food processor! FOODS.EDU.VN suggests the following adaptations:
- Replace Butter with Vegan Butter or Shortening: Substitute the cold butter with an equal amount of vegan butter or vegetable shortening. Ensure the vegan butter or shortening is very cold for best results.
- Use Ice Water: As with traditional pie crust, use ice water to bind the ingredients.
- Follow the Same Process: Follow the same steps as a traditional pie crust recipe, pulsing the ingredients in the food processor until the mixture resembles coarse crumbs.
- Chill the Dough: Chill the dough for at least 30 minutes to allow the gluten to relax.
- Roll Out and Bake: Roll out the dough and bake as usual, adjusting baking times as needed.
Vegan pie crusts can be just as flaky and delicious as traditional crusts when made with the right ingredients and techniques.
24. Can I Use Olive Oil Instead of Butter for a Healthier Pie Crust?
Yes, you can use olive oil to make a healthier pie crust. FOODS.EDU.VN recommends using high-quality extra virgin olive oil for the best flavor. Here’s how:
- Use a Different Ratio: Olive oil crusts require a different ratio of ingredients. Typically, you’ll use less liquid and more flour compared to a butter crust.
- Combine Ingredients: In a bowl, whisk together the flour and salt. Add the olive oil and mix until the mixture resembles coarse crumbs.
- Add Water: Gradually add ice water until the dough just comes together.
- Chill: Wrap the dough in plastic wrap and chill for at least 30 minutes.
- Roll and Bake: Roll out the dough and bake as usual.
Olive oil crusts will have a different texture than butter crusts – they tend to be less flaky but still delicious and tender.
25. How Do I Make a Graham Cracker Crust in a Food Processor?
Making a graham cracker crust in a food processor is quick and easy. FOODS.EDU.VN provides these simple steps:
- Combine Ingredients: In a food processor, combine graham cracker crumbs, melted butter, and sugar.
- Process: Pulse until the mixture is evenly combined and resembles wet sand.
- Press into Pie Plate: Press the mixture into the bottom and up the sides of a pie plate.
- Chill or Bake: Chill the crust in the refrigerator for at least 30 minutes to set. For a firmer crust, bake in a preheated oven at 350°F (175°C) for 8-10 minutes.
- Cool: Let the crust cool completely before adding the filling.
Graham cracker crusts are perfect for no-bake pies and cheesecakes.
26. What Are Some Tips for Making Mini Pies or Tarts?
Making mini pies or tarts is a fun way to create individual desserts. FOODS.EDU.VN offers these tips:
- Use a Muffin Tin or Tart Pans: Press the pie dough into muffin tins or mini tart pans.
- Adjust Baking Time: Reduce the baking time, as mini pies and tarts will cook faster than full-sized pies.
- Use Smaller Filling Portions: Use smaller portions of filling to avoid overflow.
- Get Creative with Decorations: Decorate the mini pies and tarts with fresh fruit, whipped cream, or chocolate shavings.
- Chill Before Serving: Chill the mini pies and tarts before serving for the best flavor and texture.
27. Can I Use a Food Processor to Make Other Types of Dough, Like Cookie Dough or Bread Dough?
While food processors are great for pie dough, FOODS.EDU.VN advises caution when using them for other types of dough:
- Cookie Dough: A food processor can be used for cookie dough, but be careful not to overmix. Pulse the ingredients until just combined.
- Bread Dough: Food processors can handle some bread dough, but they are not ideal for large batches or doughs that require extensive kneading. Overworking the dough can strain the motor.
For bread dough, a stand mixer is generally a better choice.
28. How Do I Prevent the Bottom of My Pie Crust from Getting Soggy?
A soggy bottom crust is a common pie-baking problem. FOODS.EDU.VN provides these solutions:
- Blind Bake: Blind bake the crust before adding the filling.
- Dock the Crust: Prick the bottom of the crust with a fork before adding the filling.
- Use a Hot Baking Sheet: Place the pie dish on a hot baking sheet in the oven. This helps to cook the bottom crust more quickly.
- Brush with Egg White: Brush the bottom of the crust with a beaten egg white before adding the filling. This creates a barrier that prevents the filling from soaking into the crust.
- Use a Thickening Agent: Use a thickening agent in the filling, such as cornstarch or tapioca starch, to prevent it from being too runny.
- Avoid Overfilling: Avoid overfilling the pie, as excess liquid can seep into the crust.
29. What Are Some Creative Ways to Decorate a Pie Crust?
Decorating a pie crust can elevate it from simple to stunning. FOODS.EDU.VN suggests these ideas:
- Lattice Crust: Create a classic lattice pattern with strips of dough.
- Cut-Outs: Use cookie cutters to cut out shapes from the dough and arrange them on top of the pie.
- Braided Crust: Braid strips of dough and place them around the edge of the pie.
- Crimp the Edges: Crimp the edges of the crust with your fingers or a fork for a decorative finish.
- Egg Wash: Brush the crust with an egg wash (egg beaten with a little water or milk) for a golden brown, shiny finish.
- Sugar: Sprinkle the crust with sugar before baking for a sweet, crunchy topping.
- Leaf Designs: Use a leaf-shaped cutter to create decorative leaves from the pie dough. Arrange them artfully on top of the pie or around the edges.
30. Where Can I Find More Expert Pie Dough Recipes and Tips?
For more expert pie dough recipes and tips, FOODS.EDU.VN is your ultimate resource. Our website features a wealth of information on pie baking, including:
- Detailed recipes for various types of pie dough, including traditional, vegan, and gluten-free options.
- Step-by-step tutorials with photos and videos.
- Troubleshooting guides to help you solve common pie-baking problems.
- Creative ideas for decorating pie crusts.
- Tips from experienced bakers to help you achieve perfect results every time.
Visit FOODS.EDU.VN today to elevate your pie-baking skills and create delicious, unforgettable pies!
Making pie dough in a food processor is a game-changer for any baker. It simplifies the process, ensures consistency, and delivers a flaky, delicious crust every time. With the tips and techniques shared by FOODS.EDU.VN, you’ll be able to create stunning pies that impress your family and friends.
Ready to explore more baking secrets and delicious recipes? Visit foods.edu.vn at 1946 Campus Dr, Hyde Park, NY 12538, United States, or contact us via Whatsapp at +1 845-452-9600. Don’t miss out on our expert guidance and start creating culinary masterpieces today.