How to make food with polymer clay? FOODS.EDU.VN is here to help you unleash your inner artist and create stunning miniature food masterpieces. This comprehensive guide dives deep into the world of polymer clay, providing expert techniques, essential tools, and creative inspiration to elevate your miniature food creations. Discover the secrets to realistic textures, vibrant colors, and mouthwatering details that will impress even the most discerning miniature food connoisseurs.
1. What is Polymer Clay and How is it Used to Make Food?
Polymer clay is a type of modeling clay that hardens when baked, making it a versatile medium for creating durable and detailed miniature food items. It is a synthetic clay composed of polymers, resins, coloring agents, and fillers. According to a study by the University of North Texas, the specific formulation of polymer clay can vary between manufacturers, resulting in differences in texture, flexibility, and baking requirements. This makes it ideal for crafting realistic textures, intricate details, and vibrant colors in miniature food replicas.
Polymer clay is used by artists to create realistic miniature food items by first conditioning the clay to make it pliable. It is then shaped and sculpted to mimic the desired food, with attention to detail such as texture and color. The shaped clay is baked at a low temperature to harden, and finishing touches like glazes or paints are added to enhance realism.
- Conditioning the Clay: Conditioning involves kneading and manipulating the clay to make it soft, pliable, and free of air bubbles.
- Shaping and Sculpting: Once conditioned, the clay can be shaped and sculpted using various tools to mimic the desired food item.
- Baking: After shaping, the clay is baked in a conventional oven at a low temperature (usually around 275°F or 130°C) to harden it.
- Finishing Touches: Once cooled, the baked clay can be further enhanced with paints, glazes, or other embellishments to add realism and detail.
2. What are the Essential Tools Needed to Make Food with Polymer Clay?
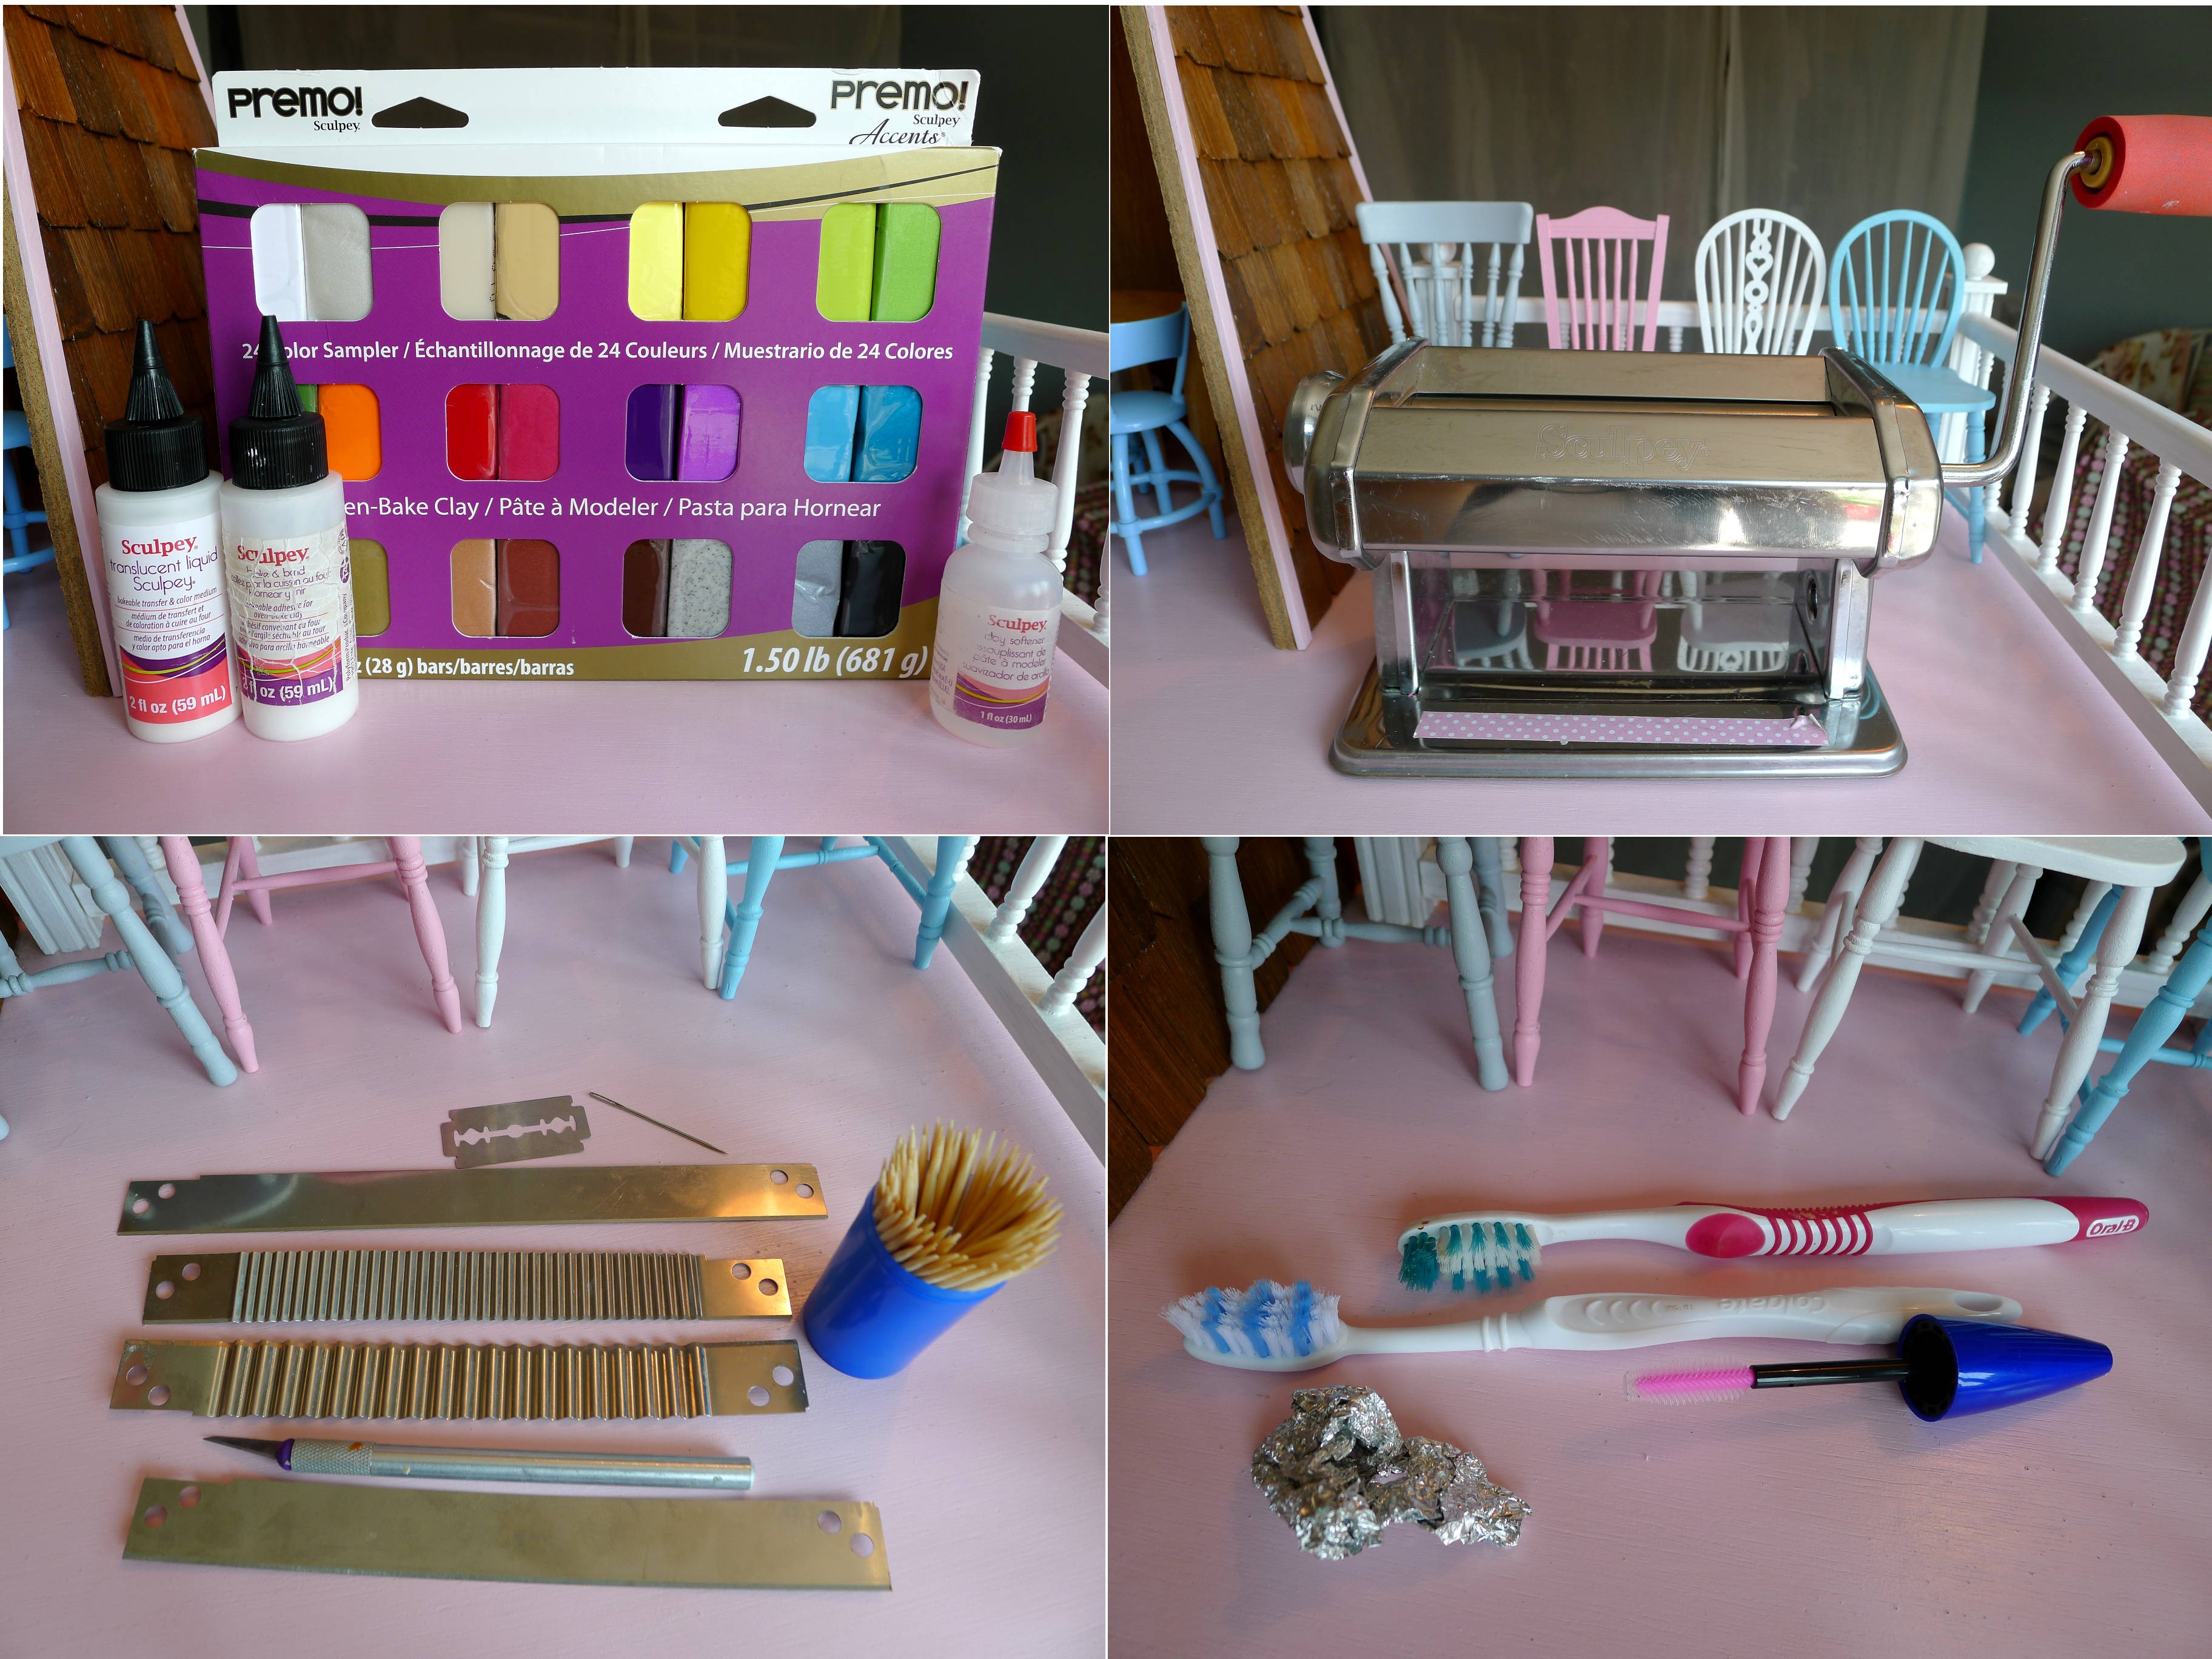
To make realistic miniature food with polymer clay, you will need a variety of tools to shape, texture, and finish your creations. Here are some essential tools to get you started:
| Tool | Description | Use |
|---|---|---|
| Polymer Clay | The primary medium for creating miniature food items. | Shaping, sculpting, and creating realistic textures. |
| Clay Conditioning Machine | A machine used to roll out even sheets of clay and blend colors. | Creating smooth, consistent sheets of clay for various food items. |
| Blades and X-Acto Knife | Sharp tools used for cutting, slicing, and shaping clay. | Precisely cutting clay, creating fine details, and trimming excess material. |
| Needle Tool | A pointed tool used for texturing and shaping clay. | Adding textures to food items, creating fine details, and shaping small components. |
| Old Toothbrush | Used for creating textures on clay surfaces. | Adding rough or uneven textures to simulate the appearance of bread, cakes, or other food items. |
| Recycled Foil | Used for creating textures on clay surfaces. | Adding irregular textures to simulate the appearance of crusts, surfaces, or other food items. |
| Modeling Tools | A set of tools used for shaping and adding details to clay. | Shaping clay, creating indentations, smoothing surfaces, and adding fine details to food items. |
| Ball Tools | Tools with rounded ends used for creating indentations and shaping clay. | Creating rounded shapes, indentations, and adding details to food items like fruits, vegetables, or pastries. |
| Molds and Cutters | Pre-made shapes used for quickly creating uniform pieces. | Cutting out shapes, creating consistent sizes, and adding decorative elements to food items. |
| Translucent Liquid Sculpey | A liquid form of polymer clay used for gluing pieces together and creating translucent effects. | Gluing pieces of clay together, creating translucent glazes, and adding shine to food items. |
| Sculpey Oven Bake Adhesive | An adhesive specifically designed for polymer clay, used for bonding pieces together. | Bonding pieces of clay together securely before baking, ensuring that they stay intact during and after the baking process. |
| Clay Softener | A product used to revive and soften old or hardened polymer clay. | Softening and rejuvenating old or hardened clay, making it pliable and easy to work with again. |
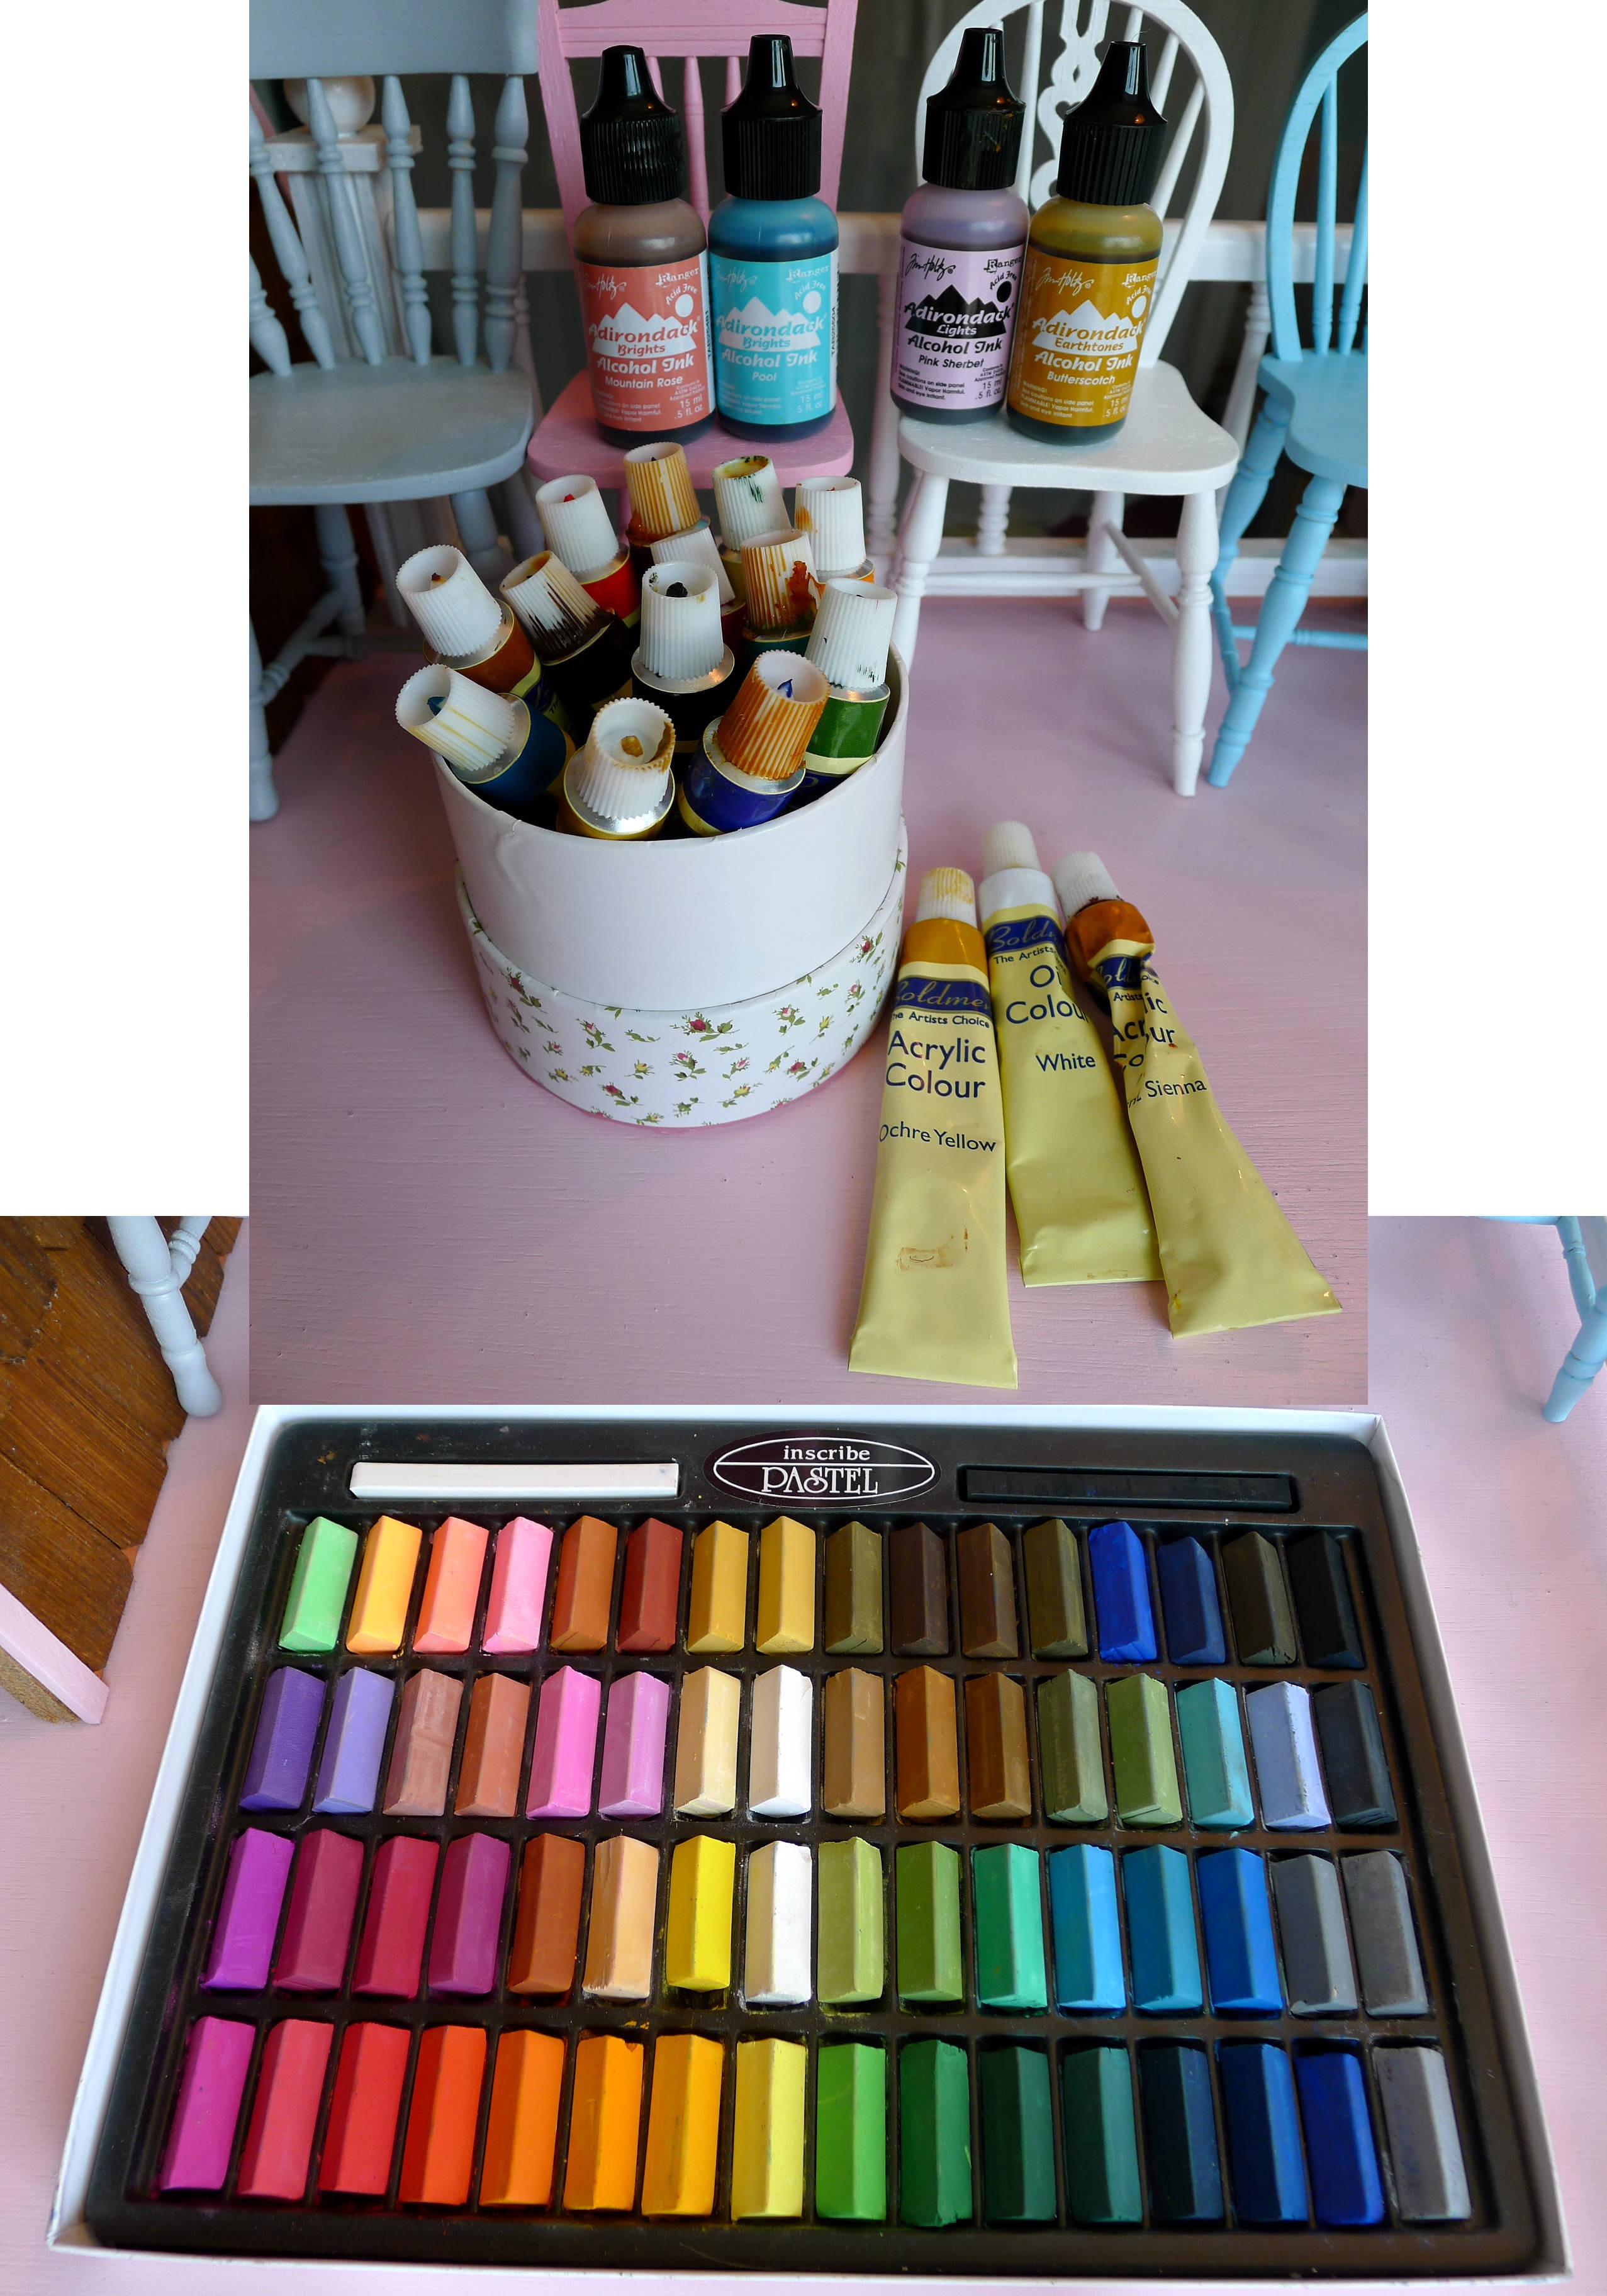
| Alcohol Inks | Inks used for adding color and shading to cured clay. | Adding vibrant colors, creating gradients, and shading details on baked clay surfaces. |
| Acrylic Paint | Paint used for adding color and details to cured clay. | Painting intricate details, adding highlights and shadows, and creating custom colors on baked clay surfaces. |
| Oil Paint | Paint used for tinting Translucent Liquid Sculpey and creating subtle color variations. | Tinting liquid clay to create custom colors, adding subtle color variations, and creating realistic effects in translucent glazes. |
| Pastels | Soft, powdery pigments used for shading and adding color to clay. | Adding soft, blended colors, creating subtle shading effects, and enhancing the realism of food items. |
| Molds | Pre-made shapes used for quickly replicating designs. | Replicating shapes, creating consistent designs, and speeding up the process of creating multiple identical food items. |
| Silicone Mold | A flexible mold used for creating detailed shapes. | Creating intricate shapes, capturing fine details, and easily releasing baked clay pieces without distortion. |
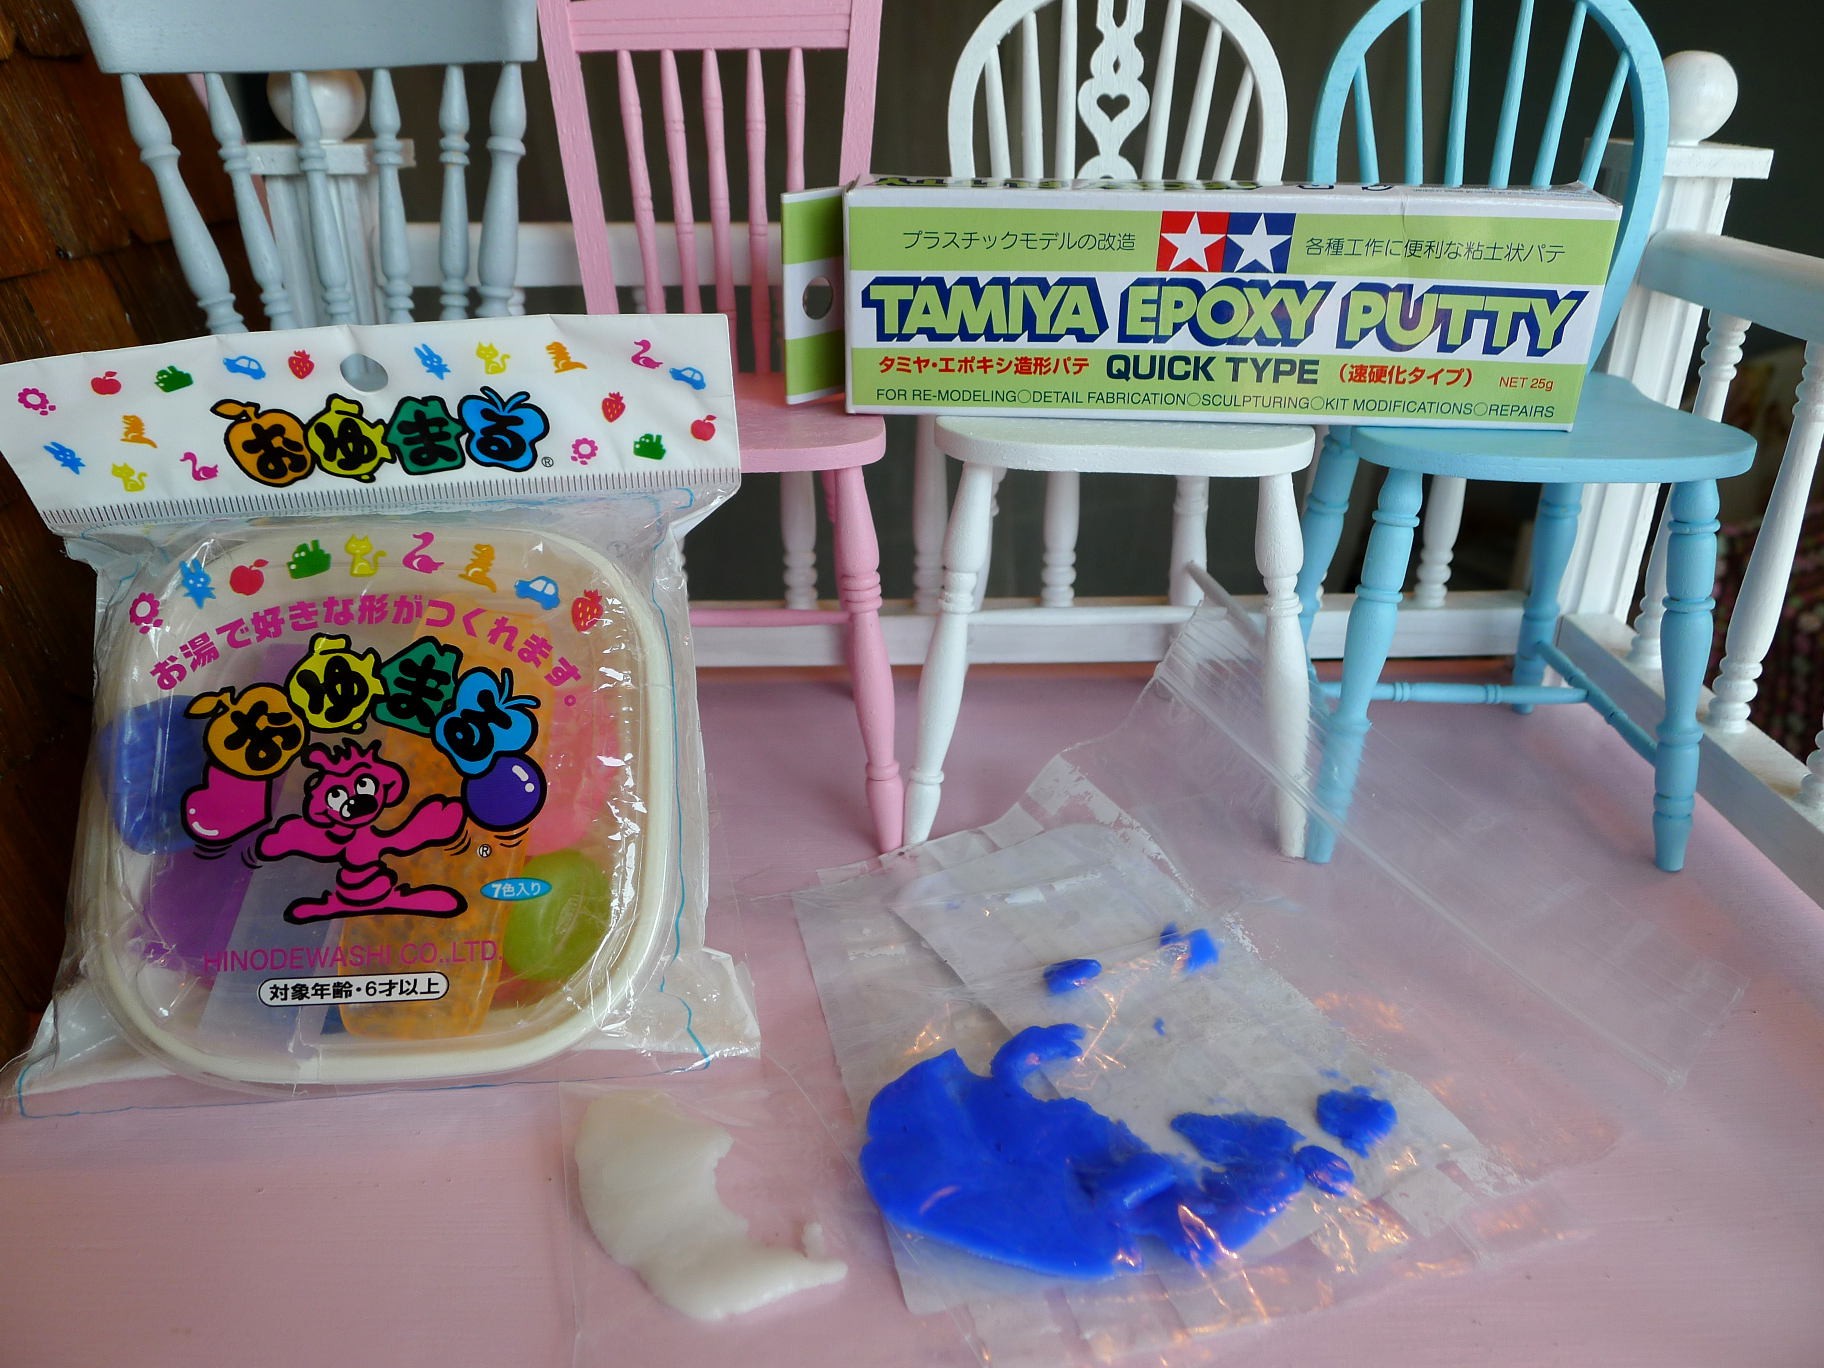
| Epoxy Putty | A two-part epoxy clay used for sculpting and creating molds. | Sculpting durable shapes, creating custom molds, and adding structural support to miniature food items. |
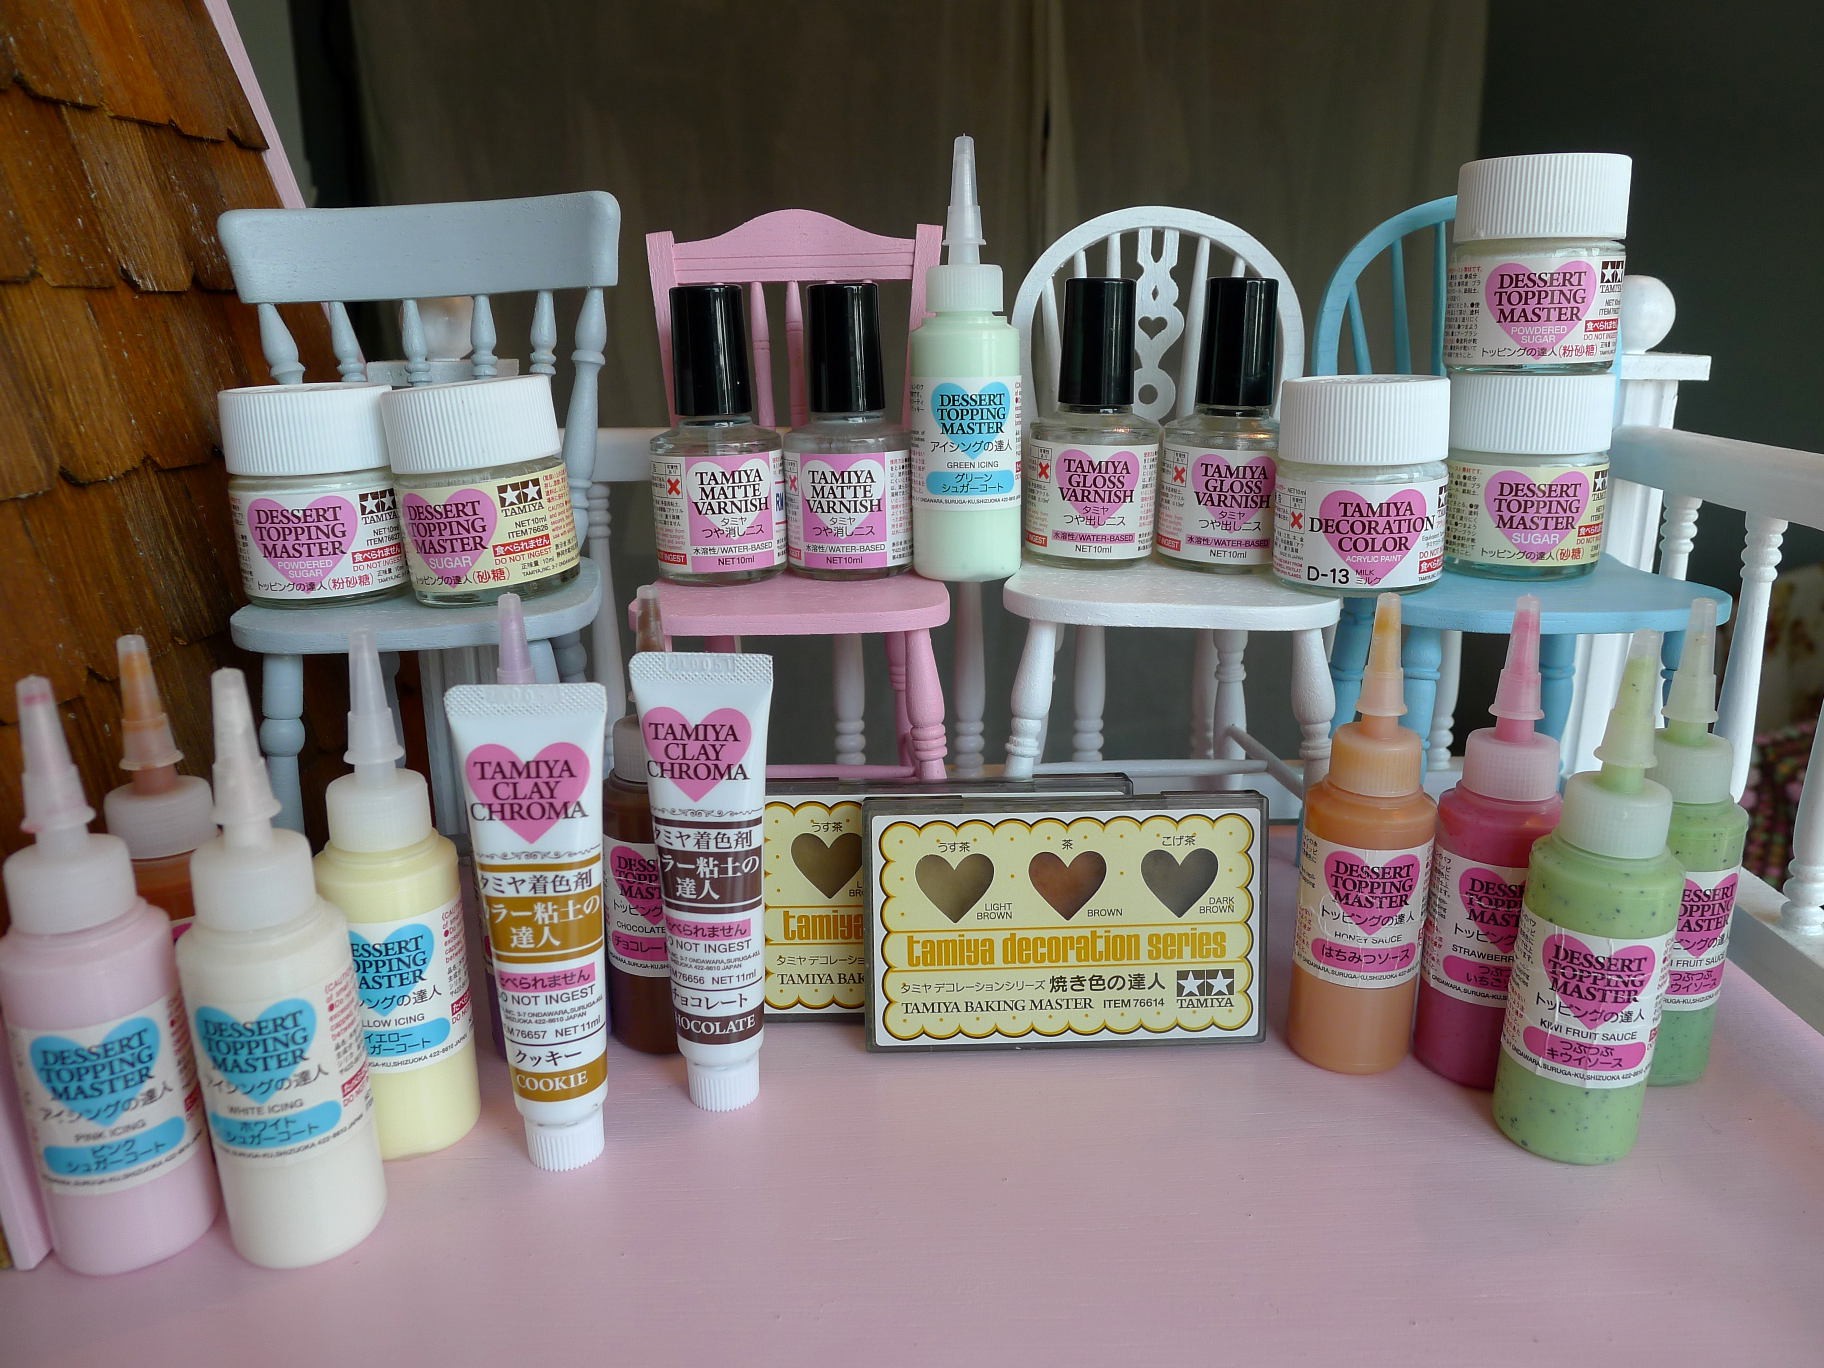
| Glazes | Clear coatings used to seal and protect clay, as well as add shine or matte finishes. | Sealing in colors, protecting clay from damage, and adding a glossy or matte finish to enhance the appearance of food items. |
| Dessert Topping Master | A colored PVA glue used to create realistic sauces and toppings. | Creating realistic sauces, toppings, and drizzles on miniature desserts and other food items. |
| Brushes | Tools used for applying paints, glazes, and shading powders. | Applying smooth, even coats of paint, blending colors, and adding precise shading details to miniature food items. |
| Wet Wipes | Used for cleaning tools and hands. | Cleaning tools, removing clay residue from surfaces, and keeping hands clean while working with polymer clay. |
| PVA Glue | A type of glue used for attaching clay pieces together. | Attaching cured or uncured clay pieces together, creating strong and durable bonds between components. |
| Talcum Powder | Used to prevent clay from sticking to molds. | Dusting molds to prevent clay from sticking, ensuring easy release and preserving the detail of the mold. |
| Small Tiles | Used as a work surface for multiple projects. | Providing a stable, non-stick surface for working on multiple projects simultaneously, preventing clay from sticking and making it easy to move projects around. |
Having these tools on hand will allow you to create a wide variety of miniature food items with polymer clay. According to research from the International Polymer Clay Association, using the right tools can significantly improve the quality and realism of your creations.
3. How Do You Condition Polymer Clay For Making Miniature Food?
Conditioning polymer clay is a crucial first step in any miniature food project. It ensures that the clay is pliable, smooth, and free of air bubbles, resulting in a more professional and durable final product. According to experts at FOODS.EDU.VN, proper conditioning prevents cracking, crumbling, and other imperfections that can ruin your miniature creations.
Follow these steps to condition your polymer clay effectively:
- Soften the Clay: Begin by breaking off a piece of polymer clay and warming it in your hands. Gently roll and squeeze the clay to soften it and make it more pliable.
- Knead the Clay: Once the clay is softened, start kneading it with your fingers. Use a firm, even pressure to work the clay, folding it over on itself and pressing out any air bubbles.
- Use a Clay Conditioning Machine: For larger projects or to save time, a clay conditioning machine can be a valuable tool. Feed the clay through the machine multiple times, gradually decreasing the thickness setting until the clay is smooth and even.
- Check for Air Bubbles: As you condition the clay, keep an eye out for any air bubbles. These can cause cracks or weak spots in your finished piece. If you spot any bubbles, gently puncture them with a needle or pin and smooth the clay back together.
- Test the Texture: Once the clay is thoroughly conditioned, test its texture by rolling it into a smooth ball. If the ball is free of cracks and feels pliable, the clay is ready to use.
According to a study by the Polymer Clay Society, proper conditioning can improve the strength and durability of polymer clay by up to 30%.
4. What are Some Techniques for Making Realistic Food Textures with Polymer Clay?
Creating realistic textures is essential for making your miniature food look believable and appetizing. Here are some techniques for achieving different textures with polymer clay:
- Texturing with Tools: Use tools like needles, toothpicks, or textured mats to create patterns and textures on the surface of the clay. For example, you can use a needle to create the texture of bread or a toothbrush to create the texture of a cake.
- Using Molds: Molds are a quick and easy way to create consistent textures. Simply press the clay into the mold and remove it to reveal the textured surface.
- Adding Inclusions: Incorporate small particles like sand, seeds, or spices into the clay to create unique textures. For example, you can add poppy seeds to create the texture of a muffin or sand to create the texture of a beach scene.
- Layering: Layer different colors and textures of clay to create depth and dimension. For example, you can layer brown and beige clay to create the crust of a pie or use translucent clay to create a glossy glaze.
According to miniature food artist Kim Kaswell, experimenting with different textures is key to creating realistic and visually appealing miniature food.
5. How Do You Bake Polymer Clay Food Items Properly?
Baking polymer clay correctly is crucial to ensure that your miniature food items are durable and long-lasting. Here are some tips for baking polymer clay properly:
| Step | Description |
|---|---|
| 1. Preheat the Oven | Preheat your oven to the temperature recommended by the clay manufacturer. This is typically around 275°F (130°C), but always check the packaging for specific instructions. |
| 2. Use an Oven Thermometer | Use an oven thermometer to ensure that your oven is heating to the correct temperature. Oven temperatures can vary, so it’s important to have an accurate reading. |
| 3. Protect Your Baking Surface | Place your polymer clay items on a baking sheet lined with parchment paper or aluminum foil. This will prevent the clay from sticking to the baking sheet and ensure even baking. |
| 4. Baking Time | Bake the clay for the recommended time, which is usually 15-30 minutes per 1/4 inch of thickness. Thicker pieces may require longer baking times. |
| 5. Prevent Overbaking | To prevent overbaking, cover the clay items with a tent of aluminum foil during the last half of the baking time. This will help to distribute the heat evenly and prevent the clay from burning. |
| 6. Cooling | Allow the clay items to cool completely in the oven before handling them. This will prevent them from warping or cracking. |
| 7. Ventilation | Ensure your working area is well-ventilated during baking to avoid inhaling fumes. Although polymer clay is generally safe, proper ventilation minimizes any potential health risks. |
| 8. Texture Preservation | To maintain texture, place your items on a bed of baking soda. This prevents the base from flattening and ensures even heat distribution for consistent baking results. |
| 9. Correct Baking Temperature | Maintaining the correct baking temperature is essential for optimal polymer clay hardening. If the clay is underbaked, it may be brittle and prone to breakage, while overbaking can lead to discoloration and structural weakening. |
According to research by the American Society for Testing and Materials (ASTM), following these baking guidelines will result in stronger, more durable polymer clay creations.
6. How Can You Add Color and Details to Polymer Clay Food Items?
Adding color and details to your polymer clay food items is what brings them to life and makes them look truly realistic. Here are some techniques for achieving vibrant colors and intricate details:
- Mixing Clay Colors: Blend different colors of polymer clay to create custom shades and gradients. Experiment with layering and marbling techniques to add depth and dimension to your creations.
- Using Acrylic Paints: Apply acrylic paints to baked polymer clay to add fine details, highlights, and shadows. Use small brushes for precise application and blend colors for a seamless finish.
- Applying Alcohol Inks: Use alcohol inks to create vibrant washes of color on baked polymer clay. These inks are transparent and can be layered to create interesting effects.
- Adding Pastels: Use pastels to add soft, blended colors to your polymer clay creations. Apply the pastels with a brush or sponge and blend them for a smooth, natural look.
According to polymer clay artist Marie Segal, using a combination of these techniques will help you achieve the most realistic and visually appealing results.
7. What are Some Finishing Touches for Polymer Clay Food Items?
Finishing touches are the final steps that can elevate your polymer clay food items from ordinary to extraordinary. Here are some finishing touches to consider:
- Applying Glazes: Apply a glaze to your baked polymer clay to add shine and protection. Choose from glossy, matte, or satin glazes depending on the desired effect.
- Adding Sauces and Toppings: Use colored PVA glue or other decorative gels to create realistic sauces and toppings. Drizzle them over your miniature desserts or add them as garnish to your savory dishes.
- Adding Textural Elements: Incorporate small elements like sprinkles, seeds, or glitter to add texture and visual interest to your creations.
- Sealing and Protecting: Apply a sealant to protect your polymer clay items from dust, dirt, and UV damage. This will help to preserve their color and appearance over time.
According to experts at FOODS.EDU.VN, these finishing touches are essential for creating professional-looking miniature food items that will impress collectors and enthusiasts alike.
8. How Do You Create Realistic Miniature Cakes and Pastries with Polymer Clay?
Creating realistic miniature cakes and pastries with polymer clay requires attention to detail, patience, and a few key techniques. Here’s how to achieve stunning results:
- Start with a Solid Base: Begin by creating a solid base for your cake or pastry using polymer clay. Use a clay conditioning machine to roll out a smooth, even sheet of clay and cut it into the desired shape.
- Add Texture: Use tools like needles, toothpicks, or textured mats to add texture to the surface of the clay. For example, you can use a needle to create the texture of a sponge cake or a toothbrush to create the texture of a croissant.
- Create Layers: Layer different colors and textures of clay to create depth and dimension. For example, you can layer brown and beige clay to create the crust of a pie or use translucent clay to create a glossy glaze.
- Add Decorations: Use molds, cutters, and other tools to add decorations to your cakes and pastries. Create flowers, leaves, and other embellishments using polymer clay or other materials.
- Bake and Finish: Bake your cakes and pastries according to the manufacturer’s instructions. Once cooled, add finishing touches like glazes, sauces, and sprinkles to complete the look.
According to miniature food artist Sue Heaser, paying attention to small details like the texture of the frosting or the color of the fruit can make all the difference in creating realistic miniature cakes and pastries.
9. What Are Some Tips for Making Miniature Fruits and Vegetables with Polymer Clay?
Creating realistic miniature fruits and vegetables with polymer clay can be a fun and rewarding project. Here are some tips for achieving lifelike results:
| Tip | Description |
|---|---|
| 1. Observe Real Fruits and Vegetables | Carefully study the shapes, colors, and textures of real fruits and vegetables. Pay attention to details like the curves of a banana, the dimples of an orange, or the veins of a leaf. |
| 2. Use the Right Colors | Mix different colors of polymer clay to create custom shades that match the colors of real fruits and vegetables. Use color charts and reference photos to guide your mixing. |
| 3. Add Texture | Use tools like needles, toothpicks, or textured mats to add texture to the surface of the clay. For example, you can use a needle to create the texture of a strawberry or a toothbrush to create the texture of a kiwi. |
| 4. Create Imperfections | Real fruits and vegetables are not perfect, so don’t be afraid to add imperfections to your miniature creations. Add blemishes, bruises, and other details to make them look more realistic. |
| 5. Add Details | Use small brushes and acrylic paints to add fine details like highlights, shadows, and seeds. These details will bring your miniature fruits and vegetables to life. |
| 6. Use Molds | For fruits and vegetables with complex shapes, consider using molds to create the basic form. You can then add details and textures by hand to customize each piece. |
| 7. Consider Size and Scale | Pay attention to the size and scale of your miniature fruits and vegetables. They should be proportionate to the other items in your miniature scene. |
| 8. Blend Colors Carefully | Achieve seamless transitions between colors by carefully blending the clay. This is especially important for fruits and vegetables with gradients, such as tomatoes or apples. Use blending tools or your fingers to soften the edges between colors. |
| 9. Protect Your Work | Apply a sealant to protect your polymer clay items from dust, dirt, and UV damage. This will help to preserve their color and appearance over time. |
| 10. Experiment with Techniques | Don’t be afraid to try new techniques and experiment with different materials. The more you practice, the better you will become at creating realistic miniature fruits and vegetables. |
According to miniature food artist Barbara Meyer, attention to detail is key to creating realistic miniature fruits and vegetables that will fool the eye.
10. How Can You Store and Display Your Polymer Clay Food Creations?
Proper storage and display are essential for preserving the beauty and longevity of your polymer clay food creations. Here are some tips for keeping your miniatures safe and looking their best:
| Method | Description |
|---|---|
| 1. Store in a Cool, Dry Place | Keep your polymer clay food creations away from direct sunlight, heat, and humidity. These elements can cause the clay to soften, warp, or fade over time. |
| 2. Protect from Dust | Dust can accumulate on your miniatures and make them look dull and dirty. To prevent this, store them in a closed display case or cover them with a cloth when not in use. |
| 3. Avoid Contact with Other Materials | Polymer clay can react with certain materials, such as plastic or metal, causing discoloration or damage. To prevent this, store your miniatures in acid-free containers or wrap them in archival-quality paper. |
| 4. Handle with Care | Polymer clay can be fragile, so handle your miniatures with care. Avoid dropping them or subjecting them to excessive pressure. |
| 5. Display Strategically | Choose a display location that is both visually appealing and safe for your miniatures. Consider factors like lighting, background, and accessibility when selecting a display space. |
| 6. Use Display Cases | Display cases offer protection from dust, handling, and environmental factors. Opt for cases made of clear acrylic or glass to showcase your miniatures while keeping them safe. |
| 7. Rotate Displays Regularly | Rotate your displays periodically to prevent prolonged exposure to light and other environmental factors. This will help to ensure that your miniatures remain in pristine condition for years to come. |
| 8. Clean Gently | When cleaning your polymer clay food creations, use a soft brush or cloth and gentle soap and water. Avoid using harsh chemicals or abrasive cleaners, as these can damage the clay. |
| 9. Repair as Needed | If your miniatures become damaged, repair them as soon as possible. Use polymer clay adhesive to reattach broken pieces or fill in cracks. |
| 10. Insure Valuable Pieces | For valuable or sentimental pieces, consider insuring them against loss or damage. This will provide peace of mind and protect your investment. |
According to experts at FOODS.EDU.VN, following these storage and display tips will help you enjoy your polymer clay food creations for years to come.
FAQ About Making Food With Polymer Clay
Here are some frequently asked questions about making food with polymer clay:
- Is polymer clay safe to use for making food-related items?
Yes, polymer clay is generally safe to use for making decorative food items. However, it is not food-safe and should not be used for items that will come into direct contact with food. - What type of polymer clay is best for making miniature food?
Brands like Sculpey and Fimo are popular choices for miniature food due to their consistent texture and wide range of colors. - How do I prevent my polymer clay from cracking when baking?
Ensure the clay is properly conditioned to remove air bubbles, bake at the recommended temperature, and avoid rapid temperature changes. - Can I use regular paint on polymer clay?
Acrylic paints work best on polymer clay after it has been baked. Seal the paint with a varnish for added protection. - How do I create a glossy finish on my polymer clay food?
Apply a polymer clay-specific glaze after baking to achieve a glossy finish. - What tools can I use to create textures on polymer clay?
Needles, toothpicks, brushes, and textured mats are great for creating various textures. - How do I attach small details to polymer clay?
Use liquid polymer clay or a bakeable glue to securely attach small details before baking. - Can I mix different brands of polymer clay?
Mixing different brands is generally not recommended as they may have different baking temperatures and properties. - How do I store leftover polymer clay?
Wrap leftover clay tightly in plastic wrap or store it in an airtight container to prevent it from drying out. - What if my polymer clay is too hard to work with?
Use a clay softener or mix it with a small amount of liquid polymer clay to restore its pliability.
Unleash Your Culinary Creativity with FOODS.EDU.VN
Ready to take your polymer clay food creations to the next level? Visit FOODS.EDU.VN today to discover a treasure trove of expert tips, detailed tutorials, and inspiring ideas. Whether you’re a beginner or an experienced artist, FOODS.EDU.VN has everything you need to unleash your culinary creativity and craft miniature masterpieces that will delight and amaze.
Contact us:
- Address: 1946 Campus Dr, Hyde Park, NY 12538, United States
- Whatsapp: +1 845-452-9600
- Website: foods.edu.vn