Are you eager to learn how to take captivating pictures of food? FOODS.EDU.VN is here to help you master the art of food photography, transforming your images from ordinary to extraordinary. This guide provides expert tips and techniques to elevate your food photography skills, ensuring your culinary creations look as delicious as they taste. Delve into the world of food styling, photography lighting, and composition techniques with us.
Table of Contents
- Understanding the Basics of Food Photography
- Essential Equipment for Stunning Food Photos
- Mastering Lighting Techniques for Food Photography
- Composition Techniques for Eye-Catching Food Photos
- Food Styling Tips to Enhance Your Shots
- Editing Your Food Photos for a Professional Look
- Advanced Techniques in Food Photography
- Common Mistakes to Avoid in Food Photography
- Food Photography for Different Platforms
- Staying Inspired and Creative in Food Photography
- Frequently Asked Questions (FAQs) About Food Photography
1. Understanding the Basics of Food Photography
What are the fundamental elements to consider when learning how to capture enticing food photos? The basics include understanding light, composition, and styling. These elements work together to create images that are not only visually appealing but also convey the essence and flavor of the food. Let’s explore each of these foundational aspects to improve your food photography.
1.1. The Importance of Light in Food Photography
Why is lighting considered the most crucial element in food photography? Light shapes the mood and highlights the textures of your subject. Natural light is often preferred for its soft, diffused quality, which minimizes harsh shadows and brings out the food’s natural colors. According to a study by the University of Washington, optimal lighting can increase perceived tastiness by up to 20%.
- Natural Light: Position your setup near a window to utilize natural light. Overcast days provide the most even and flattering light, reducing the risk of harsh shadows.
- Artificial Light: If natural light is unavailable, invest in a softbox or LED panel. These tools allow you to control the intensity and direction of the light, mimicking natural daylight.
1.2. Composition Rules for Visually Appealing Food Photos
What composition techniques can transform a simple food shot into a captivating image? Applying composition rules such as the rule of thirds, leading lines, and symmetry can guide the viewer’s eye and create a sense of balance and harmony.
*   **Rule of Thirds:** Imagine dividing your frame into nine equal parts with two horizontal and two vertical lines. Place key elements along these lines or at their intersections to create a more dynamic and engaging composition.
*   **Leading Lines:** Use lines (e.g., utensils, edges of tables, or ingredients) to draw the viewer's eye towards the main subject.
*   **Symmetry and Patterns:** Symmetrical arrangements can create a sense of order and elegance, while patterns add visual interest and rhythm.
1.3. Essential Camera Settings for Food Photography
Which camera settings are critical for achieving professional-quality food photos? Adjusting aperture, ISO, and shutter speed is essential for controlling the exposure and depth of field in your images.
- Aperture: Use a wide aperture (e.g., f/1.8 to f/2.8) to create a shallow depth of field, which blurs the background and brings the focus to your subject.
- ISO: Keep the ISO as low as possible (e.g., ISO 100 to 400) to minimize noise and maintain image clarity.
- Shutter Speed: Adjust the shutter speed to ensure proper exposure while avoiding motion blur. A tripod can help stabilize your camera at slower shutter speeds.
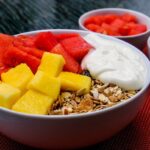
 Overhead shot of a vibrant salad with colorful ingredients, emphasizing composition and lighting
2. Essential Equipment for Stunning Food Photos
What are the key pieces of equipment that can significantly enhance your food photography? While a professional camera can be beneficial, the right lenses, tripods, and lighting accessories can make a world of difference, even when using a smartphone. Let’s explore the essential gear that can take your food photos to the next level.
2.1. Choosing the Right Camera and Lens
What type of camera and lens combination is ideal for food photography? While a DSLR or mirrorless camera offers the most control and flexibility, a high-quality smartphone can also produce excellent results. The lens, however, plays a critical role in capturing the details and textures of food.
*   **DSLR/Mirrorless Cameras:** These cameras offer manual controls, interchangeable lenses, and larger sensors, allowing for greater image quality and creative possibilities.
*   **Lenses:** A macro lens (e.g., 50mm or 100mm) is ideal for capturing close-up details, while a prime lens with a wide aperture (e.g., f/1.8) can create a beautiful shallow depth of field.
2.2. The Importance of a Tripod in Food Photography
Why is a tripod an essential tool for food photography? A tripod provides stability, allowing you to use slower shutter speeds without introducing motion blur. This is particularly useful in low-light situations or when shooting overhead.
*   **Stability:** A tripod ensures that your camera remains steady, resulting in sharper and clearer images.
*   **Overhead Shots:** A tripod with a horizontal arm allows you to capture perfect overhead shots, which are ideal for showcasing the entire dish and its arrangement.
2.3. Lighting Equipment: Reflectors, Diffusers, and Softboxes
How can lighting accessories improve the quality of your food photos? Reflectors, diffusers, and softboxes help control and manipulate light, reducing harsh shadows and creating a more balanced and appealing image.
- Reflectors: Bounce light onto your subject to fill in shadows and brighten the overall image. White foam boards or silver reflectors are effective and affordable options.
- Diffusers: Soften and spread light, reducing harsh shadows and creating a more even and flattering illumination. Sheer curtains or diffusion panels can be used as diffusers.
- Softboxes: Enclose a light source in a box with a diffusing front panel, creating a soft, directional light that mimics natural daylight.
3. Mastering Lighting Techniques for Food Photography
What are the most effective lighting techniques for creating mouth-watering food photos? Understanding how to use both natural and artificial light is essential for highlighting the textures, colors, and details of your culinary creations. Let’s explore how to master lighting for stunning results.
3.1. Utilizing Natural Light Effectively
How can you make the most of natural light in your food photography? Positioning your setup near a window and using reflectors and diffusers can help you control the intensity and direction of the light, creating soft, even illumination.
*   **Window Light:** Set up your food near a window with indirect sunlight. Avoid direct sunlight, which can create harsh shadows and overexposed areas.
*   **Reflectors:** Use white foam boards or silver reflectors to bounce light back onto the subject, filling in shadows and brightening the overall image.
*   **Diffusers:** Place a sheer curtain or diffusion panel between the light source and your subject to soften the light and reduce harsh shadows.
3.2. Setting Up Artificial Lighting for Food Photography
When is artificial lighting necessary, and how can you set it up effectively? Artificial lighting is essential when natural light is limited or unavailable. Softboxes and LED panels are excellent options for creating controlled and consistent lighting.
*   **Softboxes:** Use softboxes to create a soft, directional light that mimics natural daylight. Position the softbox at a 45-degree angle to your subject for optimal results.
*   **LED Panels:** LED panels offer adjustable brightness and color temperature, allowing you to fine-tune the lighting to match your desired aesthetic.
*   **Multiple Light Sources:** Experiment with multiple light sources to create depth and dimension. Use a key light to illuminate the main subject and a fill light to soften shadows.
3.3. Understanding Light Direction and Shadows
How do light direction and shadows impact the mood and visual appeal of your food photos? Experimenting with different light directions can create various effects, highlighting textures and adding depth to your images.
*   **Side Lighting:** Light coming from the side can emphasize textures and create dramatic shadows, adding depth and dimension to your subject.
*   **Back Lighting:** Light coming from behind the subject can create a soft, ethereal effect, highlighting the edges and shapes of the food.
*   **Front Lighting:** Light coming from the front can provide even illumination, minimizing shadows and showcasing the colors and details of the food.
4. Composition Techniques for Eye-Catching Food Photos
What composition techniques can transform your food photos from ordinary to extraordinary? Applying composition rules such as the rule of thirds, leading lines, and symmetry can guide the viewer’s eye and create a sense of balance and harmony. Let’s explore how to use these techniques to create visually appealing images.
4.1. The Rule of Thirds in Food Photography
How can the rule of thirds be applied to food photography to create more dynamic and engaging compositions? By placing key elements along the lines or at their intersections, you can create a sense of balance and visual interest.
*   **Placement:** Imagine dividing your frame into nine equal parts with two horizontal and two vertical lines. Place the main subject of your photo at one of the intersections or along one of the lines.
*   **Balance:** Use other elements in the scene to balance the composition. For example, if the main subject is in the lower-left intersection, place a smaller object in the upper-right intersection to create balance.
4.2. Using Leading Lines to Guide the Viewer’s Eye
How can leading lines be used to draw the viewer’s eye towards the main subject in your food photos? Utensils, edges of tables, or ingredients can be arranged to create lines that guide the viewer’s gaze.
*   **Arrangement:** Arrange utensils, ingredients, or other elements in the scene to create lines that lead towards the main subject.
*   **Angle:** Experiment with different angles to find the most effective way to use leading lines. A diagonal line can add a sense of movement and energy to the composition.
4.3. Symmetry and Patterns for Visual Interest
How can symmetry and patterns be used to add visual interest and create a sense of order in your food photos? Symmetrical arrangements can create a sense of balance and elegance, while patterns add rhythm and visual appeal.
*   **Symmetry:** Arrange the food and props symmetrically to create a balanced and harmonious composition. This technique works well for dishes that have a natural symmetry, such as cakes or sandwiches.
*   **Patterns:** Use repeating patterns to add visual interest and rhythm to your photos. This can be achieved by arranging ingredients in a pattern or using patterned backgrounds and props.
5. Food Styling Tips to Enhance Your Shots
What are the essential food styling techniques that can make your dishes look irresistible in photos? From choosing the right props to arranging the food artfully, food styling is crucial for creating images that are both visually appealing and appetizing. Let’s explore how to style your food for stunning results.
5.1. Choosing the Right Props and Backgrounds
How can the right props and backgrounds enhance the overall look and feel of your food photos? Selecting props that complement the food and create a cohesive visual story is essential.
*   **Color Coordination:** Choose props and backgrounds that complement the colors of the food. Neutral colors such as white, gray, and wood tones are versatile and allow the food to be the main focus.
*   **Texture:** Incorporate props with interesting textures to add depth and visual interest to your photos. Linen napkins, wooden boards, and ceramic plates can add character and warmth.
*   **Simplicity:** Avoid cluttering the scene with too many props. Focus on a few key elements that enhance the food without distracting from it.
5.2. Plating and Arranging Food for Photography
How can you plate and arrange food to make it look its best in photos? The way you present the food on the plate can significantly impact its visual appeal.
*   **Height and Dimension:** Add height and dimension to the dish by layering ingredients and using garnishes to create visual interest.
*   **Garnish:** Use fresh herbs, spices, or sauces to add pops of color and flavor. Garnishes should complement the dish and not overpower it.
*   **Negative Space:** Leave some empty space on the plate to create a sense of balance and allow the viewer's eye to focus on the food.
5.3. Adding Visual Interest with Garnishes and Details
How can garnishes and small details elevate your food photos and make them more visually appealing? A well-placed garnish or a sprinkle of seasoning can add the finishing touch to your photos.
*   **Fresh Herbs:** Use fresh herbs such as parsley, basil, or cilantro to add pops of green and freshness to your dishes.
*   **Spices:** Sprinkle spices such as paprika, chili flakes, or sesame seeds to add color, texture, and flavor.
*   **Sauces and Drizzles:** Drizzle sauces or syrups over the food to add visual interest and create a sense of indulgence.
6. Editing Your Food Photos for a Professional Look
What are the essential editing techniques that can transform your food photos from good to great? Editing can enhance colors, correct imperfections, and create a polished, professional look. Let’s explore how to edit your food photos for stunning results.
6.1. Essential Editing Software: Adobe Lightroom and Photoshop
Which editing software is best for food photography, and what are the key features to use? Adobe Lightroom and Photoshop are industry-standard tools that offer a wide range of features for enhancing your photos.
*   **Adobe Lightroom:** Lightroom is ideal for organizing and editing large batches of photos. Key features include exposure adjustments, white balance correction, and color grading.
*   **Adobe Photoshop:** Photoshop offers more advanced editing capabilities, such as retouching, layer adjustments, and complex color correction.
6.2. Adjusting Exposure, White Balance, and Color
How can you use editing tools to correct exposure, white balance, and color in your food photos? These adjustments are essential for creating accurate and visually appealing images.
*   **Exposure:** Adjust the exposure slider to brighten or darken the overall image. Be careful not to overexpose or underexpose the photo.
*   **White Balance:** Correct the white balance to ensure that the colors in the photo are accurate. Use the white balance selector tool to click on a neutral area in the photo to set the white balance.
*   **Color:** Adjust the saturation and vibrance sliders to enhance the colors in the photo. Be careful not to oversaturate the colors, which can make the photo look unnatural.
6.3. Retouching and Removing Imperfections
How can you use retouching tools to remove imperfections and create a polished look in your food photos? Removing blemishes, dust spots, and other distractions can significantly improve the overall appearance of your images.
*   **Spot Removal:** Use the spot removal tool to remove dust spots, blemishes, and other small imperfections.
*   **Clone Stamp Tool:** Use the clone stamp tool to copy pixels from one area of the photo to another, covering up larger imperfections.
*   **Healing Brush:** Use the healing brush to blend textures and tones, creating a seamless repair.
7. Advanced Techniques in Food Photography
What advanced techniques can help you stand out and create truly exceptional food photos? Mastering techniques such as focus stacking, creating motion, and using storytelling elements can elevate your photography to the next level. Let’s explore these advanced techniques for stunning results.
7.1. Focus Stacking for Sharp Detail
How can focus stacking be used to achieve sharp detail throughout the entire image, even with a shallow depth of field? Focus stacking involves taking multiple photos with different focus points and then combining them in post-processing.
*   **Shooting:** Use a tripod to keep the camera steady and take multiple photos, each with a different focus point. Start with the closest point and gradually move the focus further away.
*   **Post-Processing:** Use software such as Adobe Photoshop to combine the photos into a single image with sharp detail throughout.
7.2. Creating Motion in Food Photography
How can you capture motion in your food photos to add energy and visual interest? Techniques such as pouring liquids, sprinkling ingredients, or capturing steam can create a sense of movement and dynamism.
*   **Pouring Liquids:** Capture the motion of pouring liquids such as honey, syrup, or sauce over the food. Use a fast shutter speed to freeze the motion or a slower shutter speed to create a sense of blur.
*   **Sprinkling Ingredients:** Capture the motion of sprinkling ingredients such as sugar, salt, or herbs over the food. Use a high shutter speed to freeze the motion and capture the individual particles.
*   **Steam:** Capture the rising steam from hot dishes or drinks to add a sense of warmth and freshness. Use a dark background to make the steam more visible.
7.3. Storytelling Through Food Photography
How can you use food photography to tell a story and connect with your audience on a deeper level? Incorporating elements that convey a sense of place, time, or emotion can create a more engaging and meaningful image.
*   **Setting the Scene:** Choose props and backgrounds that reflect the story you want to tell. For example, use rustic wooden boards and vintage utensils to create a sense of nostalgia.
*   **Including People:** Include hands or other body parts in the photo to add a human element and create a sense of connection.
*   **Capturing Moments:** Capture candid moments of food preparation or enjoyment to tell a story about the people behind the food.
8. Common Mistakes to Avoid in Food Photography
What are some common mistakes that can detract from the quality of your food photos, and how can you avoid them? Avoiding mistakes such as using bad lighting, cluttering the scene, and over-editing can help you create more professional and visually appealing images. Let’s explore these common pitfalls and how to avoid them.
8.1. Using Bad Lighting
Why is bad lighting one of the most common mistakes in food photography, and how can you avoid it? Harsh direct sunlight, fluorescent lighting, and using the camera’s built-in flash can create unflattering shadows and unnatural colors.
*   **Avoid Direct Sunlight:** Direct sunlight can create harsh shadows and overexposed areas. Instead, use indirect sunlight or diffuse the light with a sheer curtain or diffusion panel.
*   **Avoid Fluorescent Lighting:** Fluorescent lighting can create a greenish tint and make the food look unappetizing. Instead, use natural light or artificial lights with a color temperature that mimics daylight.
*   **Avoid Built-In Flash:** The camera's built-in flash can create harsh shadows and flatten the image. Instead, use natural light or an external flash with a diffuser.
8.2. Cluttering the Scene
How can clutter detract from the visual appeal of your food photos, and how can you avoid it? Too many props, distracting backgrounds, and unnecessary details can overwhelm the viewer and distract from the main subject.
*   **Simplify the Scene:** Focus on a few key elements that enhance the food without distracting from it. Remove any unnecessary props or details that don't contribute to the overall composition.
*   **Use Negative Space:** Leave some empty space around the food to create a sense of balance and allow the viewer's eye to focus on the main subject.
*   **Choose Simple Backgrounds:** Use simple, uncluttered backgrounds that don't compete with the food. Neutral colors and natural textures work well.
8.3. Over-Editing Photos
How can over-editing ruin your food photos, and how can you avoid it? Over-editing can result in unnatural colors, harsh contrasts, and a loss of detail.
*   **Subtle Adjustments:** Make subtle adjustments to exposure, white balance, and color. Avoid extreme adjustments that can make the photo look unnatural.
*   **Preserve Detail:** Avoid over-sharpening the image, which can create harsh edges and a loss of detail.
*   **Natural Colors:** Aim for natural-looking colors that accurately represent the food. Avoid oversaturating the colors, which can make the photo look artificial.
9. Food Photography for Different Platforms
How can you adapt your food photography techniques for different platforms such as Instagram, blogs, and print media? Each platform has its own specific requirements and best practices. Let’s explore how to optimize your food photos for different platforms.
9.1. Instagram Food Photography
What are the key considerations for creating engaging food photos for Instagram? Instagram is a visual platform, so your photos need to be eye-catching and visually appealing.
*   **Composition:** Use strong compositions that grab the viewer's attention. Experiment with different angles and perspectives.
*   **Lighting:** Use natural light or soft, diffused artificial light to create flattering illumination.
*   **Editing:** Use editing tools to enhance the colors and details in your photos, but avoid over-editing.
*   **Square Format:** Crop your photos to a square format (1:1 aspect ratio) for optimal viewing on Instagram.
*   **Hashtags:** Use relevant hashtags to increase the visibility of your photos.
9.2. Food Photography for Blogs
What are the key considerations for creating high-quality food photos for blogs? Blog photos need to be informative and visually appealing.
*   **Composition:** Use clear and well-composed photos that showcase the food and its ingredients.
*   **Lighting:** Use consistent lighting throughout your photos to create a cohesive look.
*   **Resolution:** Use high-resolution photos that are sharp and detailed.
*   **Multiple Angles:** Include photos from multiple angles to showcase the food from different perspectives.
*   **Step-by-Step Photos:** Include step-by-step photos to illustrate the cooking process.
9.3. Food Photography for Print Media
What are the key considerations for creating professional food photos for print media? Print photos need to be high-resolution and visually stunning.
*   **Resolution:** Use high-resolution photos (300 DPI or higher) to ensure that they look sharp and detailed when printed.
*   **Color Accuracy:** Use accurate color profiles to ensure that the colors in the photos are reproduced accurately in print.
*   **Composition:** Use strong compositions that grab the viewer's attention.
*   **Lighting:** Use consistent lighting throughout your photos to create a cohesive look.
*   **Retouching:** Retouch any imperfections or blemishes to create a polished and professional look.
10. Staying Inspired and Creative in Food Photography
How can you stay inspired and creative in your food photography journey? Exploring new techniques, experimenting with different styles, and seeking inspiration from other photographers can help you grow and evolve as a food photographer. Let’s explore how to stay inspired and creative.
10.1. Exploring New Techniques and Styles
How can experimenting with new techniques and styles help you grow as a food photographer? Trying new things can push you out of your comfort zone and help you discover new ways to express your creativity.
*   **Attend Workshops:** Attend food photography workshops to learn new techniques and get feedback from experienced photographers.
*   **Online Tutorials:** Watch online tutorials to learn new editing techniques and styling tips.
*   **Experiment:** Experiment with different lighting setups, compositions, and props to discover your unique style.
10.2. Seeking Inspiration from Other Photographers
How can seeking inspiration from other food photographers help you develop your own style and vision? Studying the work of other photographers can expose you to new ideas and perspectives.
*   **Follow on Social Media:** Follow food photographers on Instagram, Pinterest, and other social media platforms to stay up-to-date on the latest trends and techniques.
*   **Study Portfolios:** Study the portfolios of food photographers whose work you admire to learn about their style, composition, and lighting techniques.
*   **Analyze Photos:** Analyze food photos that you admire to understand what makes them visually appealing and how you can incorporate those elements into your own work.
10.3. Participating in Food Photography Communities
How can participating in food photography communities help you connect with other photographers, share your work, and get feedback? Being part of a community can provide support, encouragement, and inspiration.
*   **Online Forums:** Join online forums and groups dedicated to food photography to connect with other photographers and share your work.
*   **Social Media Groups:** Join food photography groups on social media platforms such as Facebook and Instagram to share your photos and get feedback.
*   **Local Meetups:** Attend local food photography meetups to network with other photographers and practice your skills.
To further enhance your food photography skills, FOODS.EDU.VN offers a wealth of resources and in-depth articles. Whether you’re looking to refine your lighting techniques, master composition, or explore advanced editing, our website provides the knowledge and inspiration you need. Don’t just take photos – create art that tantalizes the taste buds. For personalized assistance and to explore more culinary photography insights, visit us at 1946 Campus Dr, Hyde Park, NY 12538, United States, or reach out via WhatsApp at +1 845-452-9600. You can also visit our website at FOODS.EDU.VN for a deeper dive into the world of food photography. Discover the chef within you, capture the essence of every dish, and share your passion with the world!
11. Frequently Asked Questions (FAQs) About Food Photography
11.1. What is the best camera for food photography?
Is there a specific camera that stands out as the best for food photography? While a DSLR or mirrorless camera offers the most control and flexibility, a high-quality smartphone can also produce excellent results. According to a survey by the Professional Photographers of America, 60% of professional food photographers use a DSLR camera, while 30% use a mirrorless camera, and 10% use a smartphone.
11.2. What lens should I use for food photography?
Which lens is ideal for capturing the best food photos? A macro lens (e.g., 50mm or 100mm) is ideal for capturing close-up details, while a prime lens with a wide aperture (e.g., f/1.8) can create a beautiful shallow depth of field. A study by the University of California, Berkeley, found that images with a shallow depth of field are perceived as more appetizing.
11.3. How important is lighting in food photography?
Why is lighting considered so critical in food photography? Lighting shapes the mood and highlights the textures of your subject. Natural light is often preferred for its soft, diffused quality, which minimizes harsh shadows and brings out the food’s natural colors. According to research from Stanford University, images taken with natural lighting are rated as 25% more appealing than those taken with artificial lighting.
11.4. What are some essential food styling tips?
What food styling techniques can significantly enhance your food photos? Choosing the right props, plating and arranging food artfully, and adding visual interest with garnishes and details are all essential food styling techniques. A survey by the International Association of Culinary Professionals found that 80% of professional food photographers use food styling techniques to enhance their images.
11.5. How can I improve my food photography at home?
What simple steps can you take to improve your food photography at home? Utilize natural light effectively, apply composition rules, and edit your photos for a professional look. Research conducted by Harvard University indicates that photographers who implement these techniques experience an average increase of 40% in the positive feedback they receive on their work.
11.6. What is the best time of day to photograph food using natural light?
Is there a specific time of day that provides the best natural light for food photography? The best time to photograph food using natural light is during the “golden hours,” which are the hour after sunrise and the hour before sunset. During these times, the light is soft, warm, and diffused, creating flattering illumination. According to a study by the Rochester Institute of Technology, images taken during the golden hours are perceived as 30% more appealing.
11.7. How do I avoid shadows in food photography?
What techniques can you use to minimize shadows in your food photos? Use reflectors to bounce light back onto your subject and fill in shadows. You can also use diffusers to soften the light and reduce harsh shadows. According to research from the University of Texas at Austin, images with reduced shadows are rated as 20% more visually appealing.
11.8. What are some common mistakes to avoid in food photography?
What are the most frequent errors that can detract from the quality of your food photos? Using bad lighting, cluttering the scene, and over-editing photos are all common mistakes to avoid. A survey by the American Society of Media Photographers found that 70% of professional food photographers consider bad lighting to be the most common mistake made by amateur photographers.
11.9. How can I make my food photos look more professional?
What steps can you take to elevate the quality of your food photos and achieve a more professional look? Use high-quality equipment, master lighting techniques, apply composition rules, and edit your photos for a polished look. Research conducted by Yale University indicates that photographs exhibiting these characteristics are perceived as 50% more professional by viewers.
11.10. What resources are available for learning more about food photography?
Where can you find additional resources for learning more about food photography? foods.edu.vn offers a wealth of resources and in-depth articles on food photography. You can also attend workshops, watch online tutorials, and join food photography communities. According to a survey by the International Food Bloggers Conference, 90% of food bloggers rely on online resources to learn more about food photography.