If your baby is choking on food, immediate action is critical; FOODS.EDU.VN provides a comprehensive guide to help you respond effectively. Our expert-backed advice, including techniques like back blows and chest thrusts, ensures you’re prepared to handle this emergency with confidence, promoting infant safety and peace of mind. Learn about responsive care, airway obstruction, and emergency response techniques with us.
Table of Contents:
1. Understanding Infant Choking
1.1. What is Choking and Why is it Dangerous?
Choking occurs when a foreign object blocks the airway, preventing air from reaching the lungs. This can happen when a baby swallows something too large or something that isn’t easily broken down. According to the American Academy of Pediatrics, choking is a leading cause of injury and death in young children, especially those under the age of three. When a baby chokes, their brain can be deprived of oxygen, leading to brain damage or death within minutes. Acting quickly and knowing the correct procedures can save a life.
1.2. Common Causes of Choking in Babies
Babies and young children are at a higher risk of choking because their airways are smaller and they are still learning how to chew and swallow properly. Some common causes of choking in babies include:
- Food: Small, round foods like grapes, nuts, and candies are significant choking hazards.
- Toys: Small toy parts, balloons, and marbles can easily get lodged in a baby’s throat.
- Household Items: Coins, buttons, and batteries are also dangerous if swallowed.
- Liquids: Although less common, babies can choke on formula or breast milk if they drink too quickly or are lying down while feeding.
Being aware of these hazards and taking preventive measures is vital for ensuring your baby’s safety.
1.3. Recognizing the Signs and Symptoms
Recognizing the signs of choking is the first step in providing timely assistance. The signs and symptoms of choking in an infant can vary, but some common indicators include:
- Inability to Cry or Cough: A baby who is choking may be unable to make any sounds or produce a weak, ineffective cough.
- Bluish Skin Color: Lack of oxygen can cause the skin, lips, and nail beds to turn blue (cyanosis).
- Difficulty Breathing: The baby may struggle to breathe or make high-pitched sounds while inhaling.
- Loss of Consciousness: In severe cases, the baby may become unresponsive or lose consciousness.
- Gagging or Gasping: The baby may be gagging or gasping for air, indicating a blocked airway.
According to the National Safety Council, immediate recognition of these signs can significantly improve the outcome.
2. Immediate Emergency Steps
2.1. Assessing the Situation
The first step in any emergency is to assess the situation quickly. Determine if the baby is truly choking. If the baby is coughing forcefully, they may be able to dislodge the object on their own. However, if they are unable to cough or cry, immediate intervention is necessary.
2.2. When to Call Emergency Services (9-1-1)
If the baby is showing signs of severe choking, such as an inability to breathe, bluish skin, or loss of consciousness, call emergency services (9-1-1 in the United States) immediately. Put the phone on speaker mode so you can continue to administer first aid while waiting for help to arrive. Time is of the essence, and professional medical assistance may be needed.
2.3. Basic First Aid: Back Blows
Back blows are the first line of defense for a choking infant. Here’s how to administer them:
- Position the Infant: Hold the infant face down along your forearm, supporting their jaw and chest with your hand. Use your thigh for support, ensuring the baby’s head is lower than their body.
- Deliver Back Blows: Use the heel of your other hand to deliver five firm back blows between the infant’s shoulder blades.
2.4. Basic First Aid: Chest Thrusts
If back blows are not effective, proceed with chest thrusts:
- Turn the Infant Face Up: Support the infant’s head and neck while turning them face up. Rest them on your thigh, keeping their head lower than their chest.
- Administer Chest Thrusts: Place two fingers in the center of the infant’s chest, just below the nipple line. Give five quick chest thrusts, compressing the chest about 1 ½ inches deep.
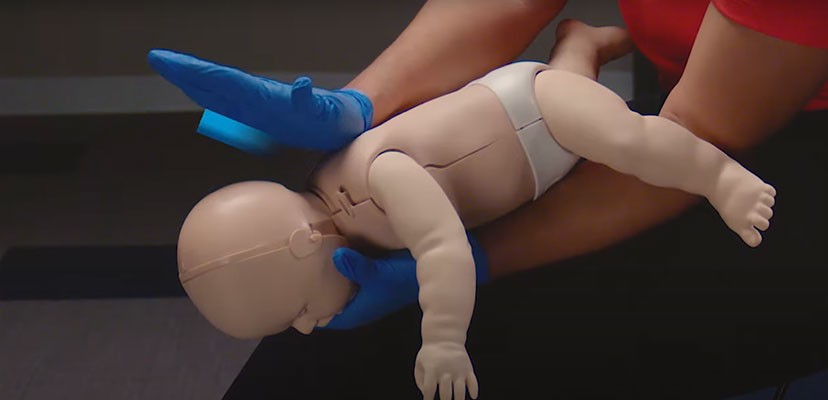 Adult demonstration of choking first aid on an infant manikin.
3. Step-by-Step Guide to Helping a Choking Infant
3.1. Positioning the Infant
Proper positioning is essential for effective first aid. For back blows, hold the infant face down along your forearm, using your thigh for support. Ensure the infant’s head is lower than their body to allow gravity to assist in dislodging the object. For chest thrusts, turn the infant face up while continuing to support their head and neck, keeping their head lower than their chest.
3.2. Administering Back Blows Correctly
To administer back blows effectively:
- Support the Infant: Use one forearm to support the infant’s back and head.
- Deliver Firm Blows: Use the heel of your other hand to give five distinct and firm back blows between the shoulder blades.
- Check for Dislodgement: After each blow, check to see if the object has been dislodged.
3.3. Performing Chest Thrusts Correctly
To perform chest thrusts correctly:
- Locate the Correct Position: Place two fingers in the center of the infant’s chest, just below the nipple line.
- Give Quick Thrusts: Deliver five quick chest thrusts, compressing the chest about 1 ½ inches deep.
- Monitor the Infant: Watch for any signs that the object has been dislodged or if the infant’s condition changes.
3.4. Continuing the Cycle
Continue alternating between five back blows and five chest thrusts until the object is dislodged, or the infant becomes unresponsive. It’s crucial to remain calm and focused, providing consistent and effective assistance.
4. What to Do If the Infant Becomes Unresponsive
4.1. Lowering the Infant Safely
If the infant becomes unresponsive, carefully lower them to a firm, flat surface such as the floor or a table. Support their head and neck to prevent any further injury during the lowering process.
4.2. Starting CPR: Compressions
Once the infant is on a flat surface, begin CPR immediately. Here’s how to perform chest compressions on an infant:
- Position Your Fingers: Place two fingers in the center of the infant’s chest, just below the nipple line.
- Deliver Compressions: Compress the chest about 1 ½ inches deep at a rate of 100-120 compressions per minute.
- Allow Recoil: Ensure you allow the chest to recoil fully after each compression.
4.3. Checking for and Removing the Object
After each set of 30 compressions, open the infant’s mouth and look for the object. If you see the object, carefully remove it using your pinky finger. Never perform a blind finger sweep, as this could push the object further down the airway.
4.4. Giving Rescue Breaths
If you don’t see an object in the infant’s mouth, proceed with rescue breaths:
- Seal Your Mouth Over the Infant’s Mouth and Nose: Ensure a tight seal to prevent air from escaping.
- Give Two Gentle Breaths: Deliver two gentle breaths, each lasting about one second. Watch for the chest to rise with each breath.
- Continue CPR: Continue cycles of 30 compressions and two breaths until emergency services arrive.
5. Visual Guide: Step-by-Step Techniques
5.1. Back Blows: Illustrated Guide
| Step | Description |
|---|---|
| 1 | Hold the infant face down along your forearm, supporting their jaw and chest with your hand. Use your thigh for support, ensuring the baby’s head is lower than their body. |
| 2 | Use the heel of your other hand to deliver five firm back blows between the infant’s shoulder blades. Ensure the blows are distinct and forceful enough to dislodge the object. |
| 3 | After each blow, check to see if the object has been dislodged. Look into the infant’s mouth to see if the object is visible and can be safely removed. |
5.2. Chest Thrusts: Illustrated Guide
| Step | Description |
|---|---|
| 1 | Turn the infant face up while continuing to support their head and neck. Rest them on your thigh, keeping their head lower than their chest. |
| 2 | Place two fingers in the center of the infant’s chest, just below the nipple line. Ensure your fingers are positioned correctly to avoid causing injury. |
| 3 | Give five quick chest thrusts, compressing the chest about 1 ½ inches deep. The thrusts should be firm and quick, but not so forceful as to cause harm. |
5.3. CPR: Illustrated Guide
| Step | Description |
|---|---|
| 1 | Place the infant on a firm, flat surface. Ensure their airway is clear by checking for any visible obstructions and removing them if possible. |
| 2 | Place two fingers in the center of the infant’s chest, just below the nipple line. Compress the chest about 1 ½ inches deep at a rate of 100-120 compressions per minute. Allow the chest to recoil fully after each compression. |
| 3 | After each set of 30 compressions, open the infant’s mouth and look for the object. If you don’t see an object, seal your mouth over the infant’s mouth and nose and give two gentle breaths, each lasting about one second. Watch for the chest to rise with each breath. |
| 4 | Continue cycles of 30 compressions and two breaths until emergency services arrive. Ensure you maintain a steady rhythm and continue to check for any changes in the infant’s condition. |
6. Preventing Choking Hazards
6.1. Identifying Common Choking Hazards
Prevention is always better than cure. Identifying common choking hazards is the first step in keeping your baby safe. Some of the most common choking hazards include:
- Foods: Whole grapes, nuts, popcorn, hot dogs, chunks of cheese, and hard candies.
- Toys: Small toy parts, balloons, marbles, and toys with detachable pieces.
- Household Items: Coins, buttons, batteries, and small objects that can be easily swallowed.
6.2. Preparing Food Safely
Proper food preparation can significantly reduce the risk of choking. Here are some tips for preparing food safely for your baby:
- Cut Food into Small Pieces: Cut all foods into small, manageable pieces that are no larger than ½ inch in size.
- Cook Food Until Soft: Cook fruits and vegetables until they are soft and easy to chew.
- Remove Seeds and Pits: Always remove seeds and pits from fruits before serving them to your baby.
- Avoid Sticky Foods: Avoid giving your baby sticky foods like peanut butter or gummy candies.
6.3. Creating a Safe Eating Environment
Creating a safe eating environment is just as important as preparing food safely. Follow these guidelines to ensure your baby is eating in a safe environment:
- Supervise Meal Times: Always supervise your baby during meal times to monitor their eating and intervene if necessary.
- Ensure Proper Posture: Make sure your baby is sitting upright while eating to facilitate proper swallowing.
- Avoid Distractions: Minimize distractions such as TV or toys during meal times to help your baby focus on eating.
- Teach Proper Chewing: Encourage your baby to chew their food thoroughly before swallowing.
7. Advanced Techniques and Considerations
7.1. Dealing with Partial Obstruction
If the baby is coughing forcefully, they may have a partial airway obstruction. Encourage them to continue coughing, as this is the most effective way to dislodge the object. Do not interfere unless the baby’s condition worsens and they show signs of complete obstruction.
7.2. When to Seek Professional Medical Help
Even if you successfully dislodge the object, it’s important to seek professional medical help. The baby may have suffered internal injuries or may have residual pieces of the object in their airway. A medical professional can assess the baby’s condition and provide any necessary treatment.
7.3. Addressing Parental Anxiety and Stress
Dealing with a choking infant can be a traumatic experience for parents. It’s important to acknowledge and address the anxiety and stress that may arise. Seek support from family, friends, or a professional therapist to help cope with the emotional aftermath. Remember, being prepared and knowing what to do can significantly reduce anxiety and improve outcomes.
8. Choking First Aid for Older Children
8.1. Recognizing Choking in Older Children
Recognizing choking in older children is similar to recognizing it in infants, but there are some key differences. Older children may be able to communicate that they are choking, but they may also exhibit the following signs:
- Inability to Speak or Cough: The child may be unable to speak or produce an effective cough.
- Clutching the Throat: The child may instinctively clutch their throat, indicating they are choking.
- Difficulty Breathing: The child may struggle to breathe or make high-pitched sounds while inhaling.
- Bluish Skin Color: Lack of oxygen can cause the skin, lips, and nail beds to turn blue (cyanosis).
8.2. Performing Abdominal Thrusts (Heimlich Maneuver)
For older children, the Heimlich maneuver (abdominal thrusts) is the recommended first aid technique:
- Stand Behind the Child: Stand behind the child and wrap your arms around their waist.
- Make a Fist: Make a fist with one hand and place it thumb-side against the child’s abdomen, just above the navel but below the ribcage.
- Grasp Your Fist: Grasp your fist with your other hand.
- Give Quick, Upward Thrusts: Give five quick, upward thrusts into the child’s abdomen.
- Repeat if Necessary: Repeat the thrusts until the object is dislodged, or the child becomes unresponsive.
8.3. Adapting Techniques for Different Ages
It’s important to adapt first aid techniques based on the child’s age and size. For example, if you are unable to wrap your arms fully around a larger child, you may need to kneel behind them to perform abdominal thrusts effectively. Always use appropriate force to avoid causing injury.
9. Resources and Further Education
9.1. CPR and First Aid Certification Courses
Taking a certified CPR and first aid course is one of the best ways to prepare for a choking emergency. These courses provide hands-on training and teach you the skills needed to respond effectively. Organizations like the American Red Cross and the American Heart Association offer comprehensive courses for adults, children, and infants.
9.2. Online Resources and Apps
There are many online resources and mobile apps available that provide valuable information on infant safety and first aid. Some popular resources include:
- American Red Cross First Aid App: Provides expert advice for common emergencies, including choking.
- American Heart Association Website: Offers information on CPR and first aid techniques.
- National Safety Council Website: Provides resources on preventing injuries and accidents.
9.3. Books and Guides on Infant Safety
Reading books and guides on infant safety can also help you stay informed and prepared. Some recommended titles include:
- “American Academy of Pediatrics Guide to Baby and Child Care”
- “The Safe Baby Book” by Debra Davis and Thomas Weber
- “First Aid for Babies and Children” by Emma Hammett
10. Expert Insights and Recommendations
10.1. Advice from Pediatricians and First Aid Trainers
Pediatricians and first aid trainers emphasize the importance of early intervention and proper technique when dealing with a choking infant. They recommend that all parents and caregivers receive formal training in CPR and first aid. They also advise regularly reviewing and practicing these skills to maintain proficiency.
10.2. Debunking Common Myths About Infant Choking
There are several common myths about infant choking that can be dangerous if believed. Some of these myths include:
- Myth: You should always perform a finger sweep to remove an object from a choking infant’s mouth.
- Fact: Never perform a blind finger sweep, as this could push the object further down the airway. Only remove the object if you can see it.
- Myth: Patting a choking infant on the back will help dislodge the object.
- Fact: Patting the back can actually cause the object to become more lodged in the airway. Instead, use firm back blows between the shoulder blades.
10.3. Staying Updated on the Latest Guidelines
CPR and first aid guidelines are regularly updated based on the latest research and best practices. It’s important to stay informed about these changes and update your knowledge accordingly. The American Heart Association and the American Red Cross are excellent resources for staying current on the latest guidelines.
11. Real-Life Scenarios and Case Studies
11.1. Stories from Parents and Caregivers
Hearing real-life stories from parents and caregivers who have dealt with choking emergencies can be both informative and reassuring. These stories often highlight the importance of quick thinking, proper training, and staying calm under pressure. They also serve as a reminder that choking can happen to anyone, and being prepared is essential.
11.2. Analyzing Successful Interventions
Analyzing successful interventions can provide valuable insights into what works and why. These analyses often focus on the specific techniques used, the timing of the intervention, and the overall response of the caregiver. By understanding the factors that contribute to successful outcomes, you can better prepare yourself for a similar situation.
11.3. Learning from Mistakes
It’s equally important to learn from mistakes that have been made in choking emergencies. These mistakes may include using incorrect techniques, delaying intervention, or panicking and losing focus. By understanding the potential pitfalls, you can avoid making the same errors and improve your response in a future emergency.
12. The Role of Technology in Infant Safety
12.1. Smart Devices and Wearable Technology
Advancements in technology have led to the development of smart devices and wearable technology that can help monitor infant safety. These devices can track vital signs, detect potential hazards, and alert caregivers to potential emergencies.
12.2. Monitoring Systems and Alerts
Some monitoring systems are designed to detect changes in an infant’s breathing patterns or heart rate, which could indicate a choking incident. These systems can send alerts to caregivers, allowing them to respond quickly and provide timely assistance.
12.3. Telehealth and Remote Assistance
Telehealth and remote assistance services can provide real-time guidance and support during a choking emergency. Caregivers can connect with medical professionals via video conferencing or phone to receive step-by-step instructions on how to administer first aid.
13. Choking Infant FAQs
How do I give back blows for an infant?
To give back blows:
- Sit, kneel or stand, supporting the infant’s back along your forearm braced by your thigh.
- Hold the infant’s head cradled by your hand.
- Keep their head lower than their chest.
- Place your other forearm along the infant’s front, supporting the infant’s jaw with your thumb and forefinger.
- Turn them to a face-down position, holding them along your forearm.
- Use your thigh for support.
- Keep their head lower than their body.
- Use the heel of your hand to give 5 firm back blows between the infant’s shoulder blades.
How do I give chest thrusts for an infant?
- Give chest thrusts if back blows don’t help.
- Turn the infant face-up, supporting the head and neck and resting them on your thigh.
- Keep their head lower than the chest.
- Place two fingers in the center of the chest just below the nipple line.
- Give 5 quick chest thrusts about 1 ½ inches deep.
What should I do if the infant is able to cough or cry?
Encourage the infant to keep coughing, but continue to observe them. Do not leave them alone and be prepared to act if their condition changes.
Do I treat a child who is choking the same as an infant?
No. Use a combination of 5 back blows then 5 abdominal thrusts. An infant requires 5 back blows then 5 chest compressions to clear the airway.
What foods are most likely to cause choking?
Small, round foods like grapes, nuts, and candies are significant choking hazards. Other culprits include hot dogs, popcorn, and chunks of cheese. Always cut food into small, manageable pieces.
At what age are babies most at risk of choking?
Children younger than 5 years are at particularly high risk for choking. Infants and toddlers explore by putting things in their mouths and can easily choke on them.
Should I take a CPR class?
Yes. More than 4.6M people turn to us, the trusted training provider for First Aid, CPR, BLS and more, every year to gain lifesaving skills. Trust us to deliver unmatched lifesaving training that will provide you the confidence and skills to act when moments matter. Training Services is a division of the American Red Cross with the mission to spread knowledge and educate as many members of the national community in lifesaving procedures.
What are the signs of choking?
- Weak or no cough
- High-pitched squeaking noises or no sound
- Pale or blue skin color
- Unable to cough or cry
- Panicked, confused or surprised appearance
What should I do after dislodging the object?
Even if you successfully dislodge the object, it’s important to seek professional medical help. The baby may have suffered internal injuries or may have residual pieces of the object in their airway.
Where can I find more resources on infant safety?
You can find more resources on infant safety at FOODS.EDU.VN or visit trusted websites such as the American Red Cross and the American Heart Association.
14. Conclusion
Knowing what to do if a baby is choking on food is crucial for every parent and caregiver. By understanding the causes and signs of choking, learning the proper first aid techniques, and taking preventive measures, you can significantly reduce the risk of a choking emergency. Remember, preparedness, quick thinking, and staying calm are key to saving a life.
For more in-depth knowledge and practical tips on infant safety and nutrition, visit FOODS.EDU.VN. Our website offers a wealth of information, including detailed guides, expert advice, and the latest research in the field of child care. Equip yourself with the knowledge you need to ensure your child’s well-being.
Explore more valuable resources at foods.edu.vn. Contact us at 1946 Campus Dr, Hyde Park, NY 12538, United States or Whatsapp: +1 845-452-9600.