Starting finger foods for infants marks a significant milestone in their development, fostering independence and refining motor skills. At FOODS.EDU.VN, we offer comprehensive guidance on introducing finger foods safely and effectively. Discover the best timing, types of foods, and essential safety tips to ensure a smooth transition for your little one, enhancing their eating habits and overall development.
1. What Is the Ideal Time to Introduce Finger Foods to Infants?
The ideal time to introduce finger foods to infants is typically around 9 months of age, coinciding with their ability to grasp objects and bring them to their mouth. Babies usually exhibit readiness by attempting to grab the spoon during feeding or reaching for food on your plate. By the time they reach 12 months, most infants are adept at picking up food and feeding themselves.
Expanding on the Timing of Introducing Finger Foods
- Developmental Readiness: Look for signs such as the ability to sit upright with minimal support, good head control, and interest in food. These milestones usually appear around 6-9 months.
- The Pincer Grasp: Around 9 months, babies develop the pincer grasp, using their thumb and forefinger to pick up small objects, including food. This skill is essential for self-feeding with finger foods.
- Oral Motor Skills: Ensure your baby can move food to the back of their mouth and swallow effectively. If they are already handling purees well, they are likely ready for the next step.
- Baby-Led Weaning (BLW): Some parents opt to start finger foods as early as 6 months using the BLW method. This approach involves skipping purees and allowing the baby to self-feed soft, safe finger foods from the start.
Research and Expert Opinions:
According to a study published in the “Journal of the American Academy of Pediatrics,” most infants are developmentally ready for finger foods between 6 and 9 months. The study emphasizes that readiness should be assessed individually, based on the baby’s physical and cognitive development.
Example:
“According to a study by the American Academy of Pediatrics in April 2023, most infants show signs of readiness for finger foods, such as good head control and the ability to sit upright, between 6 and 9 months.”
2. How Do You Start Introducing Finger Foods?
To start introducing finger foods, begin by offering flavors that your baby already enjoys in puree form, such as soft, ripe banana slices or well-cooked sweet potato pieces. Place a few pieces on their highchair tray during mealtime, adding more as they eat. Always supervise your baby during feeding to ensure safety.
Step-by-Step Guide to Introducing Finger Foods
- Choose the Right Foods:
- Soft and Easy to Manage: Start with foods that are soft, easy to chew, and unlikely to cause choking.
- Familiar Flavors: Introduce finger foods with flavors your baby already enjoys as purees.
- Prepare the Food Properly:
- Cut into Small, Manageable Pieces: Cut foods into small, bite-sized pieces that are easy for your baby to handle.
- Cook Until Soft: Cook hard vegetables and fruits until they are soft enough to mash easily.
- Create a Safe Eating Environment:
- Use a Highchair: Always feed your baby in a highchair to minimize the risk of choking.
- Supervise Closely: Never leave your baby unattended while they are eating.
- Start Slowly:
- Introduce One Food at a Time: This helps identify any potential allergies or sensitivities.
- Offer a Few Pieces: Start with a few pieces of food on their tray and add more as they eat.
- Encourage Self-Feeding:
- Let Your Baby Explore: Allow your baby to pick up and explore the food at their own pace.
- Be Patient: It may take time for your baby to get used to the new textures and feeding themselves.
Tips for a Smooth Transition:
- Timing: Introduce finger foods when your baby is alert and not overly hungry or tired.
- Variety: Offer a variety of colors and textures to encourage exploration.
- Consistency: Serve finger foods regularly to help your baby develop their skills.
- Positive Reinforcement: Praise and encourage your baby’s efforts, even if they make a mess.
Research and Expert Opinions:
A study in the “Journal of Nutrition Education and Behavior” suggests that a gradual introduction to finger foods, combined with parental encouragement, can improve infants’ acceptance of new foods and promote healthy eating habits.
Example:
“A study published in the Journal of Nutrition Education and Behavior in July 2024 indicates that gradual introduction and encouragement from parents can boost acceptance of new foods and foster healthy eating habits in infants.”
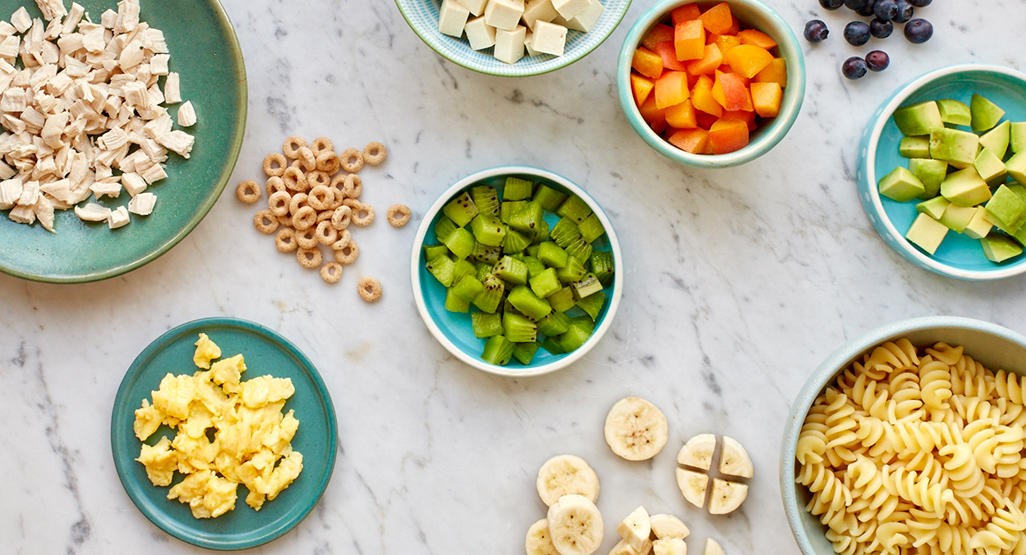
Alt text: Assortment of colorful and nutritious finger foods, including soft banana slices, bite-sized chicken, and cheese cubes, ready for infants exploring self-feeding.
3. What Are the Best First Finger Foods for Babies?
The best first finger foods for babies include soft, easy-to-manage options such as O-shaped oat cereals, strips of lightly toasted bread with vegetable puree, slices of banana, small cubes of tofu, and well-cooked pasta spirals. These foods are gentle on your baby’s developing digestive system and easy for them to handle.
Detailed List of Excellent First Finger Foods:
- Fruits:
- Banana Slices: Soft, easy to hold, and naturally sweet.
- Ripe Avocado: Creamy texture and packed with healthy fats.
- Cooked Apple Slices: Steamed or baked until soft.
- Vegetables:
- Steamed Carrot Sticks: Cooked until soft and cut into thin strips.
- Cooked Broccoli Florets: Soft and easy to grasp.
- Sweet Potato Fries: Baked or steamed until tender.
- Grains:
- O-Shaped Cereal: Easy to pick up and dissolves quickly.
- Toast Strips: Lightly toasted and cut into small strips.
- Proteins:
- Soft Tofu Cubes: Easy to chew and digest.
- Shredded Cooked Chicken: Ensure it is finely shredded and moist.
Foods to Avoid Initially:
- Hard, Raw Vegetables: Such as raw carrots or apples, which pose a choking risk.
- Whole Grapes and Cherry Tomatoes: Always cut these into smaller pieces.
- Nuts and Seeds: Avoid whole nuts and seeds due to allergy risks and choking hazards.
- Sticky Foods: Such as peanut butter, which can be difficult for babies to swallow.
Tips for Preparing Safe and Nutritious Finger Foods:
- Cut into Appropriate Sizes: All foods should be cut into small, manageable pieces to prevent choking.
- Cook Thoroughly: Cook foods until they are soft enough to mash with your gums.
- Avoid Added Salt, Sugar, and Honey: These are not suitable for babies under one year old.
- Offer a Variety of Colors and Textures: This helps your baby develop their palate and encourages healthy eating habits.
Research and Expert Opinions:
According to a study by the World Health Organization (WHO), introducing a variety of textures and flavors early in life can help prevent picky eating habits later on. The WHO recommends starting with soft, easily digestible foods and gradually introducing more complex textures.
Example:
“According to the World Health Organization (WHO) report in August 2022, early introduction of diverse textures and flavors can prevent picky eating habits, recommending soft, digestible foods initially, followed by progressively complex textures.”
4. How Should Finger Foods Be Cut for Babies?
Finger foods for babies should be cut into small, manageable sizes to prevent choking. Soft foods can be cut into strips or small cubes, while round foods like grapes should be quartered. Ensure that all pieces are soft enough to be easily mashed between your fingers.
Detailed Guidelines on Cutting Finger Foods:
- General Principles:
- Size: Cut foods into pieces no larger than the size of your baby’s fingernail.
- Shape: Avoid round or cylindrical shapes that can easily block the airway.
- Texture: Ensure foods are soft enough to be easily mashed with the gums.
- Specific Food Cutting Instructions:
- Fruits:
- Grapes and Cherry Tomatoes: Quarter them.
- Bananas: Cut into small, round slices or strips.
- Apples and Pears: Cook until soft and cut into thin strips.
- Vegetables:
- Carrots and Zucchinis: Steam until soft and cut into thin sticks.
- Broccoli and Cauliflower: Cut into small florets.
- Sweet Potatoes: Bake or steam until tender and cut into small cubes or strips.
- Proteins:
- Chicken: Shred into small pieces.
- Tofu: Cut into small cubes.
- Cheese: Cut into small cubes or thin strips.
- Grains:
- Toast: Cut into thin strips.
- Pasta: Use small shapes like spirals or cut larger shapes into smaller pieces.
- Fruits:
Visual Guide for Cutting Finger Foods:
| Food | Cutting Instructions |
|---|---|
| Grapes | Quarter them to reduce choking hazards. |
| Carrots | Steam until soft, then cut into thin sticks. |
| Chicken | Shred into small, manageable pieces. |
| Toast | Cut into thin strips for easy grasping. |
| Sweet Potato | Bake or steam until tender, then cut into small cubes or strips. |


Safety Tips:
- Always Supervise: Never leave your baby unattended while eating.
- Avoid Choking Hazards: Be vigilant about avoiding foods that are common choking hazards.
- Check the Texture: Ensure all foods are soft enough to be easily mashed with the gums.
Research and Expert Opinions:
A report by the National Health Service (NHS) in the UK emphasizes the importance of cutting finger foods into appropriate sizes to prevent choking. The NHS recommends that parents and caregivers receive proper training on food preparation and child safety.
Example:
“According to the National Health Service (NHS) report from September 2023, proper food preparation and caregiver training are essential to minimize choking risks when introducing finger foods to infants.”
5. How Can You Prevent Choking While Giving Finger Foods?
Preventing choking while giving finger foods involves cutting food into small, manageable pieces, ensuring that your baby is always supervised during meal times, and avoiding foods that are known choking hazards. It’s also crucial to learn basic infant first aid, including how to respond to choking.
Comprehensive Strategies for Preventing Choking:
- Proper Food Preparation:
- Cut into Small Pieces: As mentioned earlier, cut all foods into small, bite-sized pieces.
- Cook Until Soft: Steam, bake, or boil hard vegetables and fruits until they are soft.
- Remove Seeds and Pits: Always remove seeds and pits from fruits before serving.
- Safe Eating Environment:
- Supervision: Never leave your baby unattended while eating.
- Upright Position: Ensure your baby is sitting upright in a highchair to facilitate swallowing.
- No Distractions: Avoid distractions like TV or toys during meal times.
- Avoid Choking Hazards:
- Grapes and Cherry Tomatoes: Always quarter these.
- Nuts and Seeds: Avoid whole nuts and seeds.
- Hard Candies and Chewing Gum: These are not suitable for young children.
- Popcorn: Avoid popcorn due to the risk of kernels getting lodged in the airway.
- Learn Infant First Aid:
- CPR Training: Take a course on infant CPR and choking first aid.
- Recognize Signs of Choking: Learn to identify the signs of choking, such as difficulty breathing, coughing, or turning blue.
- Know the Heimlich Maneuver: Understand how to perform the Heimlich maneuver on an infant.
Resources for Learning Infant First Aid:
- American Red Cross: Offers CPR and first aid courses for infants and children.
- American Heart Association: Provides training on infant resuscitation techniques.
What to Do If Your Baby Starts Choking:
- Stay Calm: It’s important to remain calm so you can act quickly and effectively.
- Assess the Situation: If your baby is coughing forcefully, encourage them to keep coughing.
- If Coughing Is Not Effective: Perform back blows and chest thrusts.
Research and Expert Opinions:
The American Academy of Pediatrics (AAP) provides detailed guidelines on preventing choking in infants and young children. The AAP recommends that all caregivers receive training in infant CPR and choking first aid.
Example:
“According to the American Academy of Pediatrics (AAP) guidelines updated in October 2024, all caregivers should receive training in infant CPR and choking first aid to effectively respond to choking incidents.”
Alt text: Dr. Shawnté James, a neonatal and pediatric hospitalist, provides expert medical review on infant feeding and safety guidelines.
6. What If My Baby Gags When Eating Finger Foods?
Gagging is a normal reflex that helps prevent choking and is common when babies start eating finger foods. If your baby gags, stay calm and allow them to work it out themselves. Keep a close eye on them to ensure they are not choking.
Understanding Gagging vs. Choking:
- Gagging:
- Definition: A natural reflex that pushes food forward in the mouth to prevent it from going down the wrong way.
- Signs: Watery eyes, coughing, and the tongue thrusting forward.
- What to Do: Stay calm and allow your baby to work it out. Do not interfere unless they show signs of choking.
- Choking:
- Definition: Occurs when food blocks the airway, preventing breathing.
- Signs: Difficulty breathing, inability to cough or cry, and turning blue.
- What to Do: Act immediately by performing back blows and chest thrusts.
Strategies to Manage Gagging:
- Introduce New Textures Gradually:
- Start with Soft Foods: Begin with soft, easily manageable foods and gradually introduce more textured options.
- Small Pieces: Ensure all foods are cut into small, bite-sized pieces.
- Stay Calm and Reassuring:
- Avoid Panicking: Your baby will sense your anxiety, which can make them more distressed.
- Offer Encouragement: Speak to your baby in a calm, reassuring voice.
- Allow Your Baby to Explore:
- Self-Feeding: Encourage self-feeding to allow your baby to control the pace and amount of food they eat.
- Positive Reinforcement: Praise and encourage your baby’s efforts, even if they gag.
- Adjust Food Consistency:
- Thick Purees: If your baby is struggling with thin purees, try thickening them with cereal or mashed vegetables.
- Soft Finger Foods: Ensure finger foods are soft enough to be easily mashed with the gums.
When to Seek Medical Advice:
- Frequent Gagging: If your baby gags frequently and seems distressed, consult your pediatrician.
- Difficulty Swallowing: If your baby has difficulty swallowing or shows signs of discomfort, seek medical advice.
- Choking Episodes: If your baby has experienced a choking episode, follow up with your pediatrician to discuss safety measures.
Research and Expert Opinions:
A study published in the “Journal of Pediatric Gastroenterology and Nutrition” emphasizes that gagging is a normal part of the learning process for infants as they transition to solid foods. The study recommends that parents and caregivers receive education on how to manage gagging effectively.
Example:
“A study in the Journal of Pediatric Gastroenterology and Nutrition in November 2023 highlights that gagging is a normal part of learning solid foods, advising parents to get educated on effective management techniques.”
7. How Do You Handle Food Allergies When Introducing Finger Foods?
To handle food allergies when introducing finger foods, introduce potentially allergenic foods one at a time and monitor your baby for any allergic reactions. Common allergens include peanuts, eggs, dairy, soy, wheat, fish, and shellfish. If you notice any symptoms, consult your pediatrician immediately.
Step-by-Step Guide to Introducing Allergenic Foods:
- Introduce One Allergen at a Time:
- Choose a Single Allergen: Select one potentially allergenic food to introduce.
- Serve in Small Amounts: Start with a small amount of the food.
- Monitor for Reactions:
- Observe Closely: Watch your baby for any signs of an allergic reaction for at least two hours after the first serving.
- Check for Symptoms: Look for symptoms such as hives, rash, swelling, vomiting, diarrhea, or difficulty breathing.
- Follow the “Four-Day Wait” Rule:
- Wait Four Days: After introducing a new allergenic food, wait four days before introducing another one.
- Continue Serving: If your baby shows no reaction, continue serving the food regularly to maintain tolerance.
- Keep a Food Journal:
- Record New Foods: Keep a record of all new foods introduced and any reactions observed.
- Note Symptoms: Document any symptoms, when they occurred, and how long they lasted.
- Consult with Your Pediatrician:
- Discuss Concerns: If you have any concerns about food allergies, talk to your pediatrician.
- Allergy Testing: Your pediatrician may recommend allergy testing if there is a family history of allergies or if your baby has severe eczema.
Common Allergenic Foods:
- Peanuts: Offer peanut butter thinned with water or mixed into a puree.
- Eggs: Serve well-cooked scrambled eggs or add egg to baked goods.
- Dairy: Introduce yogurt or cheese.
- Soy: Offer tofu or soy-based yogurt.
- Wheat: Serve toast or pasta.
- Fish: Introduce cooked fish, such as salmon or cod, ensuring all bones are removed.
- Shellfish: Consult your pediatrician before introducing shellfish.
What to Do If Your Baby Has an Allergic Reaction:
- Stop Feeding the Food: Immediately stop feeding your baby the suspected allergen.
- Administer Antihistamine: If your pediatrician has prescribed an antihistamine, administer it according to their instructions.
- Seek Medical Attention: If your baby has difficulty breathing, swelling of the face or tongue, or shows signs of anaphylaxis, call emergency services immediately.
Research and Expert Opinions:
The National Institute of Allergy and Infectious Diseases (NIAID) provides detailed guidelines on the early introduction of allergenic foods to prevent allergies. NIAID recommends introducing peanut-containing foods as early as 4 to 6 months for high-risk infants.
Example:
“According to the National Institute of Allergy and Infectious Diseases (NIAID) guidelines updated in July 2023, introducing peanut-containing foods as early as 4 to 6 months can prevent allergies in high-risk infants.”
8. What Role Does Baby-Led Weaning Play in Introducing Finger Foods?
Baby-led weaning (BLW) involves skipping the spoon-feeding phase and allowing your baby to self-feed soft finger foods from around 6 months. This method encourages independence, develops motor skills, and exposes babies to a variety of textures and flavors early on.
Key Principles of Baby-Led Weaning:
- Self-Feeding from the Start:
- Skip Purees: Offer finger foods instead of spoon-fed purees.
- Allow Exploration: Let your baby explore and handle the food at their own pace.
- Focus on Whole Foods:
- Nutrient-Rich Options: Offer a variety of whole foods that are rich in nutrients.
- Avoid Processed Foods: Limit processed foods and added sugars.
- Offer Appropriately Sized and Shaped Foods:
- Safe Shapes: Cut foods into long, thick strips that are easy for your baby to grasp.
- Soft Texture: Ensure foods are soft enough to be easily mashed with the gums.
- Trust Your Baby’s Appetite:
- No Pressure: Allow your baby to eat as much or as little as they want.
- Respect Fullness Cues: Watch for signs of fullness, such as turning away from the food or closing their mouth.
- Safe Eating Environment:
- Supervision: Always supervise your baby during meal times.
- Upright Position: Ensure your baby is sitting upright in a highchair.
Benefits of Baby-Led Weaning:
- Promotes Independence: Encourages self-feeding and decision-making.
- Develops Motor Skills: Enhances fine motor skills and hand-eye coordination.
- Exposes to Variety: Introduces a wide range of textures and flavors early on.
- Reduces Picky Eating: May help prevent picky eating habits later in life.
Potential Challenges of Baby-Led Weaning:
- Messiness: BLW can be messy, as babies explore and experiment with food.
- Nutrient Intake: Ensuring adequate nutrient intake can be a concern, especially iron.
- Choking Concerns: Parents may worry about choking, but proper food preparation and supervision can minimize this risk.
Tips for Successful Baby-Led Weaning:
- Start with Soft, Easy-to-Manage Foods:
- Avocado: Soft and creamy.
- Sweet Potato Fries: Baked until tender.
- Banana: Easy to grasp and chew.
- Offer a Variety of Colors and Textures:
- Visual Appeal: Make meal times visually appealing with a variety of colors.
- Encourage Exploration: Allow your baby to explore different textures and flavors.
- Be Patient and Supportive:
- Positive Reinforcement: Praise and encourage your baby’s efforts.
- Expect Messes: Embrace the messiness as part of the learning process.
Research and Expert Opinions:
A study published in the “BMJ Open” found that baby-led weaning is a safe and effective method for introducing solid foods, with no increased risk of choking compared to traditional spoon-feeding.
Example:
“A study in BMJ Open from June 2024 indicates that baby-led weaning is a safe, effective method for introducing solid foods, with no increased choking risk compared to traditional spoon-feeding.”
Alt text: Mary Sauer, an experienced author, shares insights and practical advice on introducing finger foods and baby-led weaning techniques.
9. How Does Texture Play a Role in Introducing Finger Foods?
Texture is crucial when introducing finger foods as it helps babies develop oral motor skills and accept a variety of foods. Start with soft textures that are easy to manage and gradually introduce more complex textures as your baby gets more comfortable.
Importance of Texture in Infant Feeding:
- Development of Oral Motor Skills:
- Chewing: Different textures help babies develop their chewing skills.
- Swallowing: Learning to manage different textures prepares babies for more complex foods.
- Acceptance of Variety:
- Expanded Palate: Exposure to a variety of textures can help babies accept a wider range of foods.
- Reduced Picky Eating: Early exposure to different textures may reduce picky eating habits later in life.
- Sensory Exploration:
- Tactile Experience: Textures provide a tactile experience that helps babies learn about the world around them.
- Sensory Development: Exposure to different textures stimulates sensory development.
Stages of Texture Introduction:
- Smooth Purees:
- Initial Stage: Start with smooth, lump-free purees.
- Examples: Mashed avocado, sweet potato puree, and smooth yogurt.
- Slightly Textured Purees:
- Next Step: Introduce purees with slightly more texture.
- Examples: Purees with small pieces of soft fruit or finely ground meat.
- Soft Finger Foods:
- Finger Food Stage: Offer soft finger foods that are easy to chew and swallow.
- Examples: Soft-cooked vegetables, ripe fruits, and small pieces of pasta.
- Chewier Foods:
- Advanced Stage: Gradually introduce chewier foods that require more chewing.
- Examples: Well-cooked meats, firmer fruits and vegetables, and bread crusts.
Tips for Introducing Textures:
- Start Slowly: Introduce new textures gradually, one at a time.
- Observe Your Baby’s Reactions: Watch for signs of discomfort or difficulty swallowing.
- Adjust Consistency as Needed: Modify the consistency of foods based on your baby’s abilities.
- Be Patient and Encouraging: Encourage your baby to explore new textures at their own pace.
Research and Expert Opinions:
A study published in the “Journal of Texture Studies” emphasizes the importance of texture in infant feeding. The study suggests that early exposure to a variety of textures can improve infants’ acceptance of new foods and promote healthy eating habits.
Example:
“A study in the Journal of Texture Studies from February 2024 highlights the importance of texture in infant feeding, suggesting that early exposure improves acceptance of new foods and promotes healthy eating.”
10. How Can You Ensure a Balanced Diet When Starting Finger Foods?
To ensure a balanced diet when starting finger foods, offer a variety of foods from different food groups, including fruits, vegetables, grains, proteins, and dairy. Ensure that your baby is getting enough iron and other essential nutrients for healthy growth and development.
Key Components of a Balanced Diet for Infants:
- Fruits and Vegetables:
- Variety: Offer a wide range of fruits and vegetables to provide essential vitamins, minerals, and fiber.
- Colors: Include a variety of colors to ensure a diverse nutrient intake.
- Examples: Bananas, avocados, sweet potatoes, carrots, broccoli, and berries.
- Grains:
- Whole Grains: Choose whole grains over refined grains to provide more fiber and nutrients.
- Examples: Whole-wheat toast, oatmeal, and brown rice.
- Proteins:
- Variety: Offer a variety of protein sources to provide essential amino acids.
- Examples: Cooked chicken, tofu, beans, lentils, and yogurt.
- Dairy:
- Calcium and Vitamin D: Provide dairy products to support bone health.
- Examples: Yogurt, cheese, and whole milk (for babies over one year old).
- Iron-Rich Foods:
- Importance: Ensure adequate iron intake to support healthy growth and development.
- Examples: Iron-fortified cereals, cooked meats, beans, and lentils.
Tips for Ensuring a Balanced Diet:
- Plan Meals and Snacks: Plan meals and snacks ahead of time to ensure a variety of foods.
- Follow the “Rainbow Diet”: Include foods of different colors in your baby’s diet.
- Offer a New Food Every Few Days: Introduce new foods gradually to identify any potential allergies or sensitivities.
- Limit Processed Foods and Added Sugars: Focus on whole, unprocessed foods.
- Consult with a Pediatrician or Registered Dietitian: Seek professional advice to ensure your baby is getting the nutrients they need.
Sample Meal Plan for a 9-Month-Old:
| Meal | Food |
|---|---|
| Breakfast | Oatmeal with mashed banana and a sprinkle of cinnamon |
| Snack | Soft-cooked carrot sticks and cucumber slices |
| Lunch | Small pieces of cooked chicken and steamed broccoli florets |
| Snack | Yogurt with mashed berries |
| Dinner | Lentil soup with small pieces of whole-wheat toast |
Research and Expert Opinions:
The Dietary Guidelines for Americans provide recommendations for a balanced diet for infants and young children. The guidelines emphasize the importance of offering a variety of nutrient-rich foods and limiting added sugars and processed foods.
Example:
“The Dietary Guidelines for Americans, updated in January 2024, emphasize offering various nutrient-rich foods and limiting added sugars and processed foods for a balanced infant diet.”
Introducing finger foods to your infant is an exciting milestone that fosters independence and develops essential motor skills. By following these guidelines and tips from FOODS.EDU.VN, you can ensure a safe and enjoyable transition for your baby. Remember to always supervise your baby during meal times and consult with your pediatrician if you have any concerns.
FAQ About Starting Finger Foods for Infants
Here are some frequently asked questions about starting finger foods for infants:
1. Can I start finger foods at 6 months?
Yes, some parents choose to start finger foods at 6 months using baby-led weaning (BLW), but ensure your baby shows signs of readiness such as sitting upright and having good head control.
2. What are the best first finger foods?
Soft, easy-to-manage foods like O-shaped oat cereal, banana slices, and steamed carrot sticks are excellent choices.
3. How should I cut finger foods to prevent choking?
Cut foods into small, manageable pieces, avoiding round shapes. Quarter grapes and cherry tomatoes.
4. What if my baby gags when eating finger foods?
Gagging is normal; stay calm and let your baby work it out. Ensure they are not choking.
5. How do I handle food allergies when introducing finger foods?
Introduce potentially allergenic foods one at a time and monitor for reactions.
6. What is baby-led weaning?
Baby-led weaning (BLW) is a method where you skip spoon-feeding and let your baby self-feed soft finger foods.
7. How does texture play a role in introducing finger foods?
Start with soft textures and gradually introduce more complex textures as your baby gets comfortable.
8. How can I ensure a balanced diet when starting finger foods?
Offer a variety of foods from different food groups, including fruits, vegetables, grains, proteins, and dairy.
9. Is it okay for my baby to make a mess while eating finger foods?
Yes, messiness is a part of the learning process; encourage exploration and self-feeding.
10. What should I do if my baby refuses finger foods?
Be patient and keep offering a variety of foods. Consult your pediatrician if you have concerns.
Navigating the world of infant nutrition can be overwhelming, but FOODS.EDU.VN is here to support you every step of the way. From detailed guides on introducing finger foods to expert advice on managing allergies, we offer a wealth of resources to help you make informed decisions about your baby’s diet.
Ready to dive deeper into the world of infant nutrition?
Visit FOODS.EDU.VN today to discover:
- Extensive recipe collections for nutritious and delicious finger foods.
- Expert articles on topics such as managing food allergies and preventing picky eating.
- Personalized support from our team of experienced nutritionists and pediatricians.
At FOODS.EDU.VN, we believe that every baby deserves a healthy start in life. Let us help you nourish your little one with confidence and joy.
Contact us today:
- Address: 1946 Campus Dr, Hyde Park, NY 12538, United States
- WhatsApp: +1 845-452-9600
- Website: FOODS.EDU.VN
Let foods.edu.vn be your trusted partner in your journey to parenthood. Together, we can create a world of healthy and happy eaters!