Is burnt-on food clinging stubbornly to your favorite pan? FOODS.EDU.VN offers simple solutions for effortless cleanup and restoring your cookware. Discover proven methods for removing even the most stubborn, scorched food residue, ensuring your pans are ready for the next culinary creation and explore helpful guides.
1. Understanding the Science of Burnt Food Removal
Why does food stubbornly adhere to your pans, and what makes removing it such a chore? According to Harold McGee’s “On Food and Cooking,” the Maillard reaction, responsible for the delicious browning of food, can also lead to the formation of tough, polymerized compounds that firmly bond to the pan’s surface. Understanding this chemistry is the first step in finding effective removal methods, as explained further on FOODS.EDU.VN.
1.1. The Maillard Reaction and Its Impact on Pans
The Maillard reaction, a chemical reaction between amino acids and reducing sugars, gives browned food its distinctive flavor. However, it also creates large, complex molecules that are difficult to dissolve, resulting in stubborn burnt-on residue. This reaction occurs more rapidly at high temperatures, making temperature control during cooking crucial.
1.2. Material Matters: Pan Composition and Burning
The type of pan also significantly affects how food burns and how easily it can be cleaned. Stainless steel, cast iron, and non-stick surfaces all behave differently under heat. Stainless steel can withstand high temperatures but is prone to food sticking; cast iron distributes heat evenly but requires seasoning to prevent rust and food adhesion; non-stick pans are easy to clean but can degrade at high heat.
1.3. Preventing Burns: A Proactive Approach
Prevention is always better than cure. Using sufficient oil or liquid, stirring food frequently, and maintaining moderate cooking temperatures can significantly reduce the likelihood of burning. FOODS.EDU.VN provides specific tips tailored to different types of cookware and dishes to prevent burning.
2. Essential Tools and Supplies for Burnt Food Removal
Before diving into specific methods, gather the necessary tools and supplies. Having the right equipment will make the task easier and more efficient. These include items you likely already have in your kitchen, plus a few specialized cleaning agents that can be particularly effective.
2.1. Common Household Items
- Baking Soda: A mild alkali that helps to loosen burnt food.
- White Vinegar: An acid that can dissolve mineral deposits and help lift burnt residue.
- Dish Soap: Effective for general cleaning and degreasing.
- Water: Essential for soaking and rinsing.
- Salt: A mild abrasive that can help scrub away burnt food.
2.2. Specialized Cleaning Agents
- Bar Keepers Friend: A powdered cleanser containing oxalic acid, which is highly effective at removing stubborn stains and burnt food.
- Oven Cleaner: Can be used for heavily burnt pans, but use with caution and ensure proper ventilation.
- Dishwasher Detergent Tablets: Contain powerful enzymes that can break down burnt residue.
2.3. Scrubbing Tools
- Non-Scratch Sponges: Safe for use on most pan surfaces.
- Scouring Pads: For more aggressive scrubbing on durable surfaces like stainless steel.
- Steel Wool: Use only on cast iron or stainless steel, and test in an inconspicuous area first.
- Plastic Scrapers: Help to lift burnt food without damaging the pan’s surface.
- Old Toothbrush: Useful for cleaning hard-to-reach areas.
2.4. Safety Gear
- Rubber Gloves: Protect your hands from harsh chemicals and hot water.
- Eye Protection: Especially when using oven cleaner or other strong chemicals.
3. Proven Methods for Removing Burnt Food
Numerous methods can effectively remove burnt food from pans. Here are some of the most reliable and widely used techniques, combining household remedies with commercial products.
3.1. Baking Soda and Vinegar: The Classic Combination
This method combines the mild alkalinity of baking soda with the acidity of vinegar to loosen burnt food.
- Fill the pan: Mix equal parts water and white vinegar in the pan.
- Boil: Bring the mixture to a boil on the stovetop.
- Add baking soda: Remove from heat and add 2 tablespoons of baking soda. Be cautious as this will cause a bubbling reaction.
- Soak: Let the mixture soak for 30 minutes to an hour, or longer for severely burnt pans.
- Scrub: After soaking, use a non-scratch sponge or scouring pad to scrub away the loosened residue.
- Repeat: If necessary, repeat the process or use a baking soda paste for stubborn spots.
According to “The Joy of Cooking,” this method is particularly effective for stainless steel and enamel-coated pans.
3.2. Baking Soda Paste: A Targeted Approach
For specific, stubborn spots, a baking soda paste can be applied directly.
- Make a paste: Mix baking soda with a small amount of water to form a thick paste.
- Apply: Spread the paste over the burnt areas.
- Let it sit: Allow the paste to sit for several hours or overnight.
- Scrub: Use a non-scratch sponge or scouring pad to scrub away the residue.
- Rinse: Rinse the pan thoroughly with warm water.
3.3. Boiling Water and Dish Soap: A Gentle Soak
This method is ideal for pans with lightly burnt food.
- Fill the pan: Fill the pan with water and add a generous squirt of dish soap.
- Boil: Bring the mixture to a boil on the stovetop.
- Simmer: Reduce heat and simmer for 15-20 minutes.
- Soak: Let the pan soak for an additional 30 minutes.
- Scrub: Use a non-scratch sponge or scouring pad to scrub away the loosened residue.
- Rinse: Rinse the pan thoroughly with warm water.
3.4. Salt and Water: A Mild Abrasive
Salt acts as a gentle abrasive to help lift burnt food.
- Cover the bottom: Sprinkle a generous amount of salt over the bottom of the pan.
- Add water: Add just enough water to create a paste.
- Let it sit: Let the mixture sit for several hours or overnight.
- Scrub: Use a non-scratch sponge or scouring pad to scrub away the residue.
- Rinse: Rinse the pan thoroughly with warm water.
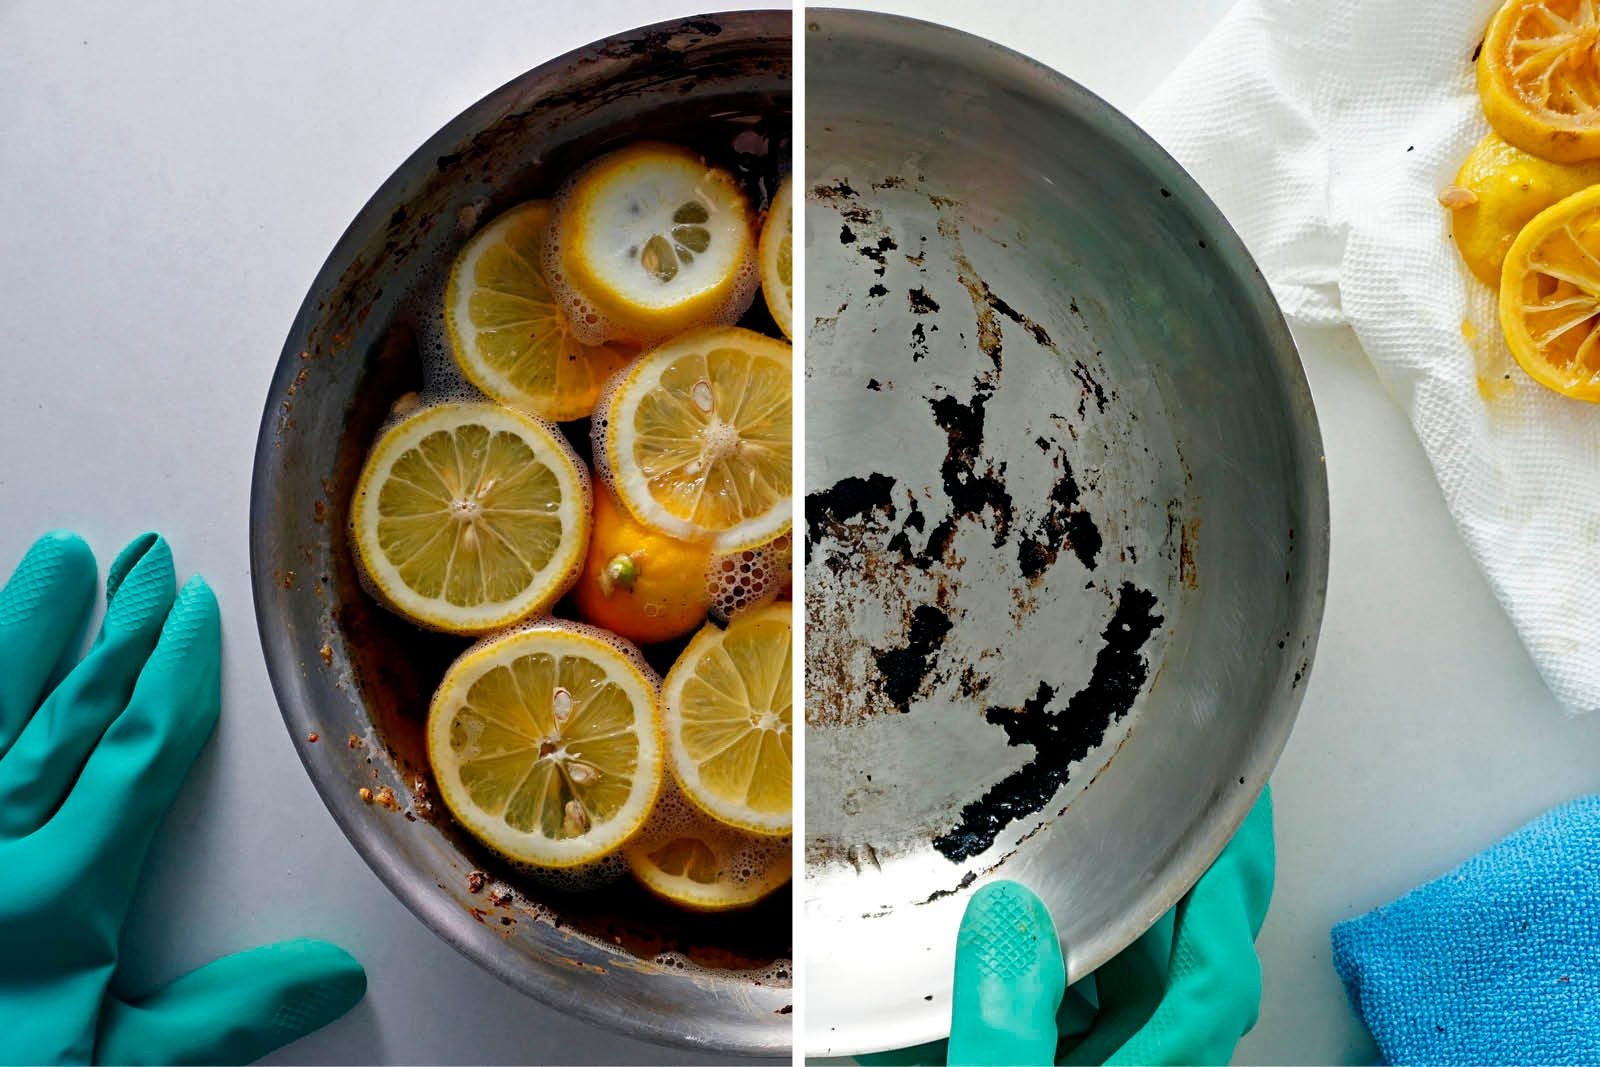
3.5. Lemon Power: A Natural Solution
Lemons contain citric acid, which can help break down burnt food.
- Slice lemons: Slice 2-3 lemons into thick rounds.
- Arrange in the pan: Place the lemon slices in the pan.
- Add water: Add enough water to cover the lemons.
- Boil: Bring the mixture to a boil on the stovetop.
- Simmer: Reduce heat and simmer for 20-30 minutes.
- Scrub: After simmering, use a non-scratch sponge or scouring pad to scrub away the loosened residue.
- Rinse: Rinse the pan thoroughly with warm water.
3.6. Bar Keepers Friend: The Heavy Hitter
Bar Keepers Friend is a powerful cleanser that contains oxalic acid, effective at removing stubborn stains and burnt food.
- Wet the pan: Wet the pan with water.
- Apply Bar Keepers Friend: Sprinkle Bar Keepers Friend onto the burnt areas.
- Make a paste: Add a small amount of water to form a paste.
- Let it sit: Allow the paste to sit for 1-2 minutes.
- Scrub: Use a non-scratch sponge or scouring pad to scrub away the residue.
- Rinse: Rinse the pan thoroughly with warm water.
- Repeat: Repeat if necessary for stubborn spots.
Note: Always wear rubber gloves when using Bar Keepers Friend, as it can irritate the skin.
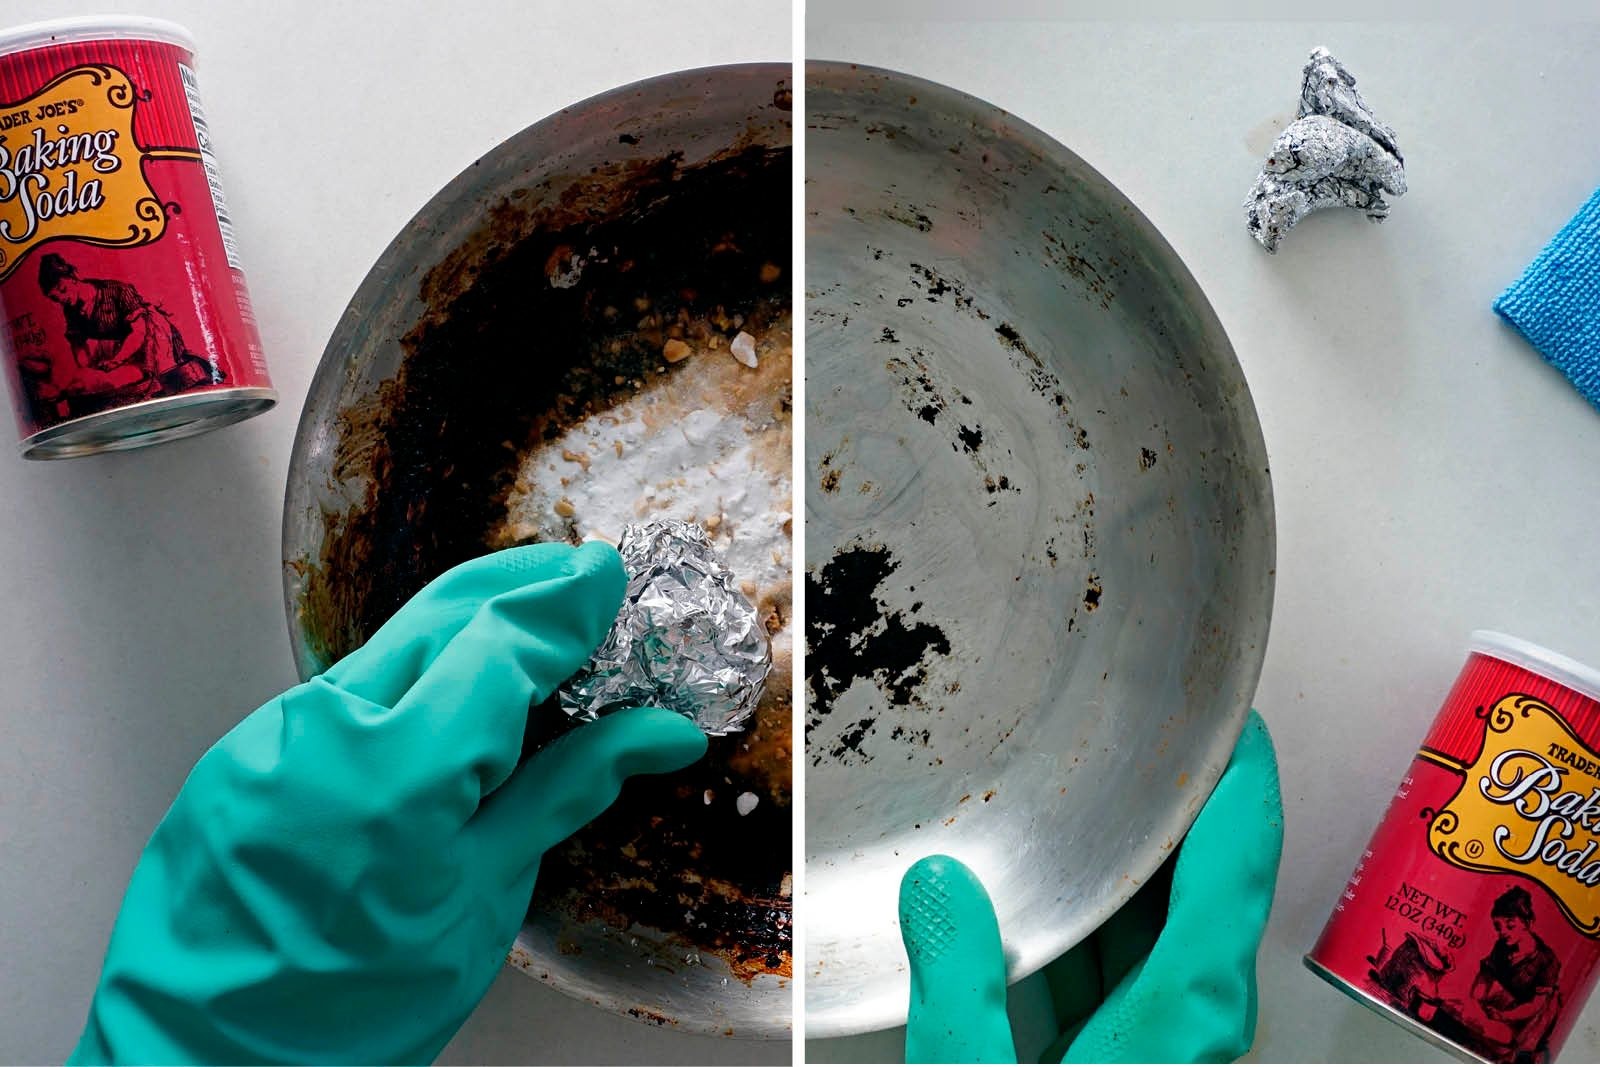
3.7. Aluminum Foil and Baking Soda: The Scrubbing Duo
Combining the abrasive power of aluminum foil with the cleaning action of baking soda can be highly effective.
- Rinse the pan: Rinse the pan with hot water.
- Sprinkle baking soda: Sprinkle a generous amount of baking soda over the burnt areas.
- Add water: Add a small amount of water to form a paste.
- Crumple foil: Crumple a piece of aluminum foil into a ball.
- Scrub: Use the crumpled foil to scrub away the burnt residue.
- Rinse: Rinse the pan thoroughly with warm water.
3.8. Dishwasher Detergent Tablets: An Unexpected Solution
Dishwasher detergent tablets contain powerful enzymes that can break down burnt food.
- Wet the pan: Wet the pan with warm water.
- Rub with tablet: Rub the burnt areas with a dishwasher detergent tablet.
- Add water: Add a small amount of water to help dissolve the tablet.
- Scrub: Use the tablet to scrub away the burnt residue.
- Rinse: Rinse the pan thoroughly with warm water.
Note: Wear gloves when using this method, as dishwasher detergent can be harsh on the skin.
3.9. Oven Cleaner: The Last Resort
Oven cleaner is a powerful chemical that should be used as a last resort for heavily burnt pans.
- Protect the area: Cover the surrounding area with newspaper or plastic.
- Apply oven cleaner: Spray oven cleaner onto the burnt areas.
- Let it sit: Allow the oven cleaner to sit for the time specified on the product label.
- Scrub: Use a scouring pad to scrub away the loosened residue.
- Rinse: Rinse the pan thoroughly with warm water and dish soap.
- Ventilate: Ensure the area is well-ventilated.
Warning: Oven cleaner contains harsh chemicals. Wear gloves and eye protection, and avoid inhaling the fumes.
4. Cleaning Different Types of Pans
Different types of pans require specific cleaning approaches to avoid damage. Here’s a guide to cleaning common types of cookware.
4.1. Stainless Steel Pans
Stainless steel pans are durable but prone to food sticking.
- Best methods: Baking soda and vinegar, Bar Keepers Friend, aluminum foil and baking soda.
- Avoid: Steel wool (except for heavily burnt areas), harsh abrasives that can scratch the surface.
4.2. Non-Stick Pans
Non-stick pans are easy to clean but can be damaged by high heat and abrasive cleaners.
- Best methods: Boiling water and dish soap, gentle scrubbing with a non-scratch sponge.
- Avoid: Abrasive cleaners, steel wool, high heat, metal utensils.
4.3. Cast Iron Pans
Cast iron pans require proper seasoning to prevent rust and food sticking.
- Best methods: Salt and water, steel wool (for removing rust), re-seasoning after cleaning.
- Avoid: Dish soap (unless re-seasoning), prolonged soaking.
4.4. Enamel-Coated Pans
Enamel-coated pans are durable and easy to clean but can chip if subjected to sudden temperature changes or harsh impacts.
- Best methods: Baking soda and vinegar, boiling water and dish soap.
- Avoid: Abrasive cleaners, steel wool, sudden temperature changes.
4.5. Copper Pans
Copper pans conduct heat very well but can tarnish easily.
- Best methods: Commercial copper cleaner, lemon and salt paste.
- Avoid: Abrasive cleaners, steel wool.
5. Step-by-Step Guide: Reviving Your Favorite Pan
Let’s walk through a detailed example using the baking soda and vinegar method, a reliable choice for stainless steel pans.
5.1. Assessment of the Damage
Before you start, assess the extent of the burnt food. Is it a light coating or a thick, stubborn layer? This will help you determine how long to soak and scrub.
5.2. Initial Soak
- Fill the pan: Pour equal parts water and white vinegar into the pan, enough to cover the burnt areas.
- Boil: Bring the mixture to a boil on the stovetop.
- Add baking soda: Remove from heat and slowly add 2 tablespoons of baking soda. The mixture will bubble up, so add it gradually.
- Soak: Let the pan soak for at least 30 minutes. For heavily burnt pans, you can soak it for several hours or overnight.
5.3. Scrubbing Process
- Drain the liquid: Carefully pour the liquid down the drain.
- Scrub: Use a non-scratch sponge or scouring pad to scrub away the loosened residue. Apply firm, even pressure.
- Baking soda paste: For stubborn spots, make a paste of baking soda and water, apply it to the spots, and let it sit for 15-20 minutes before scrubbing again.
5.4. Final Rinse and Inspection
- Rinse: Rinse the pan thoroughly with warm water.
- Inspect: Check for any remaining burnt food. If necessary, repeat the soaking and scrubbing process.
- Dry: Dry the pan completely to prevent rust.
5.5. Seasoning (If Applicable)
If you’re cleaning a cast iron pan, you’ll need to re-season it after cleaning to maintain its non-stick properties.
- Dry the pan: Ensure the pan is completely dry.
- Apply oil: Spread a thin layer of cooking oil (such as vegetable oil or flaxseed oil) over the entire surface of the pan, inside and out.
- Bake: Place the pan upside down in a preheated oven at 350°F (175°C) for one hour.
- Cool: Let the pan cool completely in the oven before using it.
6. Advanced Techniques and Tips
For particularly challenging cases, consider these advanced techniques and tips.
6.1. Using a Power Drill with a Cleaning Attachment
For large pans with extensive burnt areas, a power drill with a cleaning attachment can save time and effort.
- Choose the right attachment: Use a non-abrasive cleaning attachment designed for cookware.
- Apply cleaning solution: Apply a cleaning solution, such as baking soda paste or Bar Keepers Friend, to the burnt areas.
- Scrub with the drill: Use the power drill to scrub away the burnt residue. Be careful not to apply too much pressure, which could damage the pan.
- Rinse: Rinse the pan thoroughly with warm water.
6.2. Ultrasonic Cleaners
Ultrasonic cleaners use sound waves to create tiny bubbles that dislodge dirt and debris.
- Fill the cleaner: Fill the ultrasonic cleaner with water and a small amount of dish soap.
- Submerge the pan: Submerge the pan in the cleaner.
- Run the cleaner: Run the cleaner for the recommended time, usually 30-60 minutes.
- Rinse: Rinse the pan thoroughly with warm water.
6.3. Electrolysis Cleaning
Electrolysis cleaning uses an electric current to remove rust and other buildup from metal objects.
- Set up the system: Place the pan in a plastic container filled with water and a small amount of washing soda.
- Connect the electrodes: Connect a battery charger to a sacrificial metal electrode (such as a piece of steel) and the pan.
- Run the electrolysis: Run the electrolysis system for several hours, or until the rust and buildup are removed.
- Rinse: Rinse the pan thoroughly with warm water.
Warning: Electrolysis cleaning produces hydrogen gas, which is flammable. Perform this process in a well-ventilated area and avoid sparks or open flames.
7. Prevention: Keeping Your Pans Clean
Preventing food from burning in the first place is the best way to keep your pans clean.
7.1. Temperature Control
Maintain moderate cooking temperatures to prevent food from burning. Use a cooking thermometer to ensure accurate temperatures.
7.2. Proper Lubrication
Use enough oil, butter, or cooking spray to prevent food from sticking to the pan.
7.3. Frequent Stirring
Stir food frequently to ensure even cooking and prevent it from sticking to the bottom of the pan.
7.4. Immediate Cleaning
Clean your pans as soon as possible after cooking to prevent food from hardening and becoming difficult to remove.
7.5. Using the Right Cookware
Choose the right cookware for the task. Non-stick pans are ideal for cooking delicate foods that are prone to sticking.
8. Professional Advice
Here is professional advice from culinary experts and renowned chefs.
8.1. Chef Tips
According to Chef Gordon Ramsay, “Always preheat your pan properly before adding oil or food. A hot pan helps to sear the food and prevent sticking.”
8.2. Culinary School Insights
The Culinary Institute of America recommends, “Use a combination of dry and wet heat when cooking to prevent burning. Start by searing the food in a hot pan, then add liquid and simmer to finish cooking.”
8.3. Expert Product Recommendations
Consumer Reports recommends using non-scratch sponges and gentle cleaning solutions for non-stick pans to prolong their lifespan.
9. Real-World Examples
Real-world examples of successfully cleaned pans using different methods.
9.1. Case Study 1: Restoring a Stainless Steel Pan
A home cook successfully restored a heavily burnt stainless steel pan using the baking soda and vinegar method.
- Problem: Heavily burnt food residue on a stainless steel pan.
- Solution: Soaked the pan in a mixture of baking soda and vinegar overnight, then scrubbed with a scouring pad.
- Result: The pan was restored to its original condition.
9.2. Case Study 2: Cleaning a Non-Stick Pan
A professional chef maintained a non-stick pan by gentle cleaning after each use.
- Problem: Food sticking to a non-stick pan despite regular cleaning.
- Solution: Cleaned the pan immediately after each use with warm water and dish soap, using a non-scratch sponge.
- Result: The pan remained in good condition for an extended period.
9.3. Case Study 3: Re-Seasoning a Cast Iron Pan
A cast iron enthusiast re-seasoned a rusty cast iron pan.
- Problem: Rust and food sticking to a cast iron pan.
- Solution: Removed the rust with steel wool, then re-seasoned the pan by baking it with a thin layer of oil.
- Result: The pan was restored to its original condition and had improved non-stick properties.
10. Additional Tips
Here are some additional tips that can help you clean the burnt food easily.
10.1. Let the Pan Cool
Allow the pan to cool before attempting to clean it. This will prevent burns and make it easier to handle.
10.2. Use Hot Water
Hot water is more effective at dissolving burnt food than cold water.
10.3. Apply Pressure
Apply firm, even pressure when scrubbing to remove stubborn residue.
10.4. Take Breaks
If you’re scrubbing for an extended period, take breaks to avoid fatigue.
10.5. Know When to Replace
If the pan is severely damaged or cannot be cleaned effectively, it may be time to replace it.
11. Staying Updated with Culinary Trends
Culinary trends are always evolving, and new techniques and products are constantly emerging.
11.1. New Cleaning Products
Stay updated with new cleaning products and technologies that can make cleaning easier and more efficient.
11.2. Sustainable Cleaning Practices
Consider using sustainable cleaning practices and eco-friendly products to minimize your impact on the environment.
11.3. Community Forums and Blogs
Participate in online forums and blogs to share tips and learn from other cooks and cleaning enthusiasts.
12. Optimizing Your Kitchen for Easy Cleaning
A well-organized kitchen can make cleaning easier and more efficient.
12.1. Smart Storage Solutions
Use smart storage solutions to keep your cookware organized and accessible.
12.2. Easy-to-Clean Surfaces
Choose easy-to-clean surfaces for your countertops and backsplashes.
12.3. Regular Maintenance
Perform regular maintenance tasks, such as cleaning your oven and dishwasher, to keep your kitchen in top condition.
13. Troubleshooting Common Issues
Addressing common issues that arise during the cleaning process ensures a successful outcome.
13.1. Stubborn Stains
For stubborn stains, try using a stronger cleaning solution or soaking the pan for a longer period.
13.2. Scratched Surfaces
Avoid using abrasive cleaners or steel wool on delicate surfaces to prevent scratches.
13.3. Lingering Odors
To remove lingering odors, boil water with lemon slices or vinegar in the pan.
14. The Role of Nutrition in Preventing Burning
Understanding the nutritional content of food can help prevent burning.
14.1. Sugar Content
Foods with high sugar content are more prone to burning.
14.2. Moisture Content
Foods with low moisture content can dry out and burn easily.
14.3. Fat Content
Foods with high-fat content can splatter and cause burns.
15. Table: Summary of Cleaning Methods
| Method | Best For | Materials Required | Effectiveness | Notes |
|---|---|---|---|---|
| Baking Soda and Vinegar | Stainless Steel, Enamel | Baking soda, white vinegar, water | Medium | Can cause a bubbling reaction; soak for at least 30 minutes. |
| Baking Soda Paste | Stubborn Spots | Baking soda, water | Medium | Apply directly to burnt areas and let sit. |
| Boiling Water and Dish Soap | Lightly Burnt Food | Dish soap, water | Light | Simmer for 15-20 minutes before soaking. |
| Salt and Water | Mild Abrasive | Salt, water | Light | Let sit for several hours or overnight. |
| Lemon Power | Natural Cleaning | Lemons, water | Medium | Boil for 20-30 minutes. |
| Bar Keepers Friend | Heavy Stains | Bar Keepers Friend, water | High | Wear gloves; rinse thoroughly. |
| Aluminum Foil and Baking Soda | Enhanced Scrubbing | Aluminum foil, baking soda, water | High | Crumple foil into a ball and scrub. |
| Dishwasher Detergent Tablets | Powerful Enzymes | Dishwasher detergent tablets, water | High | Wear gloves; add water to help dissolve the tablet. |
| Oven Cleaner | Last Resort | Oven cleaner, water | Very High | Use with caution; ensure proper ventilation; wear gloves and eye protection. |

16. Common Misconceptions
Addressing common misconceptions about cleaning burnt pans.
16.1. Scrubbing Harder is Always Better
Scrubbing too hard can damage the pan’s surface. Use gentle pressure and the right cleaning tools.
16.2. All Cleaning Products are the Same
Different cleaning products are designed for different surfaces and types of stains. Choose the right product for your pan.
16.3. Burnt Pans are Ruined
Most burnt pans can be restored with the right cleaning methods.
17. FAQs
Here are some frequently asked question about cleaning burnt pans.
17.1. Can I Use Steel Wool on a Non-Stick Pan?
No, steel wool can scratch and damage the non-stick coating.
17.2. How Do I Prevent Food from Sticking to My Stainless Steel Pan?
Preheat the pan properly, use enough oil, and avoid overcrowding the pan.
17.3. Is It Safe to Use Oven Cleaner on Cookware?
Use oven cleaner as a last resort and follow the product instructions carefully.
17.4. How Often Should I Clean My Pans?
Clean your pans after each use to prevent food from hardening and becoming difficult to remove.
17.5. What is the Best Way to Clean a Burnt Cast Iron Pan?
Remove rust with steel wool, then re-season the pan by baking it with a thin layer of oil.
17.6. Can I Put My Pans in the Dishwasher?
Check the manufacturer’s instructions. Some pans are dishwasher-safe, while others should be hand-washed.
17.7. How Do I Remove Stubborn Stains from My Enamel-Coated Pan?
Try soaking the pan in a mixture of baking soda and vinegar overnight.
17.8. What Should I Do If My Pan is Severely Burnt?
Consider using oven cleaner or seeking professional cleaning services.
17.9. How Can I Prevent My Non-Stick Pan from Losing Its Coating?
Avoid high heat, use non-metal utensils, and clean gently with a non-scratch sponge.
17.10. Is It Safe to Cook with a Pan That Has a Scratched Non-Stick Coating?
It is generally recommended to replace a pan with a scratched non-stick coating, as the coating may release harmful chemicals when heated.
18. Conclusion
Removing burnt food from pans can be a breeze with the right techniques and tools. Whether you prefer natural remedies or powerful cleaning agents, several methods can effectively restore your cookware to its former glory. Always prioritize safety, use the appropriate cleaning solutions for your pan type, and consider preventive measures to avoid future burns.
Ready to explore more in-depth cleaning guides and expert culinary advice? Visit FOODS.EDU.VN today and unlock a wealth of knowledge to elevate your cooking experience. From detailed ingredient breakdowns to advanced cooking techniques, FOODS.EDU.VN is your ultimate resource for all things culinary. Contact us at 1946 Campus Dr, Hyde Park, NY 12538, United States, or reach out via WhatsApp at +1 845-452-9600. Discover the secrets to culinary mastery at foods.edu.vn.