Light as air and deliciously delicate, homemade angel food cake is truly a dessert sent from heaven. This iconic cake, known for its snowy white color and ethereal texture, is surprisingly simple to create from scratch with just a handful of ingredients. If you’re looking to master the art of angel food cake, you’ve come to the right place. This guide will walk you through each step, ensuring your cake turns out perfectly tender, pillowy, and ready to be adorned with your favorite toppings.
Angel food cake stands apart from other cakes due to its unique composition. It’s made exclusively with egg whites and contains no fat or chemical leavening agents. This absence of fat is what gives angel food cake its signature light and airy texture, often compared to a cloud melting in your mouth. While it shares some flavor profiles with sponge cake, the ingredient list and baking process are distinctly different. Imagine serving slices of this delicate cake topped with a generous dollop of whipped cream and a medley of fresh, vibrant berries – a truly delightful dessert experience.
While the recipe for angel food cake isn’t inherently complicated, achieving that perfect, cloud-like texture relies on specific techniques. Especially if you are new to baking, carefully reading through these tips and instructions is key to baking an angel food cake that will impress. And if you’re looking to expand your cake repertoire, be sure to explore recipes for hot milk cake, the classic Victoria sponge cake, and a versatile white cake recipe.
Essential Ingredients for Your Angel Food Cake
Creating a perfect angel food cake hinges on using the right ingredients and understanding their roles. Here’s what you’ll need:
Superfine Sugar: Granulated sugar is transformed into superfine sugar in a food processor. This finer texture is crucial as it dissolves effortlessly into the egg whites, creating a smooth meringue base for the cake.
Cake Flour: Cake flour is non-negotiable for angel food cake. Its lower protein content compared to all-purpose flour is what yields the cake’s signature tenderness. Using all-purpose flour will result in a denser, more bread-like texture, which is not ideal for this delicate dessert.
Salt: A pinch of salt might seem insignificant, but it plays a vital role in enhancing all the flavors in this simple yet elegant cake.
Egg Whites: The star of the show! You’ll need the whites from 10 to 12 large eggs. Egg sizes can vary, so for accuracy, it’s best to measure the egg whites by weight or volume. Aim for 355g or 1½ cups of separated egg whites. Fresh egg whites are recommended for the best volume and stability.
Cream of Tartar: This is a crucial ingredient for stabilizing the meringue. Cream of tartar, an acid, strengthens the egg white foam, preventing it from collapsing and ensuring the cake rises beautifully.
Vanilla Extract: A touch of vanilla extract elevates the subtle sweetness of the cake. For the most exquisite flavor, opt for a high-quality store-bought vanilla extract or consider making your own homemade vanilla extract.
Step-by-Step Guide: Baking Your Angel Food Cake
Let’s embark on the baking journey! Follow these detailed steps to create your own homemade angel food cake:
Step 1: Prepare the Dry Ingredients.
Begin by processing the granulated sugar in a food processor until it reaches a very fine consistency, almost like powdered sugar but not quite as powdery. This superfine sugar is essential for dissolving smoothly into the egg whites. Measure out 1 cup of this superfine sugar and set it aside in a separate bowl. Leave the remaining processed sugar in the food processor.
Add the cake flour and salt to the food processor with the remaining sugar. Pulse about 10 times to thoroughly combine these dry ingredients.
Next, prepare for sifting. Place a fine-mesh sieve over a medium-sized bowl. Sift the reserved 1 cup of superfine sugar into this bowl. Discard any larger sugar granules that remain in the sieve.
Place the same fine-mesh sieve over a separate large bowl. Add the sugar and flour mixture from the food processor to the sieve. Sift these dry ingredients together into the large bowl. This double sifting process ensures the ingredients are perfectly combined and aerated, contributing to the cake’s light texture. Set aside the sifted dry ingredients.
Step 2: Whip the Egg Whites.
In a clean, large mixing bowl, combine the egg whites and cream of tartar. It’s crucial that your bowl and whisk are completely clean and free of any grease, as even a trace of fat can prevent the egg whites from whipping up properly.
Using an electric hand mixer or a stand mixer fitted with the whisk attachment, begin whipping the egg whites on low speed until they become frothy on the surface. This initial frothing stage helps to break down the egg white proteins and start incorporating air.
Step 3: Incorporate the Sugar and Vanilla.
Once the egg whites are frothy, gradually increase the mixer speed to medium. Begin adding the reserved 1 cup of superfine sugar, one tablespoon at a time, to the whipping egg whites. Make sure each tablespoon of sugar is fully incorporated before adding the next. Adding the sugar gradually helps to create a stable meringue.
Continue beating the egg whites and sugar mixture until soft, glossy peaks form. This is a crucial stage – you want soft peaks, not stiff peaks. Soft peaks will gently curl over when you lift the whisk, while stiff peaks will stand straight up. Over-whipping to stiff peaks can result in a drier cake. Achieving soft peaks should take approximately 5 minutes of beating in total.
Once soft peaks have formed, add the vanilla extract. Reduce the mixer speed to low and beat just until the vanilla is fully incorporated into the meringue.
Step 4: Gently Fold in Dry Ingredients.
Now it’s time to combine the meringue with the sifted dry ingredients. This step requires a delicate touch to avoid deflating the airy meringue.
Sift about one-third of the flour and sugar mixture over the whipped egg whites.
Using a rubber spatula, gently fold the dry ingredients into the meringue. Use a figure-eight motion, scraping down the sides of the bowl and turning the mixture over itself. Be careful not to overmix; fold just until the dry ingredients are almost incorporated.
Repeat this process two more times, sifting in another third of the dry ingredients each time and gently folding until just combined. The batter should be light and airy.
Step 5: Prepare and Bake the Cake.
Carefully transfer the delicate batter to a clean, ungreased 16-cup capacity angel food cake pan. It’s crucial that the pan is ungreased, as the batter needs to cling to the sides of the pan to rise properly.
Once the batter is in the pan, gently tap the pan on the counter a few times. Alternatively, run a knife or skewer through the batter in a swirling motion. This helps to release any large air bubbles that might be trapped within the batter.
Bake in a preheated oven at 350°F (175°C) for 35 to 40 minutes. Position the oven rack in the bottom third of your oven to prevent the top of the cake from browning too quickly. The cake is done when it’s golden brown and a skewer inserted into the center comes out clean.
Step 6: Cool the Cake Upside Down.
Immediately upon removing the cake from the oven, invert the pan onto a cooling rack or the counter. Most angel food cake pans have small “feet” that elevate the pan when inverted, allowing for air circulation. If your pan doesn’t have feet, you can invert it over a bottle neck inserted through the center tube to suspend it.
Allow the cake to cool upside down in the pan for at least 1 hour, or until it is completely cooled. Cooling upside down is essential as it prevents the cake from collapsing and helps maintain its airy texture.
Step 7: Release and Serve.
Once the cake is completely cool, use a long, thin knife or an offset spatula to gently loosen the cake from the pan. Run the knife along the outer edge of the cake where it meets the pan and around the center tube.
Carefully remove the center piece of the pan to release the cake. Then, run the knife along the bottom of the pan to fully release the cake. Invert the cake onto a cake stand or serving plate.
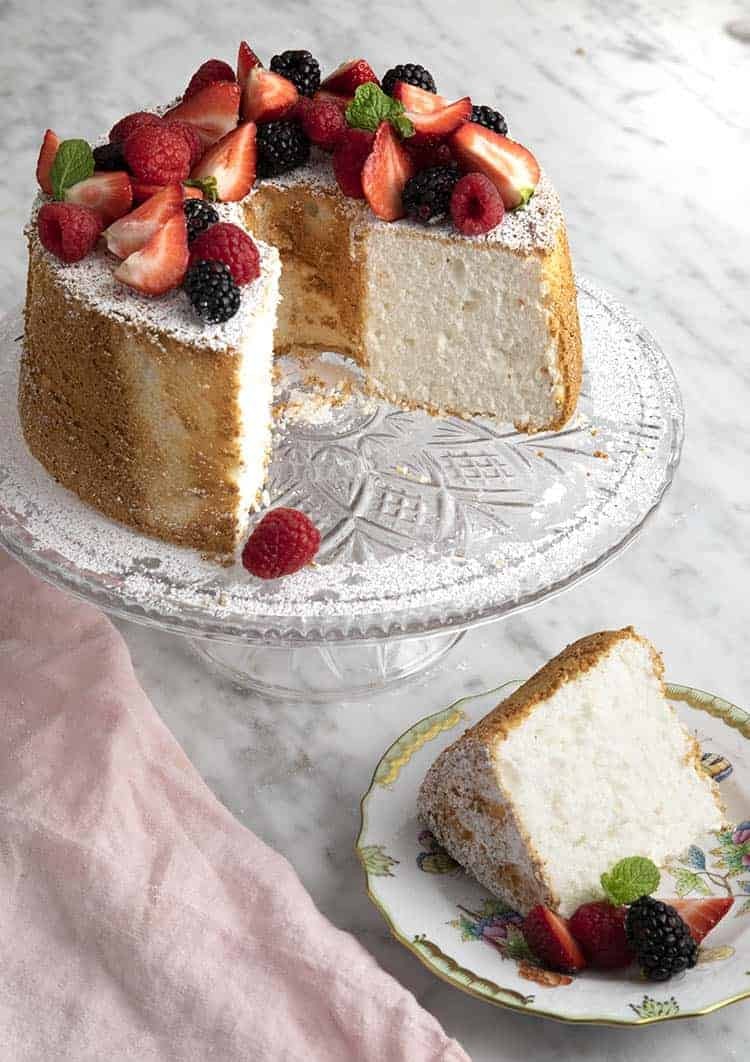
Your homemade angel food cake is now ready to be served! Dust with powdered sugar, if desired, or serve with your favorite toppings like whipped cream and fresh berries.
Pro Tips for Perfect Angel Food Cake Success
To ensure your angel food cake is a triumph, keep these expert tips in mind:
Whip to Soft Peaks: As mentioned earlier, achieving soft peaks with your meringue is crucial. Soft peaks provide the necessary structure for the cake to rise beautifully and maintain a tender crumb. Stiff peaks can result in a denser, drier cake.
Fresh Cream of Tartar is Key: Cream of tartar is vital for meringue stability. Ensure your cream of tartar is fresh; expired cream of tartar may not be as effective in stabilizing the egg whites.
Room Temperature Egg Whites: For the fluffiest meringue, allow your egg whites to come to room temperature before whipping. Room temperature egg whites whip up to a greater volume than cold egg whites.
Don’t Grease the Pan: Resist the urge to grease your angel food cake pan. The batter needs to grip the sides of the pan to climb and rise properly. A greased pan will prevent this and can cause the cake to collapse.
Gentle Folding is Essential: When incorporating the dry ingredients, be extremely gentle. Overmixing will deflate the meringue, resulting in a dense cake. Fold just until the dry ingredients disappear into the batter.
Use a Serrated Knife for Slicing: Angel food cake is delicate. Avoid smashing it by using a serrated knife to gently saw through the cake when slicing. A bread knife works perfectly.
Troubleshooting: Common Angel Food Cake Issues
Even experienced bakers can encounter hiccups. Here are some common issues and how to prevent them:
Cake Collapsed:
- Under-whipped Egg Whites: Ensure you whip the egg whites to soft peaks. Under-whipped whites lack the structure to support the cake.
- Expired Cream of Tartar: Use fresh cream of tartar to properly stabilize the meringue.
- Opening Oven Door Too Early: Avoid opening the oven door during baking, especially in the first 20-25 minutes. Temperature fluctuations can cause the meringue to deflate.
- Not Cooling Upside Down: Always cool angel food cake upside down to prevent collapse and maintain its airy texture.
Dense or Rubbery Cake:
- Overmixing Batter: Be gentle when folding in dry ingredients. Overmixing deflates the meringue.
- Using All-Purpose Flour: Cake flour is essential for the light texture. All-purpose flour will result in a denser cake.
- Stiff Peaks in Meringue: Whipping egg whites to stiff peaks can also lead to a slightly tougher texture. Aim for soft, glossy peaks.
Serving Suggestions for Angel Food Cake
Angel food cake is delightful on its own, but it truly shines when paired with complementary flavors and textures. Here are some serving ideas to elevate your dessert:
Classic Whipped Cream and Berries: This is the quintessential angel food cake pairing. The lightness of the cake, the richness of whipped cream, and the tartness of fresh berries create a perfect harmony.
Fruit Compotes or Sauces: Spoon warm or chilled fruit compotes, such as strawberry, blueberry, or raspberry, over slices of angel food cake. A tangy lemon sauce or a sweet peach sauce also complements the cake beautifully.
Powdered Sugar Dusting: For a simple yet elegant presentation, dust the cake generously with powdered sugar just before serving.
Chocolate Shavings: For a touch of decadence, sprinkle dark or white chocolate shavings over the cake.
Grilled Pineapple and Coconut: For a tropical twist, serve angel food cake with grilled pineapple slices and a sprinkle of toasted coconut flakes.
Ice Cream or Sorbet: A scoop of vanilla ice cream, strawberry sorbet, or lemon sorbet alongside angel food cake is a refreshing and delightful combination.
Remember that most toppings are best added just before serving to prevent the cake from becoming soggy.
Storage Tips for Angel Food Cake
Angel food cake is best enjoyed fresh, but leftovers can be stored properly:
Room Temperature Storage: Tightly wrap leftover angel food cake in plastic wrap or place it in an airtight container. Store at room temperature for up to 2 days.
Freezing: For longer storage, angel food cake freezes beautifully. Wrap it tightly in plastic wrap, then in aluminum foil, and place it in a freezer bag. Freeze for up to 3 months. Thaw at room temperature for a few hours before serving.
Frequently Asked Questions About Angel Food Cake
Can I bake angel food cake in a regular pan?
While a tube pan is ideal for angel food cake, you can use alternatives. An ungreased 9- or 10-inch 16-cup capacity non-stick tube pan is recommended. If you don’t have one, you can use an ungreased 9-inch loaf pan lined with parchment paper on the bottom. Divide the batter between two loaf pans and bake for 25 to 30 minutes. Invert the pans onto a wire rack to cool. Avoid using decorative bundt pans as the intricate designs make it difficult to remove the delicate cake without damage.
Can I use caster sugar or powdered sugar instead of granulated sugar?
No, granulated sugar is specified for this recipe and should not be directly substituted with powdered sugar. The recipe calls for processing granulated sugar to create superfine sugar, which has a different consistency than powdered sugar. Caster sugar (superfine sugar) can be used as a direct substitute for granulated sugar, but processing it briefly in a food processor is still recommended to ensure there are no large granules.
Can I use liquid egg whites from a carton?
While liquid egg whites from a carton can be used in a pinch, fresh egg whites are highly recommended for angel food cake. Fresh egg whites whip up to a greater volume and create a more stable meringue, which is essential for the cake’s rise and texture. Carton egg whites may not rise as much, and the cake might be denser or prone to collapsing.
Is cake flour really necessary?
Yes, cake flour is essential for achieving the signature light and airy texture of angel food cake. Its lower protein content compared to all-purpose flour is crucial for the cake’s tenderness. If you don’t have cake flour, you can try a homemade cake flour substitute, but for the best results, use cake flour.
More Heavenly Desserts to Try
If you’ve successfully baked this angel food cake and are eager to explore more delightful desserts, here are a few suggestions:
Pavlova: Another meringue-based dessert that’s light, airy, and perfect for showcasing fresh fruit.
Magic Cookie Bars: For something richer and more decadent, try these easy and crowd-pleasing bars with layers of graham crackers, chocolate, coconut, and nuts.
If you’ve tried this angel food cake recipe, don’t forget to rate it and share your experience in the comments below! Your feedback is greatly appreciated.
Angel Food Cake Recipe
Experience the ethereal delight of homemade angel food cake with this easy-to-follow recipe. Light as air and wonderfully versatile, it’s the perfect dessert for any occasion.
Save Recipe Saved! Print Recipe
Course: Dessert
Cuisine: American
Prep Time: 20 minutes
Cook Time: 35 minutes
Cool Time: 1 hour
Total Time: 1 hour 55 minutes
Servings: 12 servings
Calories: 168kcal
Author: John Kanell
Video
[Link to Video – if available, insert here]
Equipment
- 9 to 10-inch tube pan (16-cup capacity)
Ingredients
- 1¾ cups granulated sugar (350g)
- 1 cup cake flour (112g)
- ½ teaspoon salt
- 1½ cups large egg whites (10-12 large eggs) (355g)
- 1½ teaspoons cream of tartar
- 1½ teaspoons vanilla extract
Instructions
- Position an oven rack in the bottom third of your oven and preheat to 350°F (175°C). Have an ungreased 9 or 10-inch tube pan (16-cup capacity) ready.
- Place sugar in a food processor and blend until very finely ground, about 1 minute. Remove 1 cup (200g) of the fine sugar, leaving the rest in the processor.
- Add cake flour and salt to the food processor. Pulse 10 times to combine.
- Set a fine mesh sieve over a medium bowl. Sift the reserved 1 cup of fine sugar into the bowl, discarding any large grains.
- Place the sieve over a separate large bowl and add the sugar and flour mixture. Sift together and set aside.
- In a clean, large mixing bowl, combine egg whites and cream of tartar. Beat with an electric mixer on low until frothy, about 1 minute.
- Increase speed to medium and gradually add the reserved 1 cup of fine sugar, 1 tablespoon at a time. Beat until soft, glossy peaks form, about 5 minutes. Stir in vanilla.
- Sift one-third of the flour mixture over egg whites and gently fold in with a spatula. Repeat twice more.
- Transfer batter to the ungreased tube pan. Tap pan gently to release air bubbles.
- Bake for 35-40 minutes, or until golden brown and a skewer inserted in the center comes out clean.
- Invert pan onto the counter to cool upside down for at least 1 hour.
- Once cooled, loosen cake from pan edges with a thin knife. Remove center piece, then invert cake onto a serving plate. Dust with powdered sugar and serve.
Recipe Notes
- Measure flour accurately: Use a kitchen scale for best results, or spoon flour into a measuring cup and level with a knife.
- Keep yolks out: Ensure no egg yolk contaminates the whites for proper whipping.
- Room temperature egg whites: Allow egg whites to reach room temperature for better volume.
- Do not grease the pan: Ungreased pan is essential for the cake to rise.
- Fold gently: Avoid overmixing when incorporating dry ingredients to maintain meringue volume.
- Serrated knife for slicing: Use a serrated knife to gently slice the delicate cake.
Nutrition
Calories: 168kcal | Carbohydrates: 37g | Protein: 5g | Fat: 0.3g | Saturated Fat: 0.03g | Polyunsaturated Fat: 0.1g | Monounsaturated Fat: 0.01g | Sodium: 148mg | Potassium: 123mg | Fiber: 0.3g | Sugar: 29g | Vitamin A: 0.2IU | Calcium: 4mg | Iron: 0.1mg
*Nutrition Disclaimer Have you Tried this Recipe? Tag me Today! Mention @preppykitchen and tag #preppykitchen!