Achieving that perfect, vibrant red frosting can be a challenge, but it’s absolutely achievable! Whether you’re decorating a Valentine’s Day cake, a Christmas treat, or just want a pop of color, this guide will walk you through the best methods and tips on How To Make Red Frosting With Food Coloring that’s both beautiful and delicious. We’ll cover everything from choosing the right type of food coloring to avoiding that dreaded bitter aftertaste.
Choosing the Right Food Coloring for Red Frosting
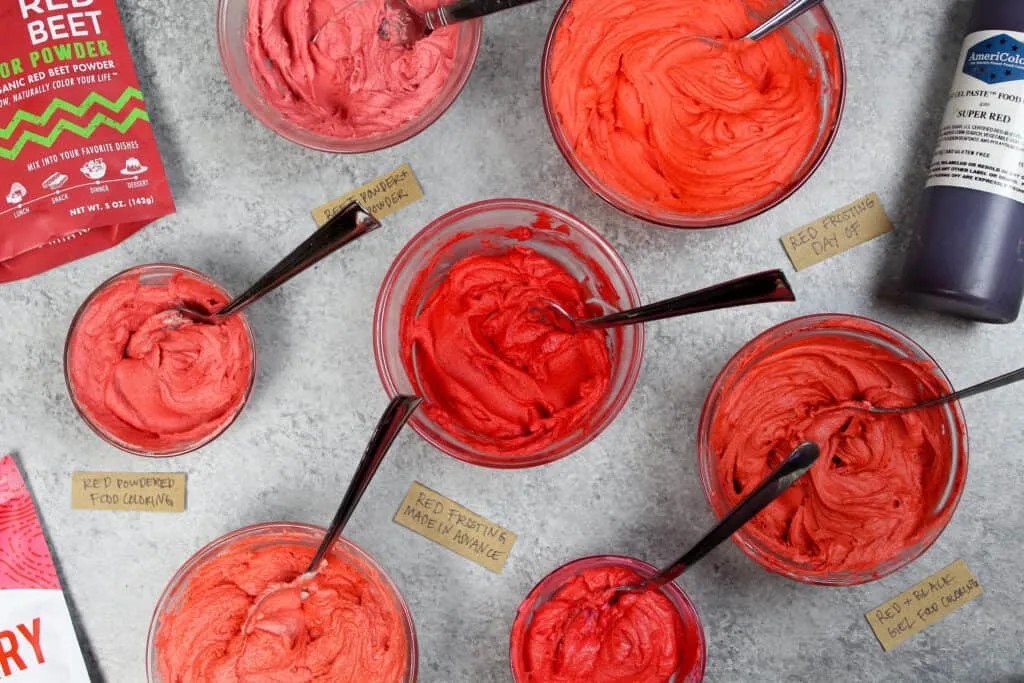
The foundation of vibrant red frosting starts with selecting the appropriate food coloring. Here are your best options:
-
Gel Food Coloring: This is your go-to choice. Gel food coloring is highly concentrated, so a little goes a long way. This prevents you from adding excess liquid, which can alter the consistency of your frosting. Americolor’s Super Red is a popular and reliable choice.
-
Powdered Food Coloring: This is another great option, especially if you’re concerned about the taste. Red powdered food coloring often has no aftertaste, but you may need to use a larger quantity to achieve the desired color.
Why Avoid Liquid Food Coloring
Liquid food coloring, while readily available, is not ideal for red frosting. It’s less concentrated, requiring you to add more to achieve a deep red. This excess liquid can thin out your frosting, making it difficult to work with.
Key Steps to Vibrant Red Frosting
Here’s a detailed breakdown of how to achieve the perfect red frosting:
-
Make the Frosting in Advance: This is arguably the most crucial step. Allowing the frosting to sit for a few days (or even a week!) will allow the color to deepen and develop. The red hue intensifies over time as the color fully disperses and saturates the buttercream.
Side-by-side comparison demonstrating how red buttercream frosting deepens in color when made in advance and allowed to sit.
-
Use a White Buttercream Base: If your buttercream has a yellowish tint, it will be more difficult to achieve a true red color. Start with a naturally white buttercream recipe for best results. The popular choice is an American buttercream, known for its pure white color.
-
Stir Well After Thawing: If you’ve made your frosting in advance and stored it in the refrigerator, give it a thorough stir with a rubber spatula after it thaws. This will remove any air bubbles and restore a smooth, silky texture.
Addressing the Bitter Taste
One of the biggest challenges with red frosting is the potential for a bitter aftertaste from the large amount of food coloring needed. Here are some ways to combat this:
-
Use “No Taste” Red Food Coloring: Some brands offer “no taste” red gel food coloring, which is formulated to minimize bitterness. While it may not completely eliminate the aftertaste, it can significantly reduce it.
-
Flavor Your Frosting: Adding a strong extract like almond, peppermint, or coconut can mask any bitterness. Cream cheese frosting is another excellent option, as the tanginess of the cream cheese helps to balance the flavor. Consider using strawberry powder to naturally add a touch of red color and strawberry flavor.
Additional Tricks and Techniques
-
Start with a Pink Base: Adding a small amount of pink food coloring before the red can make it easier to achieve the desired red shade without using as much red food coloring.
-
The Microwave Method: If you’re still struggling to achieve a deep red, try the microwave method. Scoop out about 1/4 cup of your frosting, add more red food coloring, and microwave for 5-15 seconds until it’s runny and intensely colored. Mix this back into the rest of your frosting. Be aware that this can change the consistency, so let it sit for about 30 minutes to thicken back up.
-
Add a Touch of Black: For a deeper, richer red, add a tiny drop of black gel food coloring. Be extremely careful with this, as too much black can turn your frosting a muddy color.
Recipe for Red Buttercream Frosting
This recipe provides a solid foundation for achieving that perfect red hue.
Ingredients:
- 2 cups (4 sticks) unsalted butter, room temperature
- 7 cups (2 lb bag) powdered sugar
- 1/2 tsp salt
- 2 Tbsp heavy cream or whipping cream
- 1 tsp vanilla extract
- 2 tsp almond extract (optional)
- Red gel food coloring (Americolor Super Red recommended) or red powdered food coloring
Instructions:
- If possible, make the frosting at least three days in advance. As it thaws, let it sit out overnight at room temperature.
- Beat the butter on medium speed for 30 seconds until smooth.
- Mix in vanilla extract, almond extract (optional), and salt on low speed.
- Slowly add powdered sugar, 1 cup at a time, alternating with small splashes of cream.
- Beat on low until fully incorporated and the desired consistency is reached.
- If the frosting is too thick, add cream (1 Tbsp at a time). If too thin, add powdered sugar (1/4 cup at a time).
- Add a generous amount of red gel food coloring or about 2 tsp of powdered red food coloring. Beat on low until the desired color is achieved.
- To allow the color to deepen, place in sealed piping bags or an airtight container and leave out at room temperature for a few hours or overnight.
Notes: This recipe makes about 6 cups of frosting, enough to frost and fill an 8-inch layer cake.
Storage Tips
- Make your frosting ahead of time or save any leftover frosting! It can be stored in an airtight container in the refrigerator for up to a month or in the freezer for up to 3 months.
- Be sure to give it a good stir once it thaws to get the consistency nice and smooth again.
- A frosted cake can last in the fridge for up to a week or in the freezer for up to a month. The buttercream locks in all the moisture, keeping the cake fresh and delicious!
- If you cut into the cake and have leftovers, use any remaining frosting to cover the cut section to keep it moist and store in the fridge for up to a week.
With these tips and techniques, you’ll be well on your way to creating stunning and delicious red frosting that will impress everyone! Remember to experiment and find what works best for you.