Creating your own baby food purees is a rewarding and straightforward process. Not only does it allow you to control exactly what your baby is eating, but it can also be more cost-effective than buying pre-made options. This guide will walk you through the steps of How To Puree Baby Food, from selecting the right ingredients to storing your creations safely.
Making the Perfect Baby Food Puree: A Step-by-Step Guide
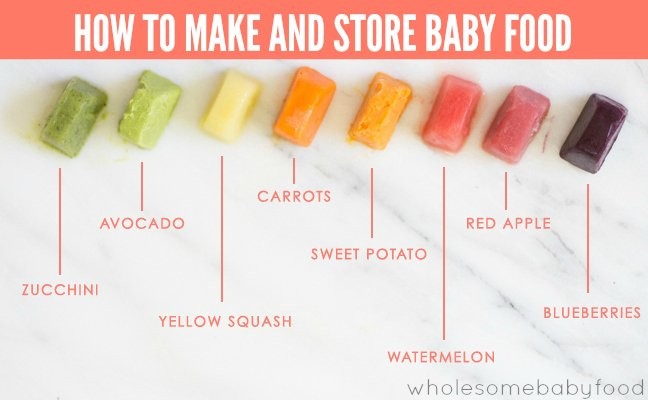
1. Choose Your Ingredients Wisely
Select fresh, ripe fruits and vegetables. Organic options are ideal to minimize exposure to pesticides. Some popular choices for first purees include:
- Fruits: Apples, bananas, pears, avocados, peaches
- Vegetables: Sweet potatoes, carrots, butternut squash, peas, green beans
2. Cooking for Puree Consistency
Cooking the fruits or vegetables is the next crucial step. Different cooking methods affect nutrient retention and flavor.
- Steaming: Considered the best method for retaining nutrients.
- Baking: Great for enhancing the natural sweetness of vegetables like sweet potatoes.
- Boiling: Simple, but can leach some nutrients into the water (which you can save and add back into the puree).
- Microwaving: Quick for small batches, preferably in glass containers.
3. The Pureeing Process: Achieving the Right Texture
Once your ingredients are cooked, it’s time to puree! Here’s how:
- Cool Slightly: Let the cooked fruits or vegetables cool down a bit.
- Transfer to Blender: Place the cooked food into a blender, food processor, or use an immersion blender.
- Add Liquid (Optional): Use the reserved cooking water (except for high-nitrate vegetables like carrots for babies under 7 months), breast milk, formula, or plain water to achieve a smooth consistency.
- Blend Until Smooth: Puree until you reach a smooth, lump-free consistency suitable for your baby’s age and stage.
4. Freezing Baby Food Puree: Ensuring Freshness and Convenience
Freezing is an excellent way to store your homemade baby food and have it readily available.
- Use Safe Containers: Avoid freezing in glass jars not specifically designed for freezing.
- Portion into Ice Cube Trays: Fill ice cube trays with the puree. Each cube is roughly one ounce.
- Cover and Freeze: Cover the tray with plastic wrap and freeze until solid.
- Transfer to Freezer Bags: Once frozen, transfer the cubes to freezer bags, removing as much air as possible.
- Label Clearly: Label each bag with the date and contents. Use within one month.
5. Thawing and Reheating: Serving with Care
Thaw the desired number of cubes in the refrigerator or microwave. Reheat thoroughly before serving.
Important Tips for Making and Storing Baby Food
- Refrigerate Properly: Freshly made puree can be stored in the refrigerator for up to 48 hours.
- Cool Foods Quickly: Refrigerate or freeze perishable foods within two hours of preparation.
- Avoid Double Dipping: Never feed your baby directly from the storage container to prevent contamination.
- Consult Your Pediatrician: Always discuss introducing solids and potential allergens with your pediatrician.
- No Salt or Sugar: Avoid adding salt, sugar, or other unnecessary spices to your baby’s food.
Conclusion
Learning how to puree baby food is a simple yet empowering way to provide your little one with nutritious and wholesome meals. By following these guidelines, you can confidently create a variety of delicious and healthy purees, ensuring your baby gets the best start in life. Remember to always prioritize food safety and consult with your pediatrician for personalized advice.