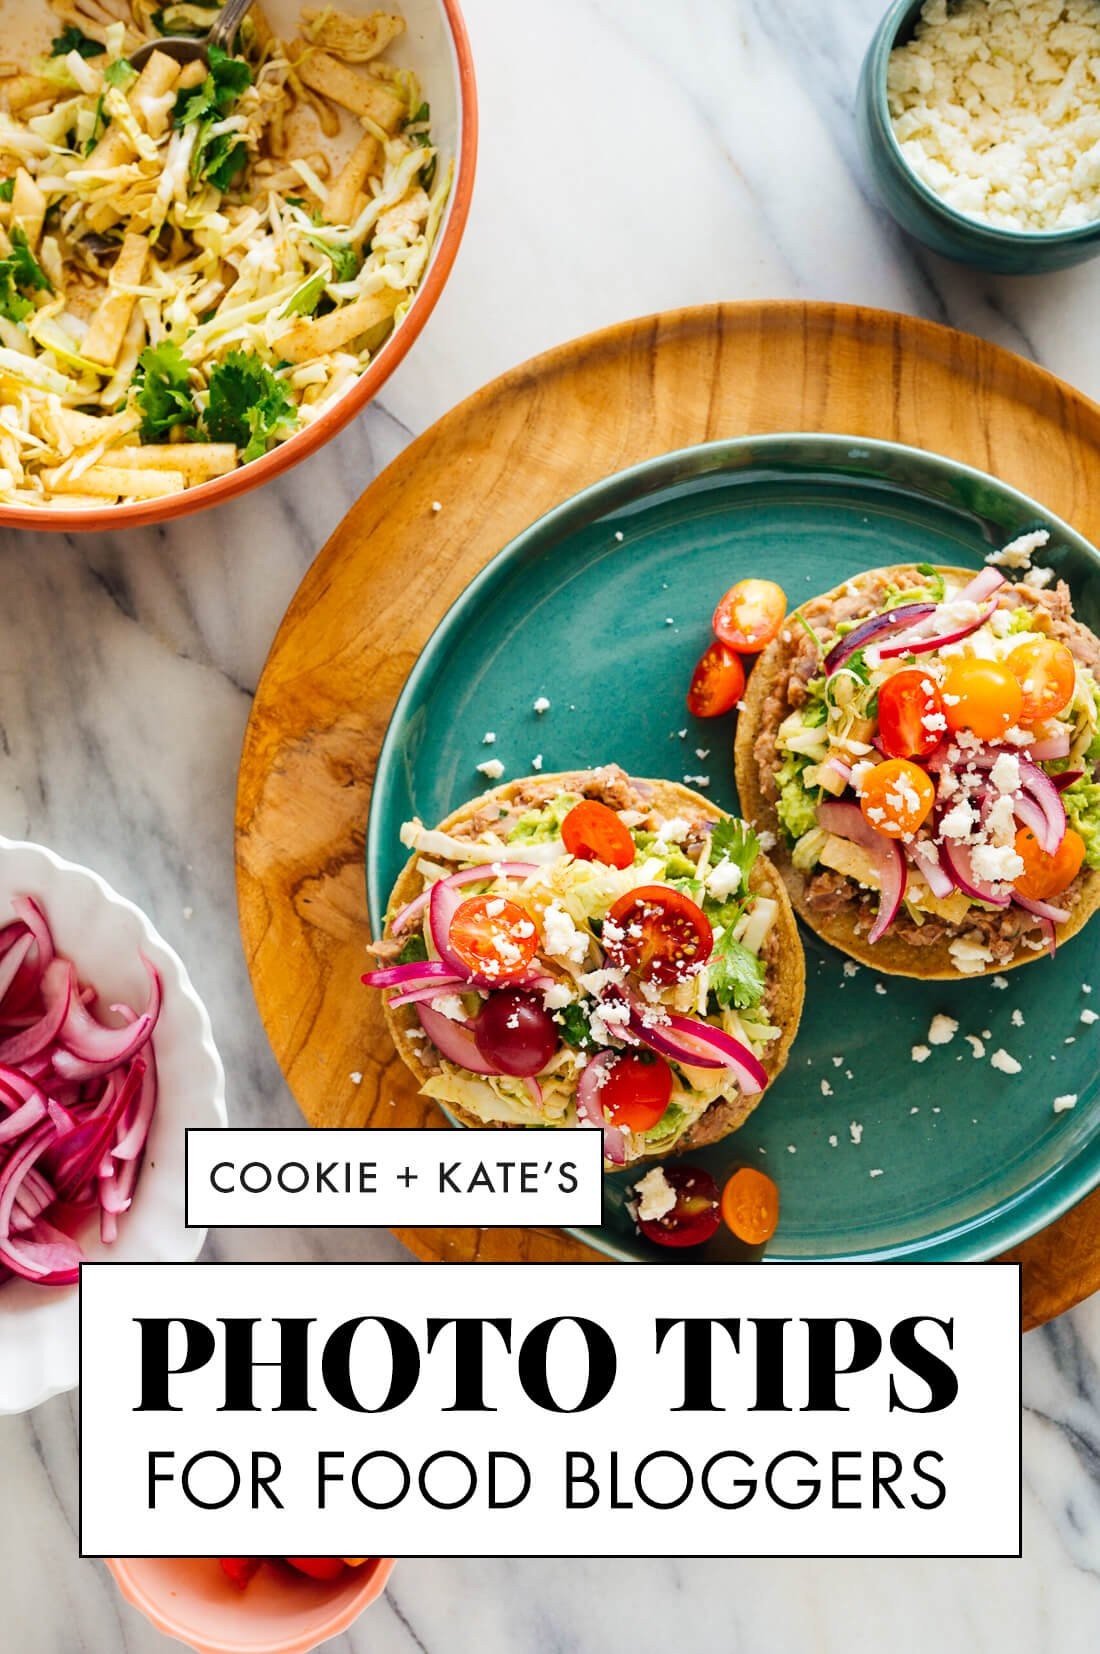
Taking better food pictures involves understanding light, composition, and editing to showcase culinary creations beautifully. FOODS.EDU.VN offers insights into mastering these techniques, turning ordinary meals into visually appealing masterpieces. Elevate your food photography game, capture stunning visuals, and share your passion for food with the world using our expert tips on visual storytelling and culinary artistry.
1. Understanding the Basics of Food Photography
Food photography is more than just pointing and shooting; it’s about capturing the essence of a dish and making it look irresistible. Whether you’re a blogger, a home cook, or a professional chef, great food photos can elevate your work and entice your audience. Let’s delve into the fundamentals to help you create stunning images that tell a story.
1.1. The Importance of Lighting
Lighting is arguably the most critical element in food photography. It can make or break a shot, highlighting textures, colors, and details. Here’s what you need to know:
- Natural Light: The golden rule of food photography is to use natural light whenever possible. Avoid direct sunlight, which can create harsh shadows. Instead, opt for soft, diffused light, like that from a window on a cloudy day.
- Artificial Light: If natural light isn’t available, use artificial lights strategically. Invest in continuous LED lights that mimic natural light. Avoid using your camera’s built-in flash, as it tends to flatten the image and create unflattering highlights.
- Light Direction: Experiment with different light directions. Side lighting can emphasize texture, while backlighting can create a soft, glowing effect. Front lighting is generally less flattering as it can flatten the subject.
1.2. Composition Techniques
Composition is how you arrange the elements within your frame to create a visually appealing image. Here are some techniques to consider:
- Rule of Thirds: Imagine dividing your frame into nine equal parts with two horizontal and two vertical lines. Place your subject at the intersection of these lines or along one of the lines to create a balanced and engaging composition.
- Leading Lines: Use lines to draw the viewer’s eye into the image. This could be the edge of a table, a utensil, or even the way food is arranged on the plate.
- Negative Space: Leave empty space around your subject to give it room to breathe. This can help to isolate the food and make it stand out.
- Depth of Field: Use a shallow depth of field to focus on a specific part of the dish while blurring the background. This can be achieved by using a wide aperture (low f-number) on your camera.
1.3. Choosing the Right Equipment
While you don’t need the most expensive gear to take great food photos, having the right equipment can make a significant difference. Here are some essentials:
- Camera: A DSLR or mirrorless camera offers the most control over settings like aperture, shutter speed, and ISO. However, many smartphones now have excellent cameras that can produce high-quality images.
- Lens: A macro lens is ideal for capturing close-up details of food. A 50mm lens is also a versatile option for food photography.
- Tripod: A tripod can help you keep your camera steady, especially in low light conditions. This is crucial for sharp, clear images.
- Reflectors and Diffusers: These tools help you control the light by bouncing it onto the subject (reflector) or softening it (diffuser).
1.4. Understanding Camera Settings
Understanding your camera settings is essential for capturing the perfect shot. Here are some key settings to master:
- Aperture: Controls the depth of field. A wide aperture (e.g., f/1.8 or f/2.8) creates a shallow depth of field, blurring the background and highlighting the subject. A narrow aperture (e.g., f/8 or f/11) creates a greater depth of field, keeping more of the image in focus.
- Shutter Speed: Controls how long the camera’s sensor is exposed to light. A faster shutter speed (e.g., 1/200 second) freezes motion, while a slower shutter speed (e.g., 1/30 second) allows more light in but can result in motion blur if the camera is not stable.
- ISO: Measures the sensitivity of the camera’s sensor to light. A low ISO (e.g., ISO 100) produces cleaner images with less noise, while a high ISO (e.g., ISO 3200) is useful in low light conditions but can result in grainy images.
- White Balance: Adjusts the color temperature of the image to ensure that whites appear white. Incorrect white balance can result in images that look too blue or too yellow.
- Shooting in RAW: Shooting in RAW format captures more data than JPEG, giving you more flexibility when editing your photos.
1.5. Styling and Propping
Styling and propping are the finishing touches that can elevate your food photos from good to great. Here are some tips:
- Choose a Theme: Decide on a theme or mood for your photos. This could be rustic, modern, minimalist, or vibrant.
- Select Props: Choose props that complement the food and enhance the overall aesthetic. This could include plates, bowls, utensils, napkins, and backgrounds.
- Keep it Simple: Don’t overcrowd the frame with too many props. Focus on highlighting the food and keeping the composition clean and uncluttered.
- Add Texture: Incorporate textures to add visual interest. This could include wooden surfaces, linen fabrics, or textured backgrounds.
- Use Fresh Ingredients: Incorporate fresh ingredients into your styling, such as herbs, spices, and garnishes. This can add color, texture, and visual appeal.
1.6. Post-Processing Techniques
Post-processing is the final step in creating stunning food photos. Here are some techniques to consider:
- Adjust Exposure: Adjust the brightness and contrast of the image to make the food look more appealing.
- Correct White Balance: Ensure that the colors in the image are accurate by adjusting the white balance.
- Enhance Colors: Boost the saturation and vibrancy of the colors to make the food look more appetizing.
- Sharpen the Image: Sharpen the image to bring out the details and textures of the food.
- Remove Imperfections: Use tools to remove any distractions or imperfections in the image, such as crumbs or blemishes.
- Use Presets: Use presets to quickly apply a consistent look and feel to your photos.
1.7. Mastering Mobile Food Photography
Smartphones have revolutionized photography, making it easier than ever to capture stunning food photos. Here are some tips for mastering mobile food photography:
- Use Natural Light: Just like with DSLR photography, natural light is key. Position your food near a window or in a well-lit area.
- Clean Your Lens: A clean lens can make a big difference in the clarity of your photos.
- Use Grid Lines: Turn on the grid lines in your camera settings to help you compose your shots using the rule of thirds.
- Focus and Exposure: Tap on the screen to focus on the food and adjust the exposure.
- Use Portrait Mode: Portrait mode can create a shallow depth of field, blurring the background and highlighting the food.
- Edit Your Photos: Use mobile editing apps like Snapseed, VSCO, or Adobe Lightroom Mobile to enhance your photos.
1.8. Avoiding Common Mistakes
Even experienced food photographers can make mistakes. Here are some common pitfalls to avoid:
- Using Flash: Avoid using your camera’s built-in flash, as it can create harsh highlights and flatten the image.
- Over-Editing: Avoid over-editing your photos, as this can make them look unnatural.
- Cluttered Backgrounds: Keep your backgrounds clean and uncluttered to avoid distracting from the food.
- Bad Lighting: Avoid shooting in poor lighting conditions, as this can result in dull, unappetizing photos.
- Ignoring Composition: Pay attention to composition to create visually appealing images.
- Not Cleaning Your Lens: A dirty lens can result in blurry or hazy photos.
By understanding these basics and practicing regularly, you can improve your food photography skills and create stunning images that showcase your culinary creations. FOODS.EDU.VN offers many resources to help you hone your skills and discover new techniques.
2. Advanced Techniques for Professional-Looking Food Photos
Taking your food photography to the next level requires mastering advanced techniques that separate amateur snapshots from professional-quality images. These techniques involve a deeper understanding of lighting, composition, styling, and post-processing.
2.1. Mastering Artificial Lighting
While natural light is ideal, it’s not always available or consistent. Mastering artificial lighting allows you to shoot at any time and maintain consistent results.
- Types of Artificial Lights:
- Continuous LED Lights: These are energy-efficient and provide a consistent light source that mimics natural light. Look for lights with adjustable color temperature.
- Strobes (Flash): Strobes provide a powerful burst of light and are useful for freezing motion. They require more technical knowledge to use effectively.
- Setting Up Your Lights:
- One-Light Setup: Start with a single light source positioned to the side or slightly behind the subject. Use a reflector to bounce light back onto the shadows.
- Two-Light Setup: Use one light as the main light and the other as a fill light to reduce shadows.
- Three-Point Lighting: This involves a key light, a fill light, and a backlight to create depth and dimension.
- Controlling Light Quality:
- Softboxes: These diffuse the light, creating a soft, even illumination.
- Umbrellas: Similar to softboxes, umbrellas soften the light and are often more portable.
- Gels: These are colored filters that can be used to adjust the color temperature of the light.
2.2. Advanced Compositional Elements
Beyond the rule of thirds, advanced composition techniques can significantly enhance your food photos.
- Symmetry: Use symmetrical arrangements to create a sense of balance and order.
- Patterns: Incorporate repeating patterns to add visual interest.
- Framing: Use elements within the scene to frame the subject and draw the viewer’s eye.
- Leading the Eye: Use lines, shapes, and colors to guide the viewer’s eye through the image.
- Creating a Story: Think about the story you want to tell with your photo and compose the shot to convey that narrative.
2.3. Depth of Field Manipulation
Mastering depth of field allows you to control which parts of the image are in focus, directing the viewer’s attention.
- Wide Aperture (Shallow Depth of Field): Use a wide aperture (e.g., f/1.4 to f/2.8) to create a shallow depth of field, blurring the background and highlighting a specific part of the dish. This is great for isolating details and creating a dreamy effect.
- Narrow Aperture (Deep Depth of Field): Use a narrow aperture (e.g., f/8 to f/16) to create a deep depth of field, keeping more of the image in focus. This is useful for showcasing the entire dish and its surroundings.
- Focus Stacking: Combine multiple images with different focus points to create an image with a greater depth of field than is possible with a single shot.
2.4. Advanced Styling Techniques
Styling is an art form that requires attention to detail and a creative eye.
- Color Theory: Understand how colors interact and use complementary or analogous color schemes to create visually appealing compositions.
- Texture and Layers: Add texture and layers to create depth and visual interest. This could include using different fabrics, surfaces, and ingredients.
- Movement and Action: Incorporate movement and action into your photos to create a sense of dynamism. This could include pouring sauce, sprinkling herbs, or cutting into a dish.
- Garnish Strategically: Use garnishes to add color, texture, and flavor to your dishes. Choose garnishes that complement the ingredients and enhance the overall aesthetic.
- Creating a Mood: Use styling to create a specific mood or atmosphere. This could include rustic, elegant, cozy, or modern.
2.5. Working with Props
Props are essential for creating visually appealing food photos.
- Curating Your Collection: Build a collection of props that reflect your style and aesthetic. This could include plates, bowls, utensils, linens, backgrounds, and decorative items.
- Mix and Match: Don’t be afraid to mix and match different props to create unique and interesting compositions.
- Scale and Proportion: Pay attention to the scale and proportion of your props. Choose props that are appropriately sized for the food and the overall composition.
- Vintage Finds: Incorporate vintage props to add character and charm to your photos.
- DIY Props: Create your own props to add a personal touch. This could include painting backgrounds, making your own linens, or crafting unique serving dishes.
2.6. Advanced Post-Processing
Post-processing is where you can fine-tune your images and bring out their full potential.
- Color Correction: Use color correction tools to ensure that the colors in your images are accurate and consistent.
- Dodging and Burning: Use dodging and burning techniques to selectively lighten or darken areas of the image, enhancing contrast and drawing attention to specific details.
- Frequency Separation: Use frequency separation to smooth out skin tones and remove blemishes without affecting the texture of the food.
- Creating a Signature Style: Develop a consistent editing style to create a cohesive look and feel across all of your photos.
- Using Plugins: Explore the use of plugins to enhance your editing workflow and add special effects.
2.7. Understanding Food Photography Trends
Staying up-to-date with current trends can help you keep your work fresh and relevant.
- Minimalism: Clean, simple compositions with plenty of negative space.
- Dark and Moody: Dramatic lighting and rich, saturated colors.
- Overhead Shots: Flat lay compositions that showcase the entire dish and its surroundings.
- Authenticity: Capturing real, unedited moments in the kitchen.
- Sustainability: Highlighting eco-friendly ingredients and practices.
2.8. Building a Portfolio
A strong portfolio is essential for showcasing your work and attracting clients or collaborations.
- Curate Your Best Work: Select your strongest images to include in your portfolio.
- Showcase Variety: Include a variety of different styles, subjects, and techniques.
- Tell a Story: Arrange your images to tell a cohesive story about your skills and aesthetic.
- Get Feedback: Ask for feedback from other photographers and industry professionals.
- Update Regularly: Keep your portfolio up-to-date with your latest work.
By mastering these advanced techniques, you can elevate your food photography and create professional-quality images that stand out. Remember, practice is key, so keep experimenting and refining your skills.
3. Optimizing Food Pictures for SEO and Social Media
Creating stunning food photos is only half the battle. To maximize their impact, you need to optimize them for search engines and social media platforms. This involves understanding SEO principles, crafting compelling captions, and using the right tools and techniques to make your images discoverable and engaging.
3.1. Understanding SEO for Food Photography
Search engine optimization (SEO) is the process of optimizing your online content to rank higher in search engine results pages (SERPs). For food photography, this means making your images more visible to people searching for recipes, cooking tips, and food-related content.
- Keyword Research:
- Identify Relevant Keywords: Use tools like Google Keyword Planner, SEMrush, or Ahrefs to identify keywords related to your food photos. Think about what people are searching for when they’re looking for recipes or food inspiration.
- Long-Tail Keywords: Focus on long-tail keywords, which are longer, more specific phrases that people use when searching for something specific. For example, instead of “chocolate cake,” try “best chocolate cake recipe with ganache.”
- On-Page Optimization:
- Image File Names: Use descriptive file names that include relevant keywords. For example, instead of “IMG_1234.jpg,” try “chocolate-cake-recipe-with-ganache.jpg.”
- Alt Text: Add descriptive alt text to your images. Alt text is used by search engines to understand what the image is about. Use relevant keywords and describe the image accurately.
- Captions: Write detailed captions that provide context and include relevant keywords.
- Image Size and Compression: Optimize your images for web use by reducing their file size without sacrificing quality. Use tools like TinyPNG or ImageOptim to compress your images.
- Off-Page Optimization:
- Link Building: Build backlinks to your website from other reputable websites in the food and cooking niche.
- Social Sharing: Encourage social sharing by making it easy for people to share your images on social media platforms.
3.2. Crafting Compelling Captions for Social Media
Captions are an essential part of your social media posts. They provide context, engage your audience, and encourage interaction.
- Tell a Story: Use your captions to tell a story about the food, the recipe, or the experience of creating the dish.
- Ask Questions: Ask questions to encourage your audience to engage with your posts. For example, “What’s your favorite topping for pizza?” or “Have you tried this recipe before?”
- Use Emojis: Use emojis to add personality and visual interest to your captions.
- Include a Call to Action: Encourage your audience to take action, such as visiting your website, trying the recipe, or sharing their own photos.
- Hashtags: Use relevant hashtags to increase the visibility of your posts. Research popular hashtags in the food and cooking niche and use a mix of broad and specific hashtags.
3.3. Optimizing Images for Different Social Media Platforms
Each social media platform has its own image size and format requirements. Optimizing your images for each platform can help them look their best and maximize engagement.
- Instagram:
- Image Size: 1080 x 1080 pixels (square), 1080 x 1350 pixels (portrait), 1080 x 608 pixels (landscape)
- Format: JPEG
- Aspect Ratio: 1:1 (square), 4:5 (portrait), 1.91:1 (landscape)
- Facebook:
- Image Size: 1200 x 630 pixels (link image), 1200 x 1200 pixels (square), 1200 x 900 pixels (landscape)
- Format: JPEG
- Aspect Ratio: 1.91:1 (link image), 1:1 (square), 4:3 (landscape)
- Pinterest:
- Image Size: 1000 x 1500 pixels (portrait)
- Format: JPEG
- Aspect Ratio: 2:3 (portrait)
- Twitter:
- Image Size: 1200 x 675 pixels (landscape)
- Format: JPEG
- Aspect Ratio: 16:9 (landscape)
3.4. Using Social Media Tools to Enhance Your Food Photography
There are many social media tools available that can help you enhance your food photography and streamline your workflow.
- Editing Apps: Use mobile editing apps like Snapseed, VSCO, or Adobe Lightroom Mobile to enhance your photos.
- Scheduling Tools: Use scheduling tools like Buffer, Hootsuite, or Later to schedule your social media posts in advance.
- Analytics Tools: Use analytics tools to track the performance of your posts and identify what’s working and what’s not.
- Hashtag Tools: Use hashtag tools like RiteTag or Hashtagify to find relevant hashtags for your posts.
- Canva: Use Canva to create visually appealing graphics and social media templates.
3.5. Engaging with Your Audience
Engaging with your audience is crucial for building a loyal following and creating a sense of community.
- Respond to Comments: Respond to comments and messages promptly and thoughtfully.
- Ask for Feedback: Ask for feedback on your photos and recipes.
- Run Contests and Giveaways: Run contests and giveaways to incentivize engagement and attract new followers.
- Collaborate with Other Food Bloggers: Collaborate with other food bloggers to cross-promote each other’s work.
- Use Instagram Stories and Live: Use Instagram Stories and Live to share behind-the-scenes content and connect with your audience in real-time.
3.6. Tracking Your Success
Tracking your success is essential for understanding what’s working and what’s not.
- Monitor Your Website Traffic: Use Google Analytics to monitor your website traffic and identify which pages are performing well.
- Track Your Social Media Engagement: Use social media analytics tools to track your engagement metrics, such as likes, comments, shares, and reach.
- Analyze Your Keyword Rankings: Use SEO tools to track your keyword rankings and identify opportunities for improvement.
- Measure Your ROI: Measure the return on investment (ROI) of your food photography efforts by tracking your website traffic, social media engagement, and revenue.
3.7. Staying Updated with Algorithm Changes
Social media algorithms are constantly changing, so it’s important to stay updated with the latest best practices.
- Follow Industry Blogs and Newsletters: Follow industry blogs and newsletters to stay informed about algorithm changes and social media trends.
- Experiment with New Features: Experiment with new features and formats on social media platforms.
- Adapt Your Strategy: Be willing to adapt your strategy based on the latest algorithm changes.
3.8. Legal Considerations
When using food photography for commercial purposes, it’s important to be aware of legal considerations.
- Copyright: Ensure that you have the rights to use any images, music, or other content in your photos and videos.
- Model Releases: Obtain model releases from anyone who appears in your photos or videos.
- Food Safety: Follow food safety guidelines when preparing and styling food for photography.
- Disclosure: Disclose any sponsored content or affiliate links in your posts.
By following these tips and techniques, you can optimize your food photography for SEO and social media, increase your visibility, engage your audience, and achieve your goals. Remember, consistency is key, so keep creating high-quality content and engaging with your audience on a regular basis. FOODS.EDU.VN offers additional resources and courses to help you master these skills.
4. The Art of Storytelling Through Food Photography
Food photography is not just about capturing visually appealing images; it’s about telling a story. Every dish has a history, a culture, and a personal connection. By understanding how to convey these elements through your photos, you can create a deeper connection with your audience and make your work more meaningful.
4.1. Understanding the Narrative Potential of Food
Food is deeply intertwined with our lives. It evokes memories, emotions, and cultural identities. Recognizing this narrative potential is the first step in telling compelling stories through your photos.
- Cultural Significance: Every cuisine has a rich history and cultural significance. Consider the origins of the dish, the traditions associated with it, and the stories of the people who created it.
- Personal Connection: Food often has personal significance. Think about your own experiences with the dish, the memories it evokes, and the emotions it stirs.
- Ingredients and Origins: Highlight the ingredients and their origins. Showcasing the source of your ingredients can add depth and authenticity to your story.
- The Cooking Process: Capture the cooking process to show the effort and care that goes into creating the dish.
4.2. Capturing the Essence of a Dish
To tell a story, you need to capture the essence of the dish. This involves focusing on the details that make it unique and appealing.
- Highlighting Textures: Use lighting and composition to highlight the textures of the food. This can make the dish look more appetizing and inviting.
- Showcasing Colors: Use color theory to create visually appealing compositions that showcase the colors of the food.
- Focusing on Details: Zoom in on the details that make the dish unique, such as the crust of a pie, the glaze on a donut, or the garnish on a cocktail.
- Capturing Steam and Motion: Capture the steam rising from a hot dish or the motion of pouring sauce to add dynamism to your photos.
4.3. Incorporating Lifestyle Elements
Adding lifestyle elements to your food photos can help to create a sense of context and tell a more complete story.
- Including People: Include people in your photos to show the joy of sharing food with others.
- Setting the Scene: Create a scene that reflects the mood and style of the dish. This could include setting the table, adding props, or choosing a background that complements the food.
- Capturing Candid Moments: Capture candid moments of people cooking, eating, or enjoying the food.
- Using Natural Light: Use natural light to create a warm and inviting atmosphere.
4.4. Creating a Sense of Place
Food is often associated with specific places. By creating a sense of place in your photos, you can transport your audience to another location and immerse them in the story.
- Showcasing Local Ingredients: Highlight local ingredients and dishes to showcase the culinary traditions of a specific region.
- Using Location Shots: Include shots of the location where the food is prepared or enjoyed, such as a restaurant, a market, or a scenic landscape.
- Capturing Local Culture: Capture elements of local culture, such as traditional clothing, music, or customs.
- Using Local Props: Use props that are specific to the location, such as pottery, textiles, or artwork.
4.5. Evoking Emotions
Food has the power to evoke strong emotions. By tapping into these emotions, you can create photos that resonate with your audience on a deeper level.
- Nostalgia: Capture dishes that evoke feelings of nostalgia, such as childhood favorites or family recipes.
- Comfort: Capture dishes that evoke feelings of comfort, such as warm soups, hearty stews, or freshly baked bread.
- Joy: Capture dishes that evoke feelings of joy, such as celebratory cakes, festive cocktails, or colorful salads.
- Excitement: Capture dishes that evoke feelings of excitement, such as exotic spices, unusual ingredients, or daring flavor combinations.
4.6. Developing a Personal Style
Developing a personal style is essential for creating a cohesive body of work and making your photos recognizable.
- Identify Your Aesthetic: Identify your aesthetic preferences, such as minimalist, rustic, or modern.
- Experiment with Different Techniques: Experiment with different lighting, composition, and styling techniques.
- Find Your Voice: Find your voice as a storyteller and develop a unique perspective on food.
- Be Consistent: Be consistent in your approach to food photography and develop a signature style that reflects your personality and values.
4.7. Inspiring Action
Ultimately, the goal of storytelling through food photography is to inspire action. Whether it’s trying a new recipe, visiting a restaurant, or simply appreciating the beauty of food, your photos should motivate your audience to engage with the culinary world.
- Provide Recipes: Provide recipes for the dishes you photograph to encourage your audience to try them at home.
- Recommend Restaurants: Recommend restaurants that serve the dishes you photograph to encourage your audience to explore new culinary experiences.
- Share Cooking Tips: Share cooking tips and techniques to empower your audience to create delicious meals.
- Promote Sustainable Practices: Promote sustainable food practices to encourage your audience to make responsible choices.
4.8. Ethical Considerations
When telling stories through food photography, it’s important to be mindful of ethical considerations.
- Authenticity: Be authentic in your portrayal of food and culture. Avoid making false claims or perpetuating stereotypes.
- Respect: Show respect for the people and cultures associated with the food you photograph.
- Transparency: Be transparent about your sources and methods.
- Responsibility: Take responsibility for the impact of your photos on the world.
By mastering the art of storytelling through food photography, you can create images that are not only visually appealing but also meaningful and impactful. foods.edu.vn provides a platform to learn more about culinary storytelling and share your unique perspective with the world.
5. Essential Equipment and Tools for Food Photography
Having the right equipment and tools can significantly enhance your food photography, whether you’re a beginner or a seasoned pro. While creativity and skill are essential, the right gear can help you achieve better results and streamline your workflow.
5.1. Cameras: Choosing the Right One for Your Needs
The camera is the foundation of your photography setup. Here’s what to consider when choosing a camera for food photography:
- DSLR and Mirrorless Cameras:
- Pros: Interchangeable lenses, full manual control, high image quality, excellent low-light performance.
- Cons: More expensive, larger and heavier, steeper learning curve.
- Recommendations:
- Nikon Z6: Known for its excellent image quality and low-light performance.
- Canon EOS R6: Offers fast autofocus and impressive dynamic range.
- Sony Alpha a7 III: A versatile option with a wide range of compatible lenses.
- Smartphones:
- Pros: Convenient, portable, easy to use, improving image quality.
- Cons: Limited manual control, smaller sensor, lower image quality compared to DSLRs or mirrorless cameras.
- Recommendations:
- iPhone 13 Pro: Excellent image quality, advanced camera features, and user-friendly interface.
- Samsung Galaxy S21 Ultra: Impressive zoom capabilities, versatile camera system, and bright display.
- Google Pixel 6 Pro: Exceptional image processing, accurate color reproduction, and computational photography features.
5.2. Lenses: Capturing the Details
The lens is just as important as the camera body. Here are some essential lenses for food photography:
- Macro Lens:
- Purpose: Capturing close-up details of food with exceptional sharpness.
- Focal Length: Typically 50mm to 105mm.
- Recommendations:
- Nikon 50mm f/1.8G Macro: Affordable and delivers excellent image quality.
- Canon EF 100mm f/2.8L Macro IS USM: Offers image stabilization and exceptional sharpness.
- Sony FE 90mm f/2.8 Macro G OSS: Provides optical image stabilization and stunning detail.
- Prime Lens:
- Purpose: Versatile lens for various food photography setups, offering wide apertures and excellent image quality.
- Focal Length: Typically 35mm or 50mm.
- Recommendations:
- Nikon Nikkor Z 50mm f/1.8 S: Designed for Nikon’s Z-format cameras, offering sharpness and clarity.
- Canon EF 50mm f/1.8 STM: Lightweight, affordable, and delivers great image quality.
- Sony FE 50mm f/1.8: Compact and provides sharp images with beautiful bokeh.
5.3. Lighting Equipment: Controlling the Light
Lighting is crucial in food photography. Here’s what you need to control and enhance your lighting:
- Reflectors:
- Purpose: Bouncing light back onto the subject to reduce shadows and brighten the scene.
- Types: White foam boards, silver reflectors, gold reflectors.
- Recommendations: Cheap white foam boards from craft stores or Target.
- Diffusers:
- Purpose: Softening harsh light and reducing contrast.
- Types: Sheer white fabric, diffusion panels.
- Recommendations: Sheer white fabric hung over a window.
- Artificial Lights:
- Purpose: Providing consistent and controllable light when natural light is insufficient.
- Types: Continuous LED lights, strobes.
- Recommendations:
- Continuous LED Lights: Look for adjustable color temperature.
- Strobes: Require more technical knowledge to use effectively.
5.4. Tripods and Support: Ensuring Stability
A tripod is essential for keeping your camera steady and achieving sharp images, especially in low light conditions.
- Tripods:
- Purpose: Providing stability and allowing for precise control over camera position.
- Recommendations:
- Manfrotto Studio Pro Triman Tripod: Sturdy and reliable, perfect for studio setups.
- Manfrotto 322RC2 Joystick Head Short: Easy to adjust, with a single trigger instead of multiple knobs.
- Overhead Shooting Arms:
- Purpose: Allowing for overhead shots of food.
- Recommendations:
- Manfrotto 131D Side Arm: Sturdy and allows for easy positioning of the camera.
5.5. Editing Software: Enhancing Your Images
Editing software is essential for post-processing and enhancing your food photos.
- Adobe Lightroom:
- Purpose: Organizing and editing digital photos, providing exceptional control over exposure adjustments.
- Pros: User-friendly interface, powerful editing tools, excellent file management.
- Cons: Subscription-based pricing.
- Adobe Photoshop:
- Purpose: Advanced image editing and manipulation.
- Pros: Comprehensive editing tools, layers, and advanced features.
- Cons: Steeper learning curve, more expensive than Lightroom.
- Mobile Editing Apps:
- Purpose: Editing photos on your smartphone.
- Recommendations: Snapseed, VSCO, Adobe Lightroom Mobile.
5.6. Styling Props: Enhancing Visual Appeal
Styling props can add character and visual interest to your food photos.
- Plates and Bowls:
- Recommendations: Crate and Barrel, West Elm, CB2, vintage shops.
- Utensils:
- Recommendations: Williams-Sonoma, Sur la Table, Anthropologie, Target, Amazon.
- Linens:
- Recommendations: Etsy, eBay, thrift stores.
- Backgrounds:
- Recommendations: Craft stores, DIY options (wooden boards, painted surfaces).
5.7. Organization and Storage: Keeping Your Gear Safe
Proper organization and storage are essential for keeping your equipment safe and accessible.
- Camera Bags:
- Purpose: Protecting your camera and lenses while on the go.
- Recommendations: Look for padded compartments and weather-resistant materials.
- Storage Cases:
- Purpose: Storing lighting equipment, props, and other accessories.
- Recommendations: Plastic storage bins, rolling carts.
5.8. Calibration Tools: Ensuring Color Accuracy
Color accuracy is essential in food photography. Calibration tools can help you ensure that your monitor is displaying colors accurately.
- Colorimeters:
- Purpose: Measuring and calibrating your