Sweet and Sour Chicken is undeniably a global favorite, especially when it comes to Chinese cuisine. If you’re craving that quintessential Chinese takeout experience, chances are Sweet and Sour Chicken is high on your list. Interestingly, while deeply loved in the West, this dish has evolved quite a bit from its Chinese roots, becoming a unique testament to culinary adaptation and global flavors.
But let’s be honest, who can resist the allure of perfectly crispy fried chicken enveloped in that classic, tangy, and sweet sauce? It’s a comforting and delicious combination that transcends cultural boundaries.
Unlock Restaurant Secrets for Authentic Sweet and Sour Chicken
Like many of the treasured recipes we share, this Sweet and Sour Chicken recipe comes directly from restaurant culinary expertise. My father, a chef with over 25 years of professional experience in numerous restaurants, perfected this dish. Now, we’re excited to share his chef-approved secrets, guaranteeing you achieve restaurant-quality Sweet and Sour Chicken right in your own kitchen, every single time.
Here are some invaluable pro tips to elevate your Sweet and Sour Chicken from good to absolutely unforgettable:
-
Chicken Choice is Key: The debate between dark (thigh) and white (breast) meat is purely about personal preference. However, for Sweet and Sour Chicken, we lean towards chicken thighs. They possess a richer flavor and, crucially, remain wonderfully moist even after frying, ensuring succulent bites in every mouthful.
-
Master the Marinade – Hydration is Your Secret Weapon: Regardless of whether you choose chicken breast or thigh, the marinating process is paramount. The secret? Water. Adding water to your marinade might sound counterintuitive for crispiness, but it’s the magic ingredient. It keeps the chicken incredibly moist during frying. This moisture, in turn, creates steam within the batter, resulting in a super crispy coating that adheres beautifully to the chicken, even when coated in that luscious sweet and sour sauce. This step is non-negotiable for achieving that perfect texture contrast.
-
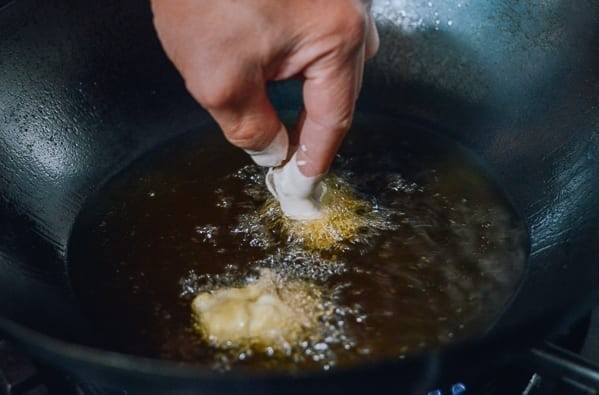
Frying Technique for Crisp Perfection: When frying, don’t overcrowd the pot! Gently lower each battered chicken piece into the hot oil individually. Here’s a chef’s trick: submerge the chicken halfway for a couple of seconds before fully releasing it into the oil. This initial partial submersion helps the batter set quickly, preventing sticking to the bottom of the pot or other chicken pieces. Always place new pieces in a spot away from already frying chicken to maintain even cooking and prevent clumping.
-
Oil Recycling – Flavor and Sustainability: Don’t discard that flavorful frying oil! Once cooled, strain any leftover oil through a fine-mesh strainer. This filtered oil is liquid gold for future stir-fries. Many Chinese restaurants reuse their frying oil, not just for cost-effectiveness but also because it imparts a unique depth of flavor to subsequent dishes. Store the strained oil in the refrigerator and use it within two weeks to maintain optimal flavor and quality.
-
Timing is Everything – Sauce and Chicken Harmony: For maximum crispiness, start cooking your sweet and sour sauce immediately after you finish frying the chicken. The goal is to minimize the time the fried chicken sits before being tossed in the sauce. If you must prepare components in advance, the ideal approach is to briefly re-fry the chicken just before assembling the final dish to revive its crispiness. For family meals with multiple dishes, prep all your ingredients and components beforehand, then quickly bring it all together right before serving for the freshest, crispiest Sweet and Sour Chicken.
-
Wok Care – Preserve Your Seasoning: A word of caution for wok enthusiasts: wash your wok immediately after serving Sweet and Sour Chicken. The vinegar in the sauce, while essential for that tangy flavor, is acidic and can potentially damage the patina of a well-seasoned wok if left for too long. For comprehensive guidance on wok care, refer to our detailed post on Seasoning and Caring for your Wok.
Enough talk, let’s get cooking! Prepare to master this classic Sweet and Sour Chicken recipe and create a dish that rivals your favorite Chinese restaurant takeout, all from the comfort of your home.
Read on for detailed, step-by-step instructions that will empower you to consistently create restaurant-quality Sweet and Sour Chicken that will impress family and friends alike!
Sweet & Sour Chicken Recipe: Step-by-Step Instructions
Step 1: Prepare the Sweet and Sour Sauce
Begin by setting aside ½ cup of pineapple juice from your canned pineapple. Reserve ⅔ cup of the pineapple chunks separately if you plan to use them. Remember, pineapple juice and chunks are optional ingredients, offering an extra layer of sweetness. If you prefer a less sweet sauce, feel free to omit them.
In a mixing bowl, combine the hot water, salt, sugar, and ketchup. Stir continuously until the salt and sugar are completely dissolved. Once dissolved, add the vinegar and pineapple juice (if using). Set the prepared sauce aside, ready to be used later.
Step 2: Marinate the Chicken for Flavor and Moisture
Regarding washing chicken: current FDA recommendations suggest it’s not necessary to wash chicken before cooking, which helps prevent the spread of bacteria. However, if you choose to rinse your chicken, be extremely cautious to avoid splashing and contaminating surrounding surfaces. If rinsing, pat the chicken dry or ensure to account for the water in the marinade. If your chicken appears dry after rinsing, add approximately 1 tablespoon of water to the marinade.
Cut the chicken into uniform 1-inch chunks. Consistent size ensures even cooking. Place the chicken pieces in a bowl. Add garlic powder, onion powder, sesame oil, white pepper, and salt to the chicken. Mix thoroughly, ensuring each piece is evenly coated with the marinade. Let it marinate for 5 minutes. The chicken should absorb any excess water during this time. If there’s still water after 5 minutes, mix again and let it sit for another 5 minutes. This crucial hydration step is what makes the chicken incredibly moist and juicy after frying.
Step 3: Create the Crispy Batter
In a separate bowl, whisk together the all-purpose flour, cornstarch, baking powder, and baking soda. Gradually add ⅔ cup of ice water to the dry ingredients. Use a fork to mix until a smooth batter forms. Finally, stir in 1 tablespoon of vegetable oil. Set the batter aside.
The secret behind this light and crispy batter lies in the leavening agents (baking powder and baking soda) and the oil. As my father explained, these ingredients work synergistically to create that signature restaurant-style crispy texture.
Step 4: Fry the Chicken to Golden Perfection
The amount of oil needed for frying depends on your pot size. A larger pot requires more oil but allows for frying larger batches, reducing cooking time. A smaller pot uses less oil but necessitates frying in multiple batches. We prefer a smaller pot for less leftover oil.
Heat the oil in your pot to 335°F/170°C. Using a candy thermometer is highly recommended for accurate temperature control when deep-frying, ensuring perfectly cooked and crispy chicken.
Take 5 to 6 marinated chicken pieces and place them in the batter. Use chopsticks, a fork, or your fingers to ensure each piece is completely coated in batter. Gently and slowly lower each battered chicken piece into the hot oil. The batter thickness is a matter of personal preference. We prefer a light coating, just enough to encase the chicken after frying, not completely masking it.
Using a slotted spoon, carefully turn the chicken pieces to ensure even frying on all sides. Fry for approximately 2 minutes, or until the batter turns a light golden brown and achieves a delightful crispiness. Remove the fried chicken with a slotted spoon and let any excess oil drain off. Place the chicken on a wire rack or a plate lined with paper towels to maintain crispiness while you fry the remaining batches.
Step 5: Assemble the Sweet and Sour Chicken in the Wok
Heat 1 tablespoon of canola oil in a wok over medium-high heat. Add the red onion and bell peppers (red and green). Stir-fry for about 30 seconds, just until slightly softened and fragrant.
Pour the prepared sweet and sour sauce into the wok with the vegetables. Bring the sauce to a boil, then immediately reduce the heat to a simmer.
In a small bowl, combine cornstarch and water to create a smooth cornstarch slurry. While continuously stirring the simmering sweet and sour sauce, slowly drizzle in the cornstarch slurry. Continue stirring until the sauce thickens to your desired consistency – enough to nicely coat the back of a spoon. You may not need to use all of the slurry.
Reduce the heat to low and taste the sauce. Adjust seasoning as needed – add more salt, vinegar, or sugar to achieve your perfect sweet and sour balance.
If using pineapple chunks, add them to the sauce now and stir until heated through. We opted to omit pineapple this time as our family prefers a less sweet version.
For ultimate crispiness, this is the moment to re-fry the chicken. Reheat the oil to 335°F/170°C and fry the chicken in two batches for just about 45 seconds per batch. This quick re-fry will revitalize the crispiness, making it perfectly crunchy.
Finally, add the crispy fried chicken pieces to the wok with the sauce. Gently toss with a wok spatula to evenly coat every piece of chicken with the luscious sweet and sour sauce.
Serve your homemade Sweet and Sour Chicken immediately and enjoy the restaurant-quality flavors and textures you’ve created!
Craving more authentic and delicious recipes? Join our email list for regular updates and be sure to connect with us on Pinterest, Facebook, Instagram, and YouTube!
Sweet and Sour Chicken Recipe Card
Sweet and Sour Chicken – An American Chinese takeout staple, featuring crispy batter-fried chicken tossed in a quick and flavorful sweet and sour sauce.
By: Bill
Serves: 4
Prep time: 25 minutes
Cook time: 20 minutes
Total time: 45 minutes
Print Recipe Rate Recipe
Ingredients
For the Sweet and Sour Sauce:
- ½ cup hot water
- ¼ teaspoon salt
- 2 tablespoons sugar
- 1 tablespoon ketchup
- ½ cup pineapple juice (optional, reserved from canned pineapple)
- 3 tablespoons rice wine vinegar (or red wine vinegar)
For the Chicken:
- 12 ounces boneless, skinless chicken breast or thighs
- 1-2 tablespoons water
- ⅛ teaspoon garlic powder
- ¼ teaspoon onion powder
- ½ teaspoon sesame oil
- ⅛ teaspoon white pepper
- ½ teaspoon salt
For the Batter:
- ¾ cup all-purpose flour
- 1 tablespoon cornstarch
- ½ teaspoon baking powder
- ¼ teaspoon baking soda
- ⅔ cup ice water
- 1 tablespoon vegetable oil (or canola oil, plus more for frying)
For the Rest of the Dish:
- ⅔ cup canned pineapple chunks (optional)
- 1 tablespoon oil
- ¼ cup red onion (cut into 1-inch/2.5cm chunks)
- ¼ cup red bell pepper (cut into 1-inch/2.5cm chunks)
- ¼ cup green bell pepper (cut into 1-inch/2.5cm chunks)
- 2 tablespoons cornstarch
- 2 tablespoons water
US Customary – Metric – Choose your preferred measurement system.
Prevent screen from going dark during cooking.
Instructions
Making the Sweet and Sour Sauce:
- Set aside ½ cup pineapple juice and ⅔ cup pineapple chunks (if using).
- Combine hot water, salt, sugar, and ketchup. Stir until dissolved.
- Add vinegar and pineapple juice (or ½ cup water/chicken stock if omitting pineapple juice). Set aside.
Marinating the Chicken:
- Cut chicken into 1-inch chunks.
- Combine chicken with garlic powder, onion powder, sesame oil, white pepper, and salt in a bowl. Mix well and marinate for 5-10 minutes.
Preparing the Batter:
- Whisk together flour, cornstarch, baking powder, and baking soda.
- Add ice water and mix until batter forms. Stir in 1 tablespoon oil.
Frying the Chicken:
- Heat oil to 335°F/170°C in a pot.
- Batter and fry chicken in batches for about 2 minutes until golden and crispy.
- Drain excess oil and place on a rack or paper towel-lined plate.
Assembling in the Wok:
- Stir-fry red onion and peppers in 1 tablespoon oil in a wok for 30 seconds.
- Add sweet and sour sauce and bring to a simmer.
- Thicken sauce with cornstarch slurry (cornstarch + water).
- Taste and adjust sauce seasonings. Add pineapple chunks if desired.
- Re-fry chicken for 45 seconds for extra crispiness.
- Add chicken to sauce and toss to coat. Serve immediately.
Tips & Notes
Note: Nutritional information excludes pineapple and juice.
Nutrition Facts
Calories: 466kcal (23%) | Carbohydrates: 33g (11%) | Protein: 19g (38%) | Fat: 30g (46%) | Saturated Fat: 14g (70%) | Cholesterol: 64mg (21%) | Sodium: 741mg (31%) | Potassium: 324mg (9%) | Fiber: 1g (4%) | Sugar: 8g (9%) | Vitamin A: 464IU (9%) | Vitamin C: 21mg (25%) | Calcium: 45mg (5%) | Iron: 2mg (11%)
Disclaimer: Nutritional information provided is an estimate for informational purposes only and may vary. Use a nutrition calculator for precise values based on your ingredients.
Did you make this recipe? Share your creation! Tag us on Instagram @thewoksoflife, subscribe to our email list, and follow us on social media for more delicious recipes! @thewoksoflife